A well-made red velvet cake is precise. The crumb should be fine and tender but sturdy enough to stack cleanly. The flavor should carry a light cocoa note, balanced by buttermilk tang and a smooth cream cheese frosting that does not overwhelm the layers.
This version is built for consistency. The ratios are intentional, the leavening is controlled, and the mixing method protects structure from the first step to the last slice. It is designed to bake evenly, frost smoothly, and hold its shape whether served the same day or the next.
Who This Recipe Is For
This recipe is for home bakers who want a classic three-layer cake that behaves predictably. If you care about clean slices, level layers, and frosting that stays where you spread it, you will appreciate the method behind this one.
It is appropriate for confident beginners who follow directions carefully and for experienced bakers who want a dependable red velvet formula for birthdays, holidays, or customer orders. The instructions assume you want to understand why each step matters, not just complete it.
If you have been disappointed by red velvet cakes that turned out dry, brownish, overly sweet, or structurally fragile, this version addresses those problems directly.
Why This Recipe Works
Red velvet is not simply chocolate cake dyed red. Structurally, it is closer to a lightly cocoa-tinted butter cake with an acidic backbone. That balance defines the texture.
The fat comes primarily from butter, not oil. Butter contributes flavor, but more importantly, it allows proper creaming with sugar. During creaming, sugar crystals cut into softened butter and create microscopic air pockets. Those pockets expand in the oven and support a fine, even crumb. Oil alone cannot create the same aeration because it is liquid at room temperature.
The cocoa quantity is deliberately restrained. Too much cocoa absorbs moisture and tightens the crumb, pushing the cake toward a true chocolate profile. Here, the cocoa provides subtle depth without competing with the tang from buttermilk and cream cheese.
Acidity is central to the structure. Buttermilk and a small amount of vinegar react with baking soda to create carbon dioxide. That reaction begins as soon as wet and dry ingredients meet, which is why overmixing or delayed baking can compromise lift. The acidity also tenderizes gluten, producing the signature soft texture.
Leavening is simplified to baking soda only. Baking powder was tested but removed. In repeated trials, dual leavening produced taller domes and a slightly coarse crumb. Baking soda alone, supported by the acidic ingredients, produced flatter layers with a tighter structure and more even rise.
Temperature control matters. Butter-based cakes set differently than oil-based ones. Baking at 350°F on the center rack allows the edges to set while the center rises gradually. Higher temperatures encouraged doming and slight cracking in testing. Lower temperatures extended bake time and dried the outer crumb.
The frosting is equally intentional. Cream cheese frosting can become loose if the fat ratio is unbalanced or if ingredients are too warm. This version uses a controlled proportion of butter to cream cheese so the frosting spreads easily but firms slightly under refrigeration. That stability prevents sliding layers.
Each element supports the next. The cake layers are tender but not fragile. The frosting is rich but not cloying. The acidity keeps the sweetness in check. Nothing is accidental.
Ingredient Insights and Function
All-Purpose Flour
All-purpose flour provides the right balance of structure and tenderness. Cake flour was tested and produced a softer crumb, but the layers were more delicate during stacking and trimming. For a three-layer cake that must hold frosting and maintain clean slices, the slightly higher protein content of all-purpose flour performs better.
Measure flour carefully. Too much flour leads to density and dryness. Weighing is ideal. If using cups, spoon and level rather than scooping directly from the bag.
Natural Cocoa Powder
Use natural cocoa powder, not Dutch-processed. Natural cocoa is acidic, which supports the baking soda reaction and helps preserve the red hue. Dutch-processed cocoa is neutralized and will mute both color and rise.
The quantity is small by design. Increasing cocoa may seem appealing, but even an extra tablespoon shifts the texture toward firmer and darker. In testing, higher cocoa levels also dulled the red color, resulting in a burgundy tone rather than a vibrant red.
If you want to better understand how cocoa quantity influences texture, compare the structure of this cake to a classic batch of Chocolate Chip Cookies Recipe. The cocoa role there is flavor-forward and structural. Here, it is background and supportive.
Buttermilk and Vinegar
Buttermilk contributes acidity, moisture, and subtle tang. Its thickness also helps suspend air bubbles created during creaming. If you substitute milk with lemon juice or vinegar, the chemical acidity may be similar, but the flavor is flatter and the texture slightly thinner.
White vinegar enhances the baking soda reaction and sharpens the tang. The amount is small but meaningful. Removing it reduces lift and alters flavor balance.
Butter and Sugar
Use unsalted butter at cool room temperature. It should give slightly when pressed but not appear shiny or greasy. Over-softened butter traps less air during creaming.
Granulated sugar provides structure and sweetness. Brown sugar was tested but added excess moisture and a caramel note that distracted from the classic profile.
Cream the butter and sugar fully. Pale color and increased volume signal adequate aeration. Under-creamed mixtures produce dense, slightly greasy crumb.
Eggs
Eggs bind the batter and stabilize the emulsion. They must be at room temperature to incorporate smoothly. Cold eggs can cause the batter to look slightly curdled, which affects texture if not corrected.
Red Food Coloring
Liquid red food coloring integrates easily into the buttermilk mixture. Gel coloring is more concentrated and may require adjustments to maintain even distribution. Excess liquid coloring can thin the batter slightly, so measure carefully.
Color does not influence flavor, but it does influence perception. Inconsistent mixing can lead to streaks or uneven crumb color.
Cream Cheese Frosting Ingredients
Use block-style cream cheese, not whipped or spreadable versions. Spreadable cream cheese contains stabilizers and more moisture, which weakens frosting structure.
Sift powdered sugar to prevent lumps. The ratio of butter to cream cheese ensures a frosting that spreads smoothly and firms gently when chilled. If you have worked with cream cheese in desserts like Apple Caramel Cheesecake Bars Recipe, you know that temperature control determines texture.
Step-by-Step Success Guidance
The recipe card provides measurements and order. This section focuses on execution details that determine outcome.
Creaming the Butter and Sugar
Beat butter alone briefly to smooth it. Add sugar gradually and cream for a full two to three minutes on medium speed. Stop and scrape the bowl once.
Visually, the mixture should lighten in color and appear fluffy. If it remains dense and slightly yellow, continue mixing. Proper creaming is foundational. Without it, no amount of leavening will compensate.
Incorporating Eggs and Cocoa
Add eggs one at a time. After each addition, mix until fully incorporated. The batter should look smooth before the next egg is added.
Sift cocoa into the creamed mixture to prevent clumps. Mix only until combined. Overmixing at this stage can begin gluten development prematurely.
Alternating Dry and Wet Ingredients
Combine dry ingredients separately. Add them to the batter in alternating portions with the buttermilk mixture, beginning and ending with dry ingredients.
Keep the mixer on low speed. Once flour is added, gluten begins forming. Mix only until no visible streaks remain. The finished batter should be smooth, lightly thick, and pourable.
If the batter appears overly stiff, you may have measured flour too heavily. If it seems thin and runny, excess liquid coloring or under-measured flour may be the cause.
Dividing and Baking
Weigh the batter to divide evenly among pans. Even layers bake more consistently and stack cleanly.
Tap filled pans gently on the counter to release large air bubbles. Bake on the center rack. Do not open the oven during the first 20 minutes. Early temperature drops can cause collapse.
Check for doneness when the centers spring back lightly and a toothpick shows moist crumbs but not wet batter.
Cooling and Assembly
Cool layers in pans briefly, then transfer to a rack. Warm layers are fragile. Attempting to frost too soon leads to sliding and tearing.
Before frosting, ensure layers are completely cool. If desired, level slight domes with a serrated knife. A thin crumb coat helps seal loose crumbs before final frosting.
Frosting should be spreadable but not loose. If it feels too soft, chill it for 10 to 15 minutes before continuing.
Attention to mixing control here mirrors the care required in dough-based recipes like Sugar Cookies Recipe, where overworking flour leads to toughness. The principle is the same.
How I Tested and Refined This Recipe
This cake was tested repeatedly with controlled adjustments.
First, cocoa levels were varied between one and three tablespoons. At three tablespoons, the cake became darker and slightly firmer. The red tone deepened toward maroon. At one tablespoon, the flavor lacked depth. The final amount balanced color and subtle chocolate undertone.
Oil was tested in partial substitution for butter. While oil increased moisture slightly, the crumb lost some structure and felt less refined. Full butter provided better aeration and stacking strength.
Cake flour was tested in place of all-purpose flour. The texture was softer but more delicate during trimming and frosting. For a three-layer cake, structural reliability outweighed slight tenderness gains.
Baking powder was added in one trial alongside baking soda. The result was a higher rise but uneven doming and a looser crumb. Removing baking powder created flatter layers and a tighter crumb.
Frosting ratios were adjusted to prevent excessive sweetness. Increasing powdered sugar improved stiffness but masked the tang. Reducing sugar too far caused instability. The final ratio balances sweetness, tang, and spreadability.
Each adjustment was made with a specific goal. The final formula reflects those controlled tests.
Common Mistakes and How to Avoid Them
Dense or Tight Crumb
Most often caused by under-creaming butter and sugar or overmixing after flour addition. Cream fully at the beginning. Once flour is added, mix minimally.
Gummy Center
Usually the result of underbaking or inaccurate oven temperature. Use an oven thermometer if needed. The center should spring back lightly before removing from the oven.
Dull or Brownish Color
Using Dutch-processed cocoa or insufficient coloring leads to muted tones. Confirm cocoa type before mixing.
Runny Frosting
Over-softened butter or cream cheese creates instability. Ingredients should be cool room temperature, not warm. If frosting loosens, chill briefly before spreading.
Sliding Layers
Frosting applied to warm layers or excessive filling between layers causes shifting. Ensure full cooling and use moderate frosting thickness.
Understanding gluten control from recipes such as Cinnamon Rolls Recipe reinforces why careful mixing and temperature awareness matter. Structure always depends on restraint.
Make-Ahead, Storage, and Freezing Guidance
Because of the cream cheese frosting, store the cake in the refrigerator if keeping longer than one day. Cover loosely to prevent drying.
Texture changes slightly when chilled. The butter in both cake and frosting firms, creating a denser bite. Allow slices to sit at room temperature for about 30 minutes before serving. This restores softness and flavor clarity.
Unfrosted layers can be wrapped tightly and refrigerated for up to two days. They can also be frozen for up to three months. Wrap in plastic and then foil to prevent freezer burn. Thaw while still wrapped to minimize condensation on the surface.
Frosted cake can be frozen, but the frosting texture may soften slightly upon thawing. For best results, freeze layers separately and frost after thawing.
Food safety is straightforward. Cream cheese frosting should not sit at warm room temperature for extended periods. Serve, then refrigerate.
Final Reinforcement
A dependable red velvet cake depends on controlled ratios, careful mixing, and respect for structure. When butter is properly creamed, acidity is balanced, and flour is handled gently, the result is consistent.
This version is designed to bake evenly, slice cleanly, and hold its shape without sacrificing tenderness. With attention to detail and measured execution, it performs the same way each time.
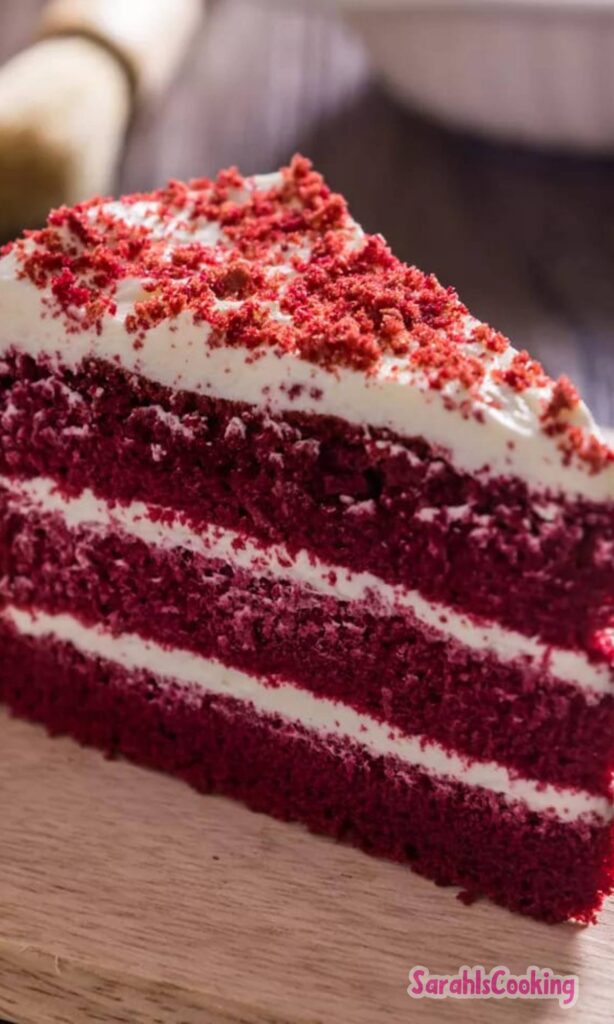
Red Velvet Cake Recipe
Description
Whether you are looking for a stunning red cake for Valentine’s Day or just need a showstopping cake for birthdays, holidays, or any other occasion, this red velvet cake recipe fits the bill. More than just a red-tinted vanilla cake, this cake is tangy and buttery, with a mild cocoa and sweet vanilla flavor. It’s dense, soft, moist, and has a velvety crumb—always a crowd-pleaser!
ingredients
For the Cake
For the Cream Cheese Frosting
Instructions
For the Cake
- Preheat the oven to 350°F (177°C). Butter and flour three 6-inch cake pans (or two 9-inch pans).
- In a medium bowl, sift together the flour, salt, and baking soda.
- In a large mixing bowl or the bowl of a stand mixer fitted with a paddle attachment, cream the butter on medium speed. Add sugar and mix until light and fluffy (~3 minutes). Add eggs one at a time, beating well after each. Beat in vanilla.
- Sift cocoa powder into the butter mixture and beat just until combined. Scrape down the bowl.
- In a liquid measuring cup, combine buttermilk, vinegar, and red food coloring.
- With mixer on low, add half the flour mixture followed by half the buttermilk mixture. Repeat with remaining halves. Mix just until combined. Scrape bowl as needed.
- Divide batter evenly among prepared pans. Bake 30–35 minutes (or 25–30 for 9-inch pans) until centers spring back when lightly touched.
- Cool in pans for 10 minutes, then turn out onto wire racks to cool completely.
For the Cream Cheese Frosting
- Beat butter and cream cheese on medium speed until smooth and fluffy (~3 minutes).
- Add vanilla and salt; beat until combined.
- Gradually add sifted confectioners sugar on low speed until incorporated. Scrape bowl, then beat on medium for 1 minute until fluffy.
- Reserve 1 cup frosting for piping; use remainder for assembly.
For the Assembly
- Place one cake layer on a cake stand. Spread ~½ cup frosting evenly on top. Repeat with second layer, then top with final layer.
- Frost the top and sides of the cake with remaining frosting. Smooth using a bench scraper or offset spatula.
- Pipe decorative border on top using reserved frosting.
- Chill cake for 1 hour or until frosting is set before serving.
Nutrition Facts
Servings 12
Serving Size 1 slice
- Amount Per Serving
- Calories 420kcal
- % Daily Value *
- Total Fat 23g36%
- Saturated Fat 14g70%
- Cholesterol 85mg29%
- Sodium 420mg18%
- Potassium 150mg5%
- Total Carbohydrate 52g18%
- Dietary Fiber 1g4%
- Sugars 41g
- Protein 4g8%
- Calcium 60 mg
- Iron 1 mg
* Percent Daily Values are based on a 2,000 calorie diet. Your daily value may be higher or lower depending on your calorie needs.
Note
- Flat cake layers? Use cake strips or DIY with damp towel strips wrapped around pans.
- No buttermilk? Make your own by adding 1 tbsp vinegar or lemon juice to 1 cup milk. Let sit 5 minutes.
- Room temp ingredients: Bring eggs, butter, cream cheese, and buttermilk to room temp for smoother mixing.
- Storage: Store covered in fridge up to 5 days. Bring to room temp before serving.
- Freezing: Wrap cooled cake layers (unfrosted or frosted) in plastic; freeze up to 3 months.