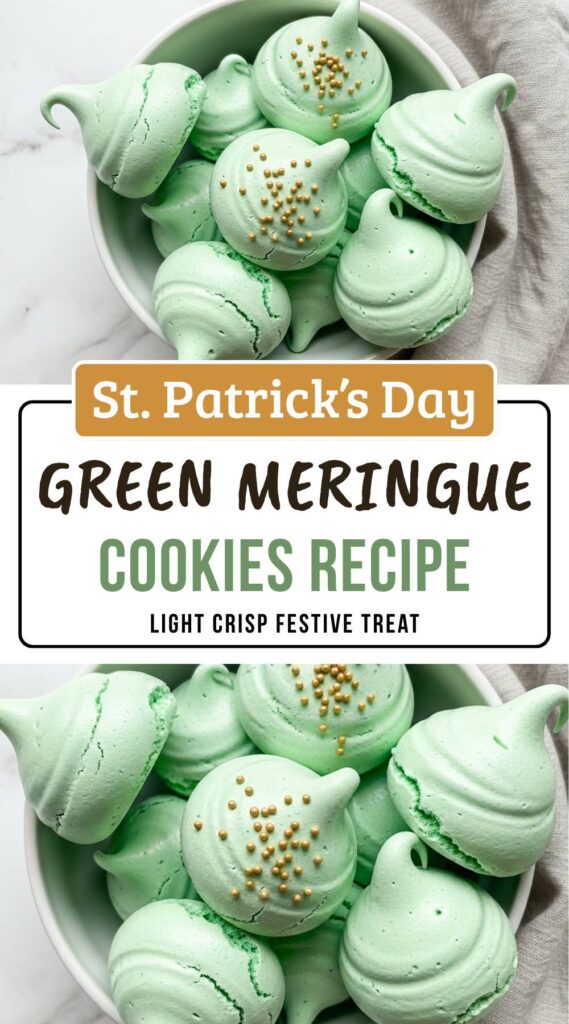
Meringue cookies are one of those recipes that look delicate but are actually grounded in very simple technique. When done correctly, they bake into crisp, feather-light bites that taste like toasted marshmallow with a clean sweetness.
I’ve made these countless times, both for personal baking and small orders, and they remain one of the most reliable cookies in my kitchen. The ingredient list is short, but the method is what determines success.
This recipe focuses on control, not shortcuts. With the right temperature, proper whipping, and enough drying time, you get consistent structure every single batch.
Who This Recipe Is For
This recipe is for home bakers who want dependable results without complicated pastry techniques. If you can use a mixer and follow temperature cues, you can make these successfully.
It’s especially helpful for those who want a make-ahead dessert, something naturally gluten free, or a decorative cookie for gifting. Beginners can handle it, and experienced bakers will appreciate the precision.
Why This Recipe Works
Meringue is a balance of protein, sugar, and controlled dehydration. Egg whites provide the structure, while sugar stabilizes the foam and prevents collapse during baking.
Instead of baking like a traditional cookie, these dry slowly at a low temperature. That slow evaporation removes moisture without browning, which is what creates the signature crisp texture.
Heating the whites and sugar first dissolves the sugar completely. This step ensures a smooth, glossy meringue that whips to stiff peaks and holds its shape when piped.
Ingredients Needed for the Recipe
- Egg whites – Provide the protein network that traps air and forms the structure of the cookie.
- Granulated sugar – Stabilizes the foam, adds sweetness, and helps create the crisp shell during drying.
- Cream of tartar – Acidifies the mixture to strengthen the egg white proteins and improve whipping stability.
- Vanilla extract or other flavoring – Adds aroma and depth without affecting structure.
- Pinch of salt – Balances sweetness and enhances overall flavor without making the cookies taste salty.
Ingredient Insights and Function
Fresh egg whites are ideal because they whip with more elasticity than older whites. Carton whites can work, but they often lack the strength needed for stable peaks.
Granulated sugar is preferred over powdered sugar since it dissolves during the warming step and creates a more stable foam. Powdered sugar can lead to chalky texture.
Cream of tartar is not just optional insurance. It actively prevents overcoagulation of proteins, allowing the meringue to whip longer without breaking down.
Flavorings should be alcohol based extracts rather than oil based ones. Oils can deflate the foam and cause the cookies to spread.
If you omit the salt, the cookies will still work structurally, but the flavor will feel flat. That tiny amount makes a noticeable difference.
How to make Meringue Cookie Recipe?
Step 1 – Prepare the Oven and Tools
Preheat the oven to 225°F and line baking sheets with parchment paper. Avoid silicone mats, which can trap moisture and slow drying.
Make sure your bowl and whisk are completely clean and grease free. Even a small amount of fat can prevent the egg whites from whipping properly.
Step 2 – Create a Gentle Double Boiler
Bring about 2 inches of water to a simmer in a saucepan. The water should not touch the bottom of the mixing bowl.
This indirect heat allows the sugar to dissolve without scrambling the egg whites. Think warm and controlled, not hot.
Step 3 – Dissolve the Sugar
Combine the egg whites and sugar in the bowl and whisk occasionally as the mixture warms. You are not whipping yet, just encouraging the sugar to melt.
Rub a small amount between your fingers. When it feels completely smooth and reaches about 110°F, it’s ready.
Step 4 – Begin Whipping
Transfer the bowl to your mixer fitted with the whisk attachment. Start on medium speed to build small, stable bubbles.
Add the cream of tartar, salt, and flavoring after the foam begins to form. This helps stabilize the structure as it develops.
Step 5 – Whip to Stiff Peaks
Increase the speed to high and whip until the meringue becomes glossy and holds a firm peak. The tip should stand straight without folding over.
This stage is critical. Underwhipped meringue spreads, while properly whipped meringue holds clean piping lines.
Step 6 – Add Color if Desired
If making decorative cookies, brush gel food coloring inside the piping bag before filling. This creates soft streaks of color as you pipe.
Fold nothing into the meringue at this stage. Mixing can deflate the foam you worked to build.
Step 7 – Pipe the Shapes
Pipe kisses, swirls, or any shape onto the prepared parchment. Keep sizes consistent so they dry evenly.
If making multiple sizes, place larger shapes on a separate tray to prevent uneven drying times.
Step 8 – Bake by Drying, Not Browning
Bake small meringues for about 60 minutes. Larger shapes may need closer to 90 minutes.
The goal is moisture removal, not color. The cookies should remain pale and feel dry to the touch.
Step 9 – Cool Slowly in the Oven
Turn off the oven and leave the cookies inside until completely cool. I often leave them overnight.
This gradual cooling prevents condensation, which is one of the main causes of sticky meringues.
How I Tested and Refined This Recipe
I tested different sugar ratios early on and found that reducing sugar created fragile cookies that collapsed during drying. The final balance provides structure without becoming cloying.
I also experimented with skipping the warming step. While it seemed faster, the sugar never dissolved fully and resulted in grainy texture.
Another trial involved higher oven temperatures to shorten baking time. That produced cracked shells and hollow interiors instead of the light, crisp texture I wanted.
Humidity testing was important as well. By extending the cooling time inside the oven, I was able to prevent the stickiness that often shows up on rainy days.
The final method reflects those adjustments. Every step now serves a purpose, from dissolving sugar to the extended cooling period.
Common Mistakes and How to Avoid Them
- Using a greasy bowl – Fat prevents proper whipping and leads to flat meringue.
- Not dissolving the sugar fully – Causes gritty texture and weak structure.
- Stopping at soft peaks – The cookies will spread and lose their shape.
- Baking at too high a temperature – Leads to browning and cracking instead of drying.
- Removing cookies before they cool – Traps moisture and creates stickiness.
- Piping uneven sizes – Results in some cookies overdrying while others stay soft.
- Adding liquid flavorings excessively – Extra moisture destabilizes the foam.
Make-Ahead, Storage, and Freezing Guidance
Meringue cookies store exceptionally well because they contain very little moisture once dried. Keep them in an airtight container at room temperature for up to two weeks.
Over time they may lose a bit of their initial snap but will remain crisp if stored properly. Avoid refrigeration, which introduces humidity.
Freezing is possible, though not always necessary. If frozen in an airtight container, allow them to return to room temperature before opening to prevent condensation.
If they soften slightly during storage, you can refresh them in a low oven for about 10 minutes, then cool completely again.
Tips
- Use gel food coloring instead of liquid to avoid thinning the meringue.
- Weigh your sugar for accuracy rather than relying on volume.
- Pipe directly perpendicular to the tray for the cleanest shapes.
- Choose dry weather when possible, though proper drying compensates for humidity.
- Let the mixer do the work. Rushing the whipping stage weakens structure.
- Store with a silica packet if gifting in humid climates.
- Test one cookie before removing the batch. It should lift cleanly from parchment.
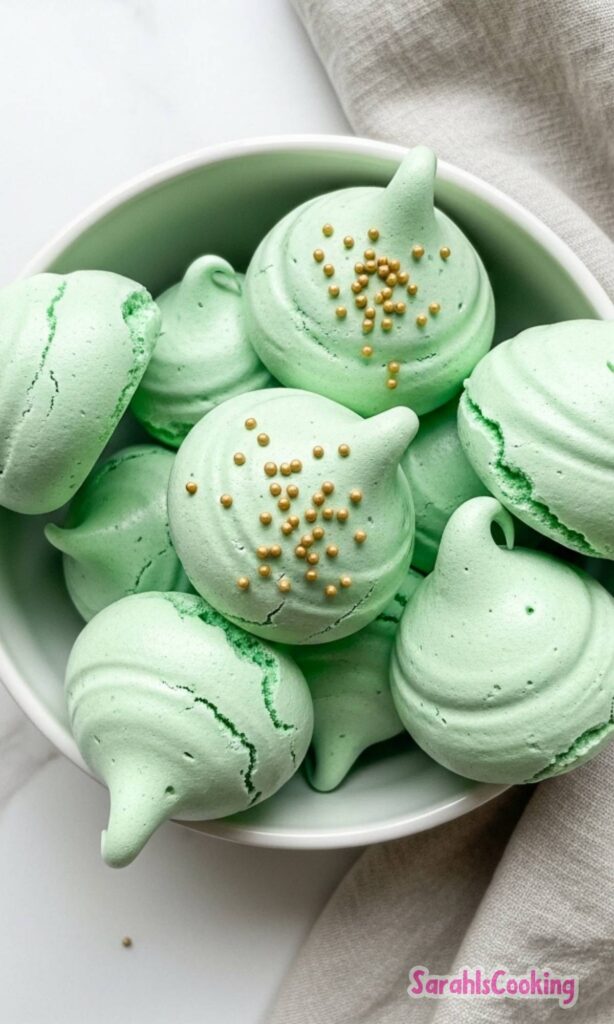
Meringue Cookie Recipe
Description
This meringue cookie recipe makes delicious, crisp cookies that taste like toasted marshmallows. Perfectly light, airy, and naturally gluten-free, these meringues are easier to make than you think! Just whip egg whites and sugar to stiff peaks, pipe into your favorite shapes, and let the low oven do the rest. Ideal for meringue pops, party favors, or elegant dessert toppings.
ingredients
Instructions
Preheat & Prep
Preheat your oven to 225°F (107°C). Line a baking sheet with parchment paper.Make sure your mixing bowl and whisk are completely clean and grease-free for best results.Create Double Boiler
Bring 2 inches of water to a gentle simmer in a pot. Place a clean stainless steel mixing bowl over the water, ensuring the bottom does not touch the water.This gentle heat helps dissolve the sugar without cooking the egg whites.Dissolve Sugar
Add egg whites and sugar to the bowl. Whisk occasionally while heating until the sugar is completely dissolved and the mixture reaches 110°F (43°C).Test by rubbing a small amount between your fingers—you should feel no graininess.Whip to Stiff Peaks
Transfer the bowl to a stand mixer with the whisk attachment. Whip on medium speed for 1 minute, then add cream of tartar, salt, and vanilla. Increase to high speed and whip until stiff, glossy peaks form.Stiff peaks mean the meringue stands straight up when you lift the whisk.Add Color & Pipe
If desired, add food coloring by dabbing a small amount inside your piping bag with a toothpick for a swirled effect. Pipe meringues onto the prepared baking sheet in kisses, swirls, or around cake pop sticks for meringue pops.Add sprinkles or edible glitter before baking if using.Bake Low & Slow
Bake small meringues (2" or smaller) for 60 minutes. For larger meringues or pops, bake for 90 minutes.Do not open the oven door during baking, as this can cause cracking.Cool Completely
Turn off the oven and leave the meringues inside to cool completely—ideally overnight. This slow cooling ensures they dry out properly and stay crisp.Meringues are done when they lift cleanly off the parchment and feel light and crisp.Store
Store cooled meringues in an airtight container or ziplock bag at room temperature for up to 2 weeks.Do not refrigerate, as humidity can make them sticky.
Nutrition Facts
Servings 24
Serving Size 1 cookie (approx. 10g)
- Amount Per Serving
- Calories 25kcal
- % Daily Value *
- Total Fat 0gg0%
- Saturated Fat 0gg0%
- Trans Fat 0gg
- Cholesterol 0mgmg0%
- Sodium 7mgmg1%
- Potassium 11mgmg1%
- Total Carbohydrate 6gg2%
- Dietary Fiber 0gg0%
- Sugars 6gg
- Protein 0.5gg1%
- Calcium 0% mg
- Iron 0% mg
* Percent Daily Values are based on a 2,000 calorie diet. Your daily value may be higher or lower depending on your calorie needs.
Note
- Humidity tip: Avoid making meringues on very humid or rainy days, as moisture in the air can prevent them from drying properly.
- Flavor variations: Swap vanilla for peppermint extract during the holidays, or add a drop of citrus oil for a bright twist.
- Make them festive: Pipe meringues onto cake pop sticks before baking for adorable meringue pops—perfect for parties or cake toppers.
- Sticky meringues? If cookies feel sticky after cooling, they need more drying time. Return to a cool oven (turned off) for another hour.