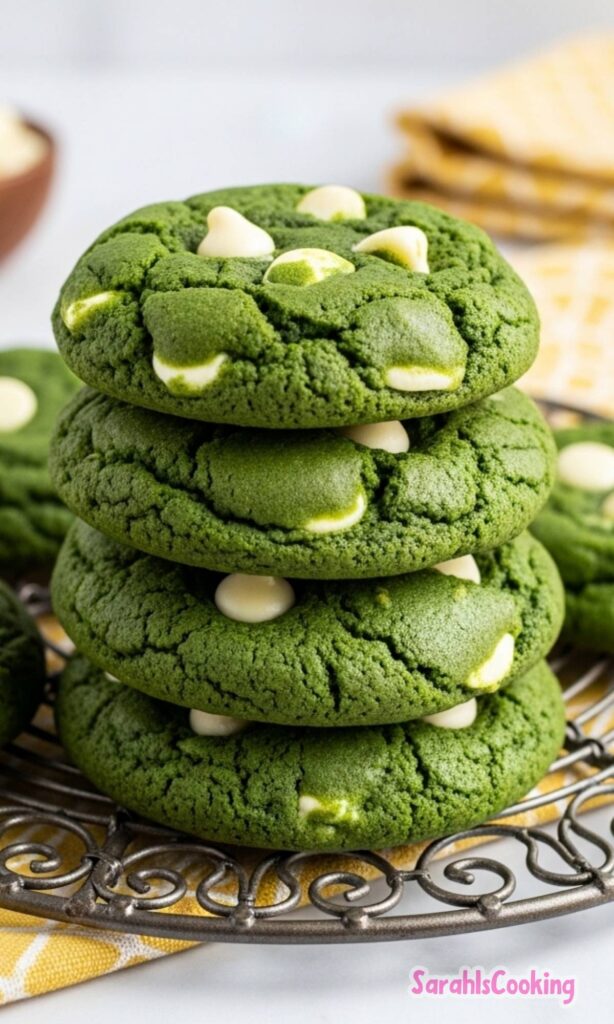
These Green Velvet Cookies are designed to be dependable, not just festive. They bake up soft, lightly airy, and structured enough to hold their shape without turning dense or greasy.
I built this recipe the same way I approach any formula in the kitchen, by focusing on ratios, mixing method, and repeatability. The goal is a cookie that feels intentional, not gimmicky.
The color may be playful, but the technique is grounded in classic baking principles. When done correctly, the texture lands somewhere between a soft-baked cookie and a tender cake crumb.
Who This Recipe Is For
This recipe is for home bakers who want clarity and results they can trust. If you like knowing why something works, not just that it works, you will feel comfortable here.
It suits beginner to intermediate bakers because the steps are straightforward, but the method teaches useful fundamentals. You do not need specialty equipment, just attention to mixing and timing.
If you are baking for gatherings, school events, or seasonal celebrations, these cookies deliver visual appeal without sacrificing flavor or structure.
Why This Recipe Works
Unlike traditional chewy cookies that rely on melted butter, this method uses creamed butter and sugar. That introduces air into the dough, which creates a lighter, more velvety texture.
The gelatin mixture is not just for flavor and color. It also contributes sugar and stabilizers that enhance tenderness while helping the cookies retain moisture.
A balanced flour-to-fat ratio keeps the cookies from spreading too much. The result is a soft interior with lightly defined edges instead of flat, overly sweet discs.
Chilling the dough is a structural step, not an optional pause. It allows the hydrated flour to relax and the butter to firm up, preventing collapse during baking.
Ingredients Needed for the Recipe
- Butter – Provides richness and structure while allowing proper aeration during creaming.
- Lime or green apple flavored gelatin – Adds sweetness, subtle flavor, and contributes to the soft crumb texture.
- Granulated sugar – Supports creaming, moisture retention, and light browning.
- Eggs – Act as binders and provide stability so the cookies hold their shape.
- Vanilla extract – Rounds out the sweetness and balances the fruit notes from the gelatin.
- Green food coloring – Enhances visual tone without affecting texture.
- All-purpose flour – Forms the structural base and determines thickness.
- Baking soda – Provides controlled lift for a softer, cakier bite.
- Salt – Balances sweetness and sharpens flavor definition.
- White chocolate chips – Add creamy pockets of sweetness and contrast against the tender dough.
Ingredient Insights and Function
Creaming butter properly is essential because it sets up the entire texture. If the butter is too cold it will not aerate, and if too warm it will collapse and behave like melted fat.
The gelatin might seem unconventional, but it behaves similarly to adding flavored sugar. Removing it changes both moisture balance and flavor concentration, so substitutions must be made carefully.
If you replace white chocolate with darker chocolate, the cookies will feel less sweet and slightly firmer. That can work, but it shifts the intended balance of softness and creaminess.
Using bread flour instead of all-purpose will make the cookies tougher due to higher protein content. For this recipe, a moderate gluten structure is exactly what we want.
How to make Green Velvet Cookies?

Step 1 – Prepare the Dry Ingredients
Whisk together the flour, baking soda, and salt in a separate bowl. This ensures even distribution so you do not end up with uneven lift or salty pockets.
Set this mixture aside so it can be incorporated quickly later without overworking the dough.
Step 2 – Cream the Butter, Sugar, and Gelatin
Beat the butter, sugar, and gelatin together until the mixture becomes light and fluffy. This stage should take several minutes and should visibly change in color and texture.
Proper creaming traps air, which gives the cookies their signature soft structure rather than a dense chew.
Step 3 – Add Eggs, Vanilla, and Color
Mix in the eggs one at a time, followed by the vanilla extract and food coloring. The dough should look smooth and slightly glossy at this point.
Do not rush this stage because proper emulsification prevents separation later during baking.
Step 4 – Incorporate the Dry Ingredients
Add the dry mixture gradually and mix just until combined. Overmixing will activate too much gluten and make the cookies firm instead of tender.
The dough should feel soft but not sticky or wet.
Step 5 – Fold in the White Chocolate Chips
Gently fold in most of the white chocolate chips, reserving some for topping. Folding keeps the dough airy and prevents crushing the structure created during creaming.
This step should be done by hand for better control.
Step 6 – Chill the Dough
Shape the dough into a single mass, cover it, and refrigerate for at least two hours. This resting time allows hydration and solidifies the butter.
Cold dough spreads less and bakes more evenly.
Step 7 – Portion and Shape
Scoop heaping tablespoon portions and place them several inches apart on a lined baking sheet. Lightly press each mound to encourage even baking.
Press a few reserved chips onto the tops for visual contrast.
Step 8 – Bake with Attention to Timing
Bake at 350°F until the edges are set but the centers remain soft. The cookies should not brown heavily, as their texture relies on gentle baking.
Immediately after baking, press a few more chips into the warm tops for a finished look.
Step 9 – Controlled Cooling
Let the cookies rest on the baking sheet briefly before transferring them to a rack. This allows carryover heat to finish setting the interior.
Moving them too soon can cause breakage because they are very soft when hot.
How I Tested and Refined This Recipe
I tested multiple fat methods before settling on creamed butter. Melted butter versions tasted good but produced a flatter, denser cookie that did not match the intended velvet texture.
I adjusted the flour amount incrementally to prevent overspreading. Too little flour made them fragile, while too much removed the softness.
I also experimented with skipping the chilling step, which resulted in uneven baking and excessive spread. That confirmed refrigeration was essential, not optional.
Even the baking time required refinement because a minute too long changed the texture dramatically. The final version preserves moisture while maintaining structure.
Common Mistakes and How to Avoid Them
- Using overly soft butter, which prevents proper aeration and leads to flat cookies.
- Skipping the chilling step, causing excessive spreading and loss of structure.
- Overmixing after adding flour, which creates toughness instead of tenderness.
- Baking too long, which dries out the interior and removes the velvet texture.
- Packing flour too tightly when measuring, resulting in dense dough.
- Placing dough on a warm baking sheet, which starts melting before baking begins.
Make-Ahead, Storage, and Freezing Guidance
The dough can be made ahead and refrigerated overnight without issue. In fact, a longer rest can slightly deepen the flavor.
Baked cookies stay soft for about three days when stored in an airtight container. After that they begin to firm but remain enjoyable.
The dough freezes well when portioned before freezing, allowing you to bake directly from frozen with a slightly extended bake time. This makes them practical for planning ahead.
To refresh baked cookies, warm them briefly in a low oven to restore softness without drying them out.
Tips
- Use room temperature butter that still feels cool to the touch for ideal creaming.
- Line baking sheets to prevent excess browning on the bottoms.
- Portion evenly so cookies bake at the same rate.
- Reserve some chocolate chips for topping to improve presentation.
- Allow full cooling to develop the final texture before storing.
- Bake one test cookie first to confirm timing in your oven.
Green Velvet Cookies Recipe
Description
These Green Velvet Cookies are the cutest St. Patrick's Day treat—soft, airy, and cakey with a vibrant green hue and bursts of sweet white chocolate chips. Perfect for festive celebrations, classroom parties, or anytime you want a cheerful, delicious cookie that's as fun to make as it is to eat.
ingredients
Instructions
- Mix flour, salt, and baking soda in a bowl and set aside.
- In a large bowl, whisk together softened butter, flavored gelatin, and white granulated sugar until light and fluffy.
- Add green food color (if using), vanilla extract, and beaten eggs. Whisk until well combined.
- Gradually mix in the dry ingredients until just combined. Do not overmix.
- Fold in 3/4 cup of the white chocolate chips.
- Shape the dough into a ball, wrap in plastic, and refrigerate for at least 2 hours or overnight.
- Preheat oven to 350°F (175°C). Line a cookie sheet with parchment paper or a silicone mat.
- Scoop dough by heaping tablespoons, place 3 inches apart on prepared baking sheet. Lightly press down each cookie and press reserved white chocolate chips on top.
- Bake for 15 minutes or until edges are lightly golden.
- Remove from oven and immediately press a few more white chocolate chips onto the warm cookies.
- Let cookies cool on the baking sheet for 8 minutes, then transfer to a wire rack to cool completely.
Nutrition Facts
Servings 24
Serving Size 1 cookie
- Amount Per Serving
- Calories 168kcal
- % Daily Value *
- Total Fat 8.3gg13%
- Saturated Fat 6gg30%
- Trans Fat 0gg
- Cholesterol 18mgmg6%
- Sodium 50mgmg3%
- Potassium 45mgmg2%
- Total Carbohydrate 26.6gg9%
- Dietary Fiber 0.3gg2%
- Sugars 12.5gg
- Protein 2.2gg5%
- Calcium 15mg mg
- Iron 0.8mg mg
* Percent Daily Values are based on a 2,000 calorie diet. Your daily value may be higher or lower depending on your calorie needs.
Note
- Make ahead: Dough can be refrigerated up to 3 days or frozen for up to 1 month. Thaw before baking.
- No gelatin? Substitute with 1 tsp lime or lemon zest plus a drop of green food coloring for color and flavor.
- Cookie texture: For chewier cookies, reduce baking time to 12-13 minutes. For crispier edges, bake the full 15 minutes.
- Storage: Store cooled cookies in an airtight container at room temperature for up to 5 days.