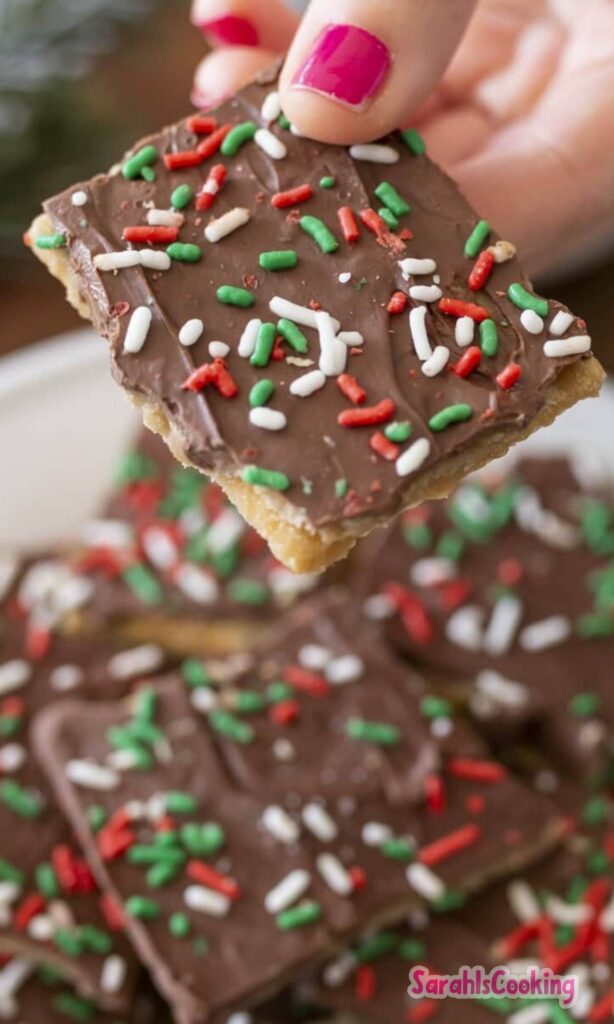
There’s something magical about the holidays, and for me, it’s not complete without a little sweet indulgence. Christmas Cracker Toffee, affectionately called Christmas Crack, hits all the right notes—crunchy, chewy, salty, and sweet. This treat has layers of saltine crackers, gooey caramel, and a chocolate topping that melts in your mouth.
The best part? This version is dairy-free, vegan, and can easily be made gluten-free, so everyone at the table can enjoy it. It’s perfect for gifting, snacking, or sneaking a few pieces before anyone notices!
I first made this for a small holiday gathering, and let’s just say it didn’t last long. It’s addicting, but the process is surprisingly simple. With a few ingredients and some basic equipment, you’ll have a dessert that feels gourmet but is truly effortless.
Ingredients Needed for the Recipe
- 24 saltine crackers – the base layer providing that iconic crunch and saltiness.
- ½ cup packed brown sugar – creates the rich caramel topping that balances the salt.
- ½ cup butter (dairy-free if needed) – melts into the sugar to form the toffee; gives richness and flavor.
- 1 cup chocolate chips (dairy-free if needed) – melts over the caramel for a smooth, sweet finish.
Each ingredient has a role that contributes to the final texture and flavor. The saltines aren’t just for structure—they contrast perfectly with the caramel’s sweetness. Brown sugar brings a deep molasses-like flavor, while butter enriches the sauce. Chocolate, of course, seals the deal, making each bite irresistible.
Choosing the Right Saltines and Chocolate
Selecting Saltines
Not all saltines are created equal. I prefer the square, lightly salted variety because they hold the caramel without getting soggy too quickly. Organic or store-brand works just fine, as long as they’re sturdy. Line them carefully in a single layer, and don’t overlap—they need space to crisp up evenly under the caramel.
Picking Chocolate Chips
Chocolate is the crowning glory of this toffee. I usually reach for dairy-free chocolate chips to keep things vegan, but any high-quality chocolate will work. Look for chips that melt smoothly without separating. Dark, semi-sweet, or even a mix of milk and dark can make for a fun flavor twist.
Optional Toppings
This is where you can get playful. Flaky sea salt, crushed pretzels, or chopped nuts add texture and visual appeal. Sprinkles, peppermint bits, or dried fruit work beautifully if you want a festive touch. Just be sure not to overload, or it might compete with the chocolate layer.
How to make Christmas Cracker Toffee?
Step 1 – Prep Your Baking Pan
Preheat your oven to 400°F (200°C). Line a 10×15-inch jelly roll pan or baking sheet with heavy-duty aluminum foil. Make sure the foil covers the sides as well as the bottom. Lightly coat with cooking spray if you’re using standard foil to prevent sticking. This ensures easy removal once your toffee is set.
Step 2 – Arrange the Crackers
Place the saltine crackers in a single layer on the prepared pan. It helps to press them lightly so the edges touch but don’t overlap. This creates an even base, ensuring every bite has that satisfying saltine crunch beneath the caramel.
Step 3 – Make the Caramel Sauce
In a medium saucepan, combine the brown sugar and butter. Cook over medium heat, stirring frequently until the butter melts and the mixture begins to bubble. Allow it to boil gently for about 3 minutes until it darkens slightly—this is your caramel developing its rich flavor. Be careful not to burn it, as that will make the toffee bitter.
Step 4 – Coat the Crackers
Pour the caramel evenly over the saltines and use a rubber spatula to spread it. Make sure every cracker gets a coating. Place the pan in the oven for 3-5 minutes until the caramel is bubbly. This short bake gives the caramel just enough time to meld with the crackers while maintaining the crunch.
Step 5 – Melt the Chocolate
Remove the pan from the oven and scatter chocolate chips over the hot caramel. Return it to the oven for another 3 minutes, just long enough to let the chocolate soften and melt. Avoid overbaking; you want a glossy, spreadable layer, not hardened chips at this stage.
Step 6 – Spread and Add Toppings
Using a spatula, spread the melted chocolate evenly over the caramel. Now’s the time to sprinkle any additional toppings—sea salt, nuts, sprinkles, or crushed candy. They add both flavor and festive flair. The chocolate layer acts as a glue to hold everything together, so toppings adhere perfectly.
Step 7 – Cool and Set
Allow the pan to cool to room temperature, then transfer it to the refrigerator to set overnight. This step is key for getting a firm, crackable texture. Once chilled, peel the foil away and break the toffee into snack-sized pieces using a chef’s knife or your hands. It’s the “crack” part of Christmas Crack!
How to Store and Serve Christmas Cracker Toffee
Storing Your Toffee
Store the toffee in an airtight container in the refrigerator for up to a week. The chocolate and caramel will stay firm, and the saltines maintain their crunch. If you want to prepare it ahead of time for gifting, wrap small batches in parchment paper or festive cellophane for easy handouts.
Serving Suggestions
This treat is incredibly versatile. Serve it on a holiday dessert tray, alongside cookies and other small sweets. It pairs wonderfully with hot chocolate, coffee, or even a festive tea. You can also crumble it over ice cream or yogurt for a quick, decadent topping. Personally, I love grabbing a few pieces while the oven’s still warm from baking cookies—the contrast is heavenly.
Tips for Perfect Toffee
- Use a heavy-duty foil for lining the pan; it makes peeling the toffee effortless.
- Don’t skip the refrigerating step—it ensures the toffee snaps perfectly.
- Stir the caramel constantly while boiling to prevent burning and grainy texture.
- Choose chocolate chips that melt smoothly; a quick oven melt works better than microwaving in this case.
- Experiment with toppings but keep them light—overloading can make spreading chocolate tricky.
- For gluten-free options, use certified gluten-free saltines; the rest of the process remains the same.
- Break the toffee when completely chilled; attempting earlier can cause uneven cracking and sticky fingers.
Making Christmas Cracker Toffee is one of those rare holiday recipes that feels indulgent but is straightforward enough for anyone to try. Each layer—salty, sweet, and chocolatey—offers a bite that’s impossible to resist. I love that it can be tailored for dietary preferences, making it a dessert everyone can enjoy at the table. This year, I guarantee it will become your go-to festive treat too.
Christmas Cracker Toffee Recipe
Description
Christmas Cracker Toffee—also known as Christmas Crack—is a festive, addictive treat made with layers of crisp saltine crackers, a buttery vegan caramel sauce, and rich dairy-free chocolate. This version is not only dairy-free and vegan but also offers a gluten-free option, making it perfect for allergy-conscious holiday gatherings. With its irresistible combination of sweet, salty, crunchy, and chewy textures, it’s no wonder this dessert disappears fast!
ingredients
Instructions
- Preheat the oven to 400°F (204°C). Line a 10x15-inch jelly roll pan with nonstick or heavy-duty aluminum foil, covering bottom and sides. Lightly grease with cooking spray if using regular foil.
- Arrange saltine crackers in a single layer on the prepared pan, covering the entire surface without gaps.
- In a medium saucepan (e.g., GreenLife Soft Grip), combine brown sugar and plant-based butter. Heat over medium, stirring frequently, until butter melts completely. Bring to a gentle boil and cook for 2–3 minutes, stirring constantly, until the mixture darkens slightly and smells caramelized.
- Immediately pour the caramel sauce evenly over the crackers. Use a rubber spatula to spread it fully across the surface.
- Bake for 3–5 minutes, or until the toffee is bubbly and golden.
- Remove from oven and quickly scatter dairy-free chocolate chips evenly over the hot toffee layer.
- Return pan to oven for 2–3 more minutes to melt chocolate. Remove and gently spread melted chocolate into an even layer with a spatula.
- Optional: Sprinkle with flaky sea salt, chopped nuts, crushed peppermints, or sprinkles while chocolate is still warm.
- Let cool completely at room temperature, then transfer to the refrigerator to set for at least 8 hours (or overnight).
- Once chilled, lift the foil out of the pan, peel away the foil, and break or cut into bite-sized pieces.
Nutrition Facts
Servings 24
Serving Size 1 piece
- Amount Per Serving
- Calories 120kcal
- % Daily Value *
- Total Fat 6gg10%
- Saturated Fat 3gg15%
- Trans Fat 0gg
- Cholesterol 0mgmg0%
- Sodium 105mgmg5%
- Potassium 45mgmg2%
- Total Carbohydrate 16gg6%
- Dietary Fiber 1gg4%
- Sugars 11gg
- Protein 1gg2%
- Calcium 10 mg
- Iron 1 mg
* Percent Daily Values are based on a 2,000 calorie diet. Your daily value may be higher or lower depending on your calorie needs.
Note
- Allergy-Friendly Swaps: Use certified gluten-free crackers and Enjoy Life chocolate chips to keep this recipe safe for those with gluten, dairy, nut, and soy allergies.
- Storage: Keep in an airtight container in the fridge for up to 1 week—or freeze for up to 2 months.
- Chocolate Not Melting? Pop the pan back in the oven for 2–3 minutes to soften the chips before spreading.
- Perfect for Gifting: Package in festive tins or cellophane bags tied with ribbon for a homemade holiday gift.