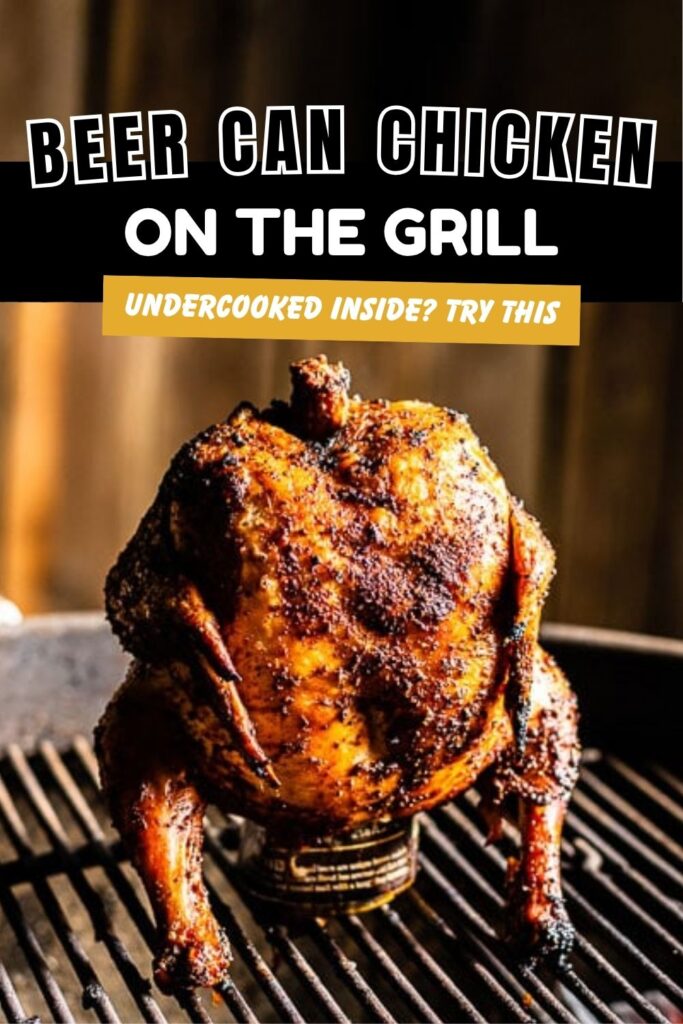
Grill juicy beer can chicken with crispy skin every time. No complicated recipe-just smart technique, temperature tips, and real-world testing.
There is something deeply satisfying about pulling a whole chicken off the grill, golden brown, skin crackling, meat so tender it practically falls apart. Beer can chicken delivers exactly that, but only when you handle the details correctly.
I have tested this method more times than I can count, adjusting temperatures, rubs, cook times, even the type of can I use. What I learned is that simplicity works best when paired with precision.
This recipe is not about fancy ingredients or complicated steps. It is about understanding how indirect heat, moisture from the beer, and proper internal temperatures work together to give you a bird that stays juicy from breast to thigh.
Ingredients Needed for the Recipe
- 1 whole chicken (3.5 to 5 pounds) – A smaller bird cooks more evenly and fits better on standard grills. Remove the giblets and pat the skin thoroughly dry for crispiness.
- ½ to ¾ can of beer or your preferred beverage – The liquid creates steam that gently cooks the chicken from the inside. Flavor matters less than moisture, but choose something you enjoy drinking.
- BBQ rub or spices (optional) – Rub adds crust and depth. Without it, the chicken still works, but seasoning transforms good into memorable.
- BBQ sauce (optional, for finishing) – Adds sweetness and glaze during the last minutes. Apply late to avoid burning the sugars.
- Disposable tin pan or old baking pan lined with foil – Catches drippings and prevents flare-ups. Essential for indirect grilling.
- Chicken stand or beer can holder (optional but helpful) – Provides stability and often includes a built-in tray. Makes transferring the bird much safer.
How to make Beer Can Chicken On The Grill?
Step 1 – Preheat the Grill for Indirect Cooking
Light your gas grill and turn only half the burners to medium-high, aiming for a steady 400 degrees Fahrenheit. For charcoal, bank the hot coals to one side of the kettle, leaving the other side empty. You want intense heat on one zone and no direct flame under the chicken.
Closing the lid during preheat is critical. Let the grill stabilize for at least 15 minutes before placing the bird inside. Temperature swings early on will extend your cook time and dry out the skin.
Step 2 – Prepare the Chicken and the Can
Remove the giblets from the cavity and check for the neck. Pat the entire bird dry with paper towels, inside and out. Damp skin steams instead of crisping, and that is not what we want here.
Open your beer and pour out or drink about half. You only need ½ to ¾ of a can. Too much liquid sloshes out or takes too long to heat. Place the can in the center of your tin pan or inside a chicken stand if you have one.
Step 3 – Mount the Chicken and Season
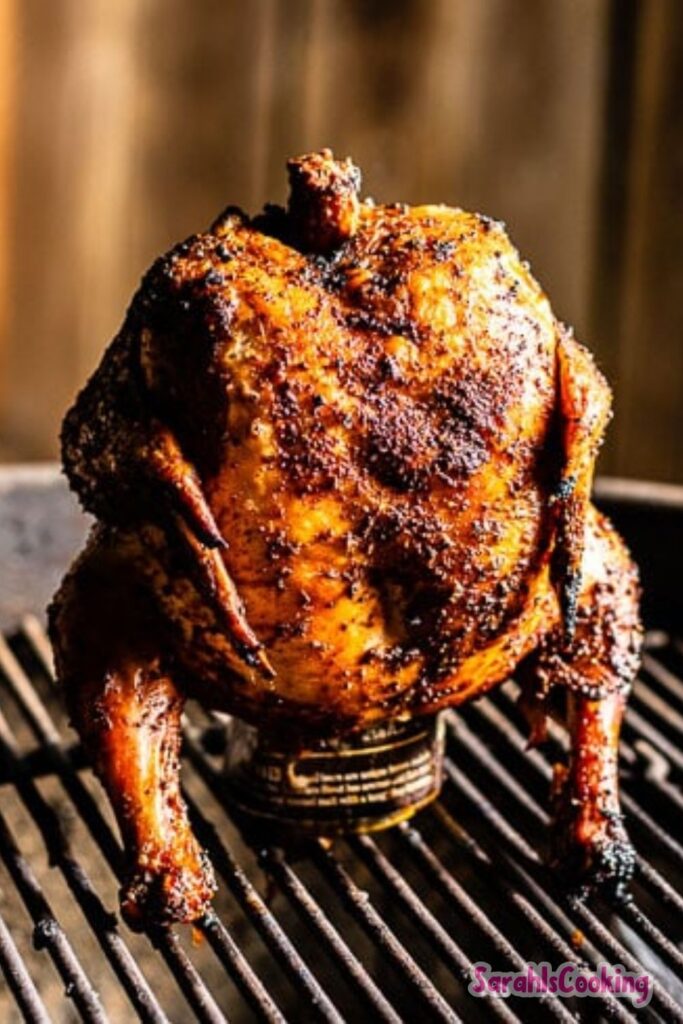
Straddle the chicken over the can, legs pointing down toward the pan. Push firmly but gently until the bird feels stable. The legs and the can should form a tripod of sorts. If it wobbles, adjust the angle or use a stand.
Apply your dry rub generously over all the skin you can reach. Do not forget the back and the top of the thighs. The rub adds flavor and helps the skin brown. At this point, no sauce yet.
Step 4 – Place on the Indirect Side and Close the Lid
Set the entire pan with the chicken onto the cool side of the grill. Double-check that no part of the bird sits directly over the flame or hot coals. Close the lid and resist the urge to peek for at least 45 minutes.
Maintain grill temperature between 375 and 450 degrees. If the temperature drops, open the vents slightly or turn up the burner slightly. If it climbs too high, crack the lid for a few seconds.
Step 5 – Rotate Halfway and Check Timing
After about 45 to 50 minutes, rotate the pan 180 degrees. This ensures even cooking since most grills have hot spots. Do not lift the chicken off the can. Just turn the whole setup carefully using heatproof gloves.
Total cook time typically runs 1 hour to 1 hour 30 minutes, depending on bird size and starting temperature. A chicken straight from the fridge takes longer than one that has rested at room temperature for 30 minutes.
Step 6 – Add BBQ Sauce and Check Final Temperatures
During the last 15 to 20 minutes, brush BBQ sauce over the skin if desired. Sugary sauces burn quickly, so keep the lid closed between applications. One coat is usually plenty.
Insert an instant-read thermometer into the thickest part of the thigh without touching bone. Target 180 degrees Fahrenheit. The breast should read 165 degrees. If the thigh lags behind, leave the bird on for another 10 minutes and check again.
Step 7 – Rest Before Carving
Carefully remove the entire pan from the grill. Using sturdy tongs and gloves, lift the chicken off the can and transfer it to a cutting board. Be cautious-the can and the liquid inside remain extremely hot.
Rest the chicken uncovered for 10 minutes. This allows juices to redistribute. Carve as you normally would, and notice how the breast meat holds moisture even after resting.
Why This Recipe Works
Steam from the beer or any canned beverage creates a humid environment inside the cavity. That moisture gently cooks the meat from within while the dry grill heat crisps the exterior. The result is a bird that does not suffer the usual fate of grilled chicken-dry breast and undercooked thighs.
Indirect heat is the real hero here. Direct flame would burn the skin before the interior finished cooking. By keeping the chicken away from the fire, the entire bird cooks slowly and evenly, giving collagen time to break down into gelatin.
The vertical position also allows fat to render and drip downward instead of pooling on top of the meat. That natural basting action keeps the breast from drying out while the dark meat reaches its ideal temperature range.
I prefer 400 degrees as the starting temperature because it is hot enough to crisp skin without scorching the outside before the inside finishes. Lower temperatures produce softer skin, and higher temperatures risk burning the rub or sauce.
How I Tested and Refined This Recipe
I cooked beer can chicken seven times over two months before settling on this method. The first two attempts used direct heat, and both resulted in burned drumsticks and raw thighs. That taught me immediately that indirect cooking is non-negotiable.
The third test used a full can of beer, and the liquid took so long to heat that the chicken spent an extra 30 minutes on the grill. The breast dried out noticeably. Reducing the liquid to half a can solved the problem completely.
I tried bottled beer poured into an empty soda can, and it worked identically to canned beer. I also tested root beer and apple cider. Both produced excellent results, though the cider gave the meat a faint sweetness that paired well with a spicy rub.
Temperature monitoring changed everything. Early tests relied on visual cues alone, and I consistently pulled the chicken too late or too early. Once I committed to using a probe thermometer for both breast and thigh, the texture became reliably tender every time.
Rotating the pan halfway was another adjustment. Without rotation, the side facing the back of the grill cooked slower, and the side facing the front finished faster. One 180-degree turn eliminated that inconsistency.
Common Mistakes and How to Avoid Them
- Not drying the skin thoroughly – Moisture creates steam, not crispiness. Pat the bird dry twice if needed.
- Cooking over direct heat – Flare-ups will char the outside while leaving the inside undercooked. Keep the chicken entirely off the flame.
- Using a full can of liquid – Extra liquid takes too long to heat and extends cook time, drying the breast.
- Opening the lid too often – Each peek releases heat and adds minutes to the cook. Trust your thermometer, not your curiosity.
- Skipping the rest – Carving immediately pushes juices onto the cutting board instead of keeping them in the meat. Ten minutes is not optional.
- Adding BBQ sauce too early – Sugars burn above 400 degrees. Wait until the last 15 minutes, or skip sauce entirely for cleaner flavor.
Make-Ahead, Storage, and Freezing Guidance
Cooked beer can chicken stores well in the refrigerator for up to four days. Let the meat cool completely before transferring to an airtight container. Slice the breast and pull the thigh meat off the bone for easier reheating.
The skin will soften in the fridge, which is unavoidable. To restore some crispiness, reheat the pieces in a 375-degree oven on a wire rack for 8 to 10 minutes. Avoid the microwave, which turns the skin rubbery and unevenly heats the meat.
Freezing works best for shredded or sliced meat, not the whole bird. Pack portions into freezer-safe bags with as much air removed as possible. Label with the date. Frozen chicken maintains good quality for up to three months.
Thaw overnight in the refrigerator before reheating. The texture will be slightly softer than fresh, but the flavor remains excellent. Use thawed chicken for tacos, sandwiches, soups, or salads.
Tips
- Let the chicken sit at room temperature for 30 minutes before grilling for more even cooking.
- Use a disposable foil pan for zero cleanup. Poke small holes in the bottom if you want smoke to reach the bird.
- Choose a beer with moderate flavor. Lagers and pilsners work well. Avoid heavy stouts or IPAs unless you want pronounced bitterness.
- If the chicken wobbles on the can, fold the legs forward slightly to create a wider base.
- Save the drippings from the pan. Skim the fat and use the juices to make a quick pan sauce or to moisten leftover meat.
- For oven preparation, place the chicken on the middle-lower rack at 400 degrees and cook using the same timing and temperature targets.
- Do not worry about alcohol in the final dish. The alcohol evaporates during cooking, leaving only flavor behind.
Beer Can Chicken On The Grill Recipe
Description
Discover the ultimate backyard BBQ classic with this easy Beer Can Chicken recipe. By grilling a whole chicken over indirect heat with a can of beer (or your favorite beverage) inside, you ensure moist, tender meat and incredibly crispy, flavorful skin. This method steams the chicken from the inside while smoking it from the outside, resulting in a juicy centerpiece for any summer gathering. No fancy equipment needed—just your grill, a can, and some simple seasonings!
Ingredients
Main Ingredients
Instructions
Preheat Grill
Preheat your grill to 400°F (200°C). Set up for indirect cooking by turning on only half of the burners (for gas) or pushing charcoal to one side (for charcoal).Prepare Chicken
Remove the giblets from the chicken cavity and pat the entire bird dry with paper towels. Drying the skin helps achieve a crispy texture.Prepare Can
Open the beer or beverage and drink or discard about 1/4 to 1/2 of the contents. Place the can in a dedicated chicken stand or a disposable tin pan lined with foil for stability.Mount Chicken
Straddle the chicken over the beer can so the can enters the large cavity. Press down gently but firmly to ensure the chicken stands upright and is stable. Adjust the legs to create a tripod base if needed.Season
Apply your preferred BBQ rub or seasoning generously over the entire exterior of the chicken.Grill
Place the chicken (and pan/stand) on the indirect heat side of the grill. Close the lid and cook for 1 hour to 1 hour 30 minutes. Rotate the chicken 180 degrees halfway through cooking to ensure even browning.Cooking time depends on the size of the chicken.Sauce (Optional)
During the last 15-20 minutes of cooking, brush with BBQ sauce if desired. Be careful not to burn the sugar in the sauce.Check Temperature
The chicken is done when an instant-read thermometer inserted into the thickest part of the thigh reads 180°F (82°C) and the breast reads 165°F (74°C).Rest and Serve
Carefully remove the chicken from the grill using tongs and heat-proof gloves. Let it rest for 10 minutes before carefully removing the can and carving. Serve warm.
Nutrition Facts
Servings 4
Serving Size 1/4 of chicken
- Amount Per Serving
- Calories 285kcal
- % Daily Value *
- Total Fat 12g19%
- Saturated Fat 3.5g18%
- Cholesterol 85mg29%
- Sodium 320mg14%
- Potassium 280mg8%
- Total Carbohydrate 2g1%
- Sugars 1g
- Protein 38g76%
* Percent Daily Values are based on a 2,000 calorie diet. Your daily value may be higher or lower depending on your calorie needs.
Note
For a non-alcoholic version, use soda, apple juice, or chicken broth in the can. Ensure the chicken is stable before placing it on the grill to prevent tipping.