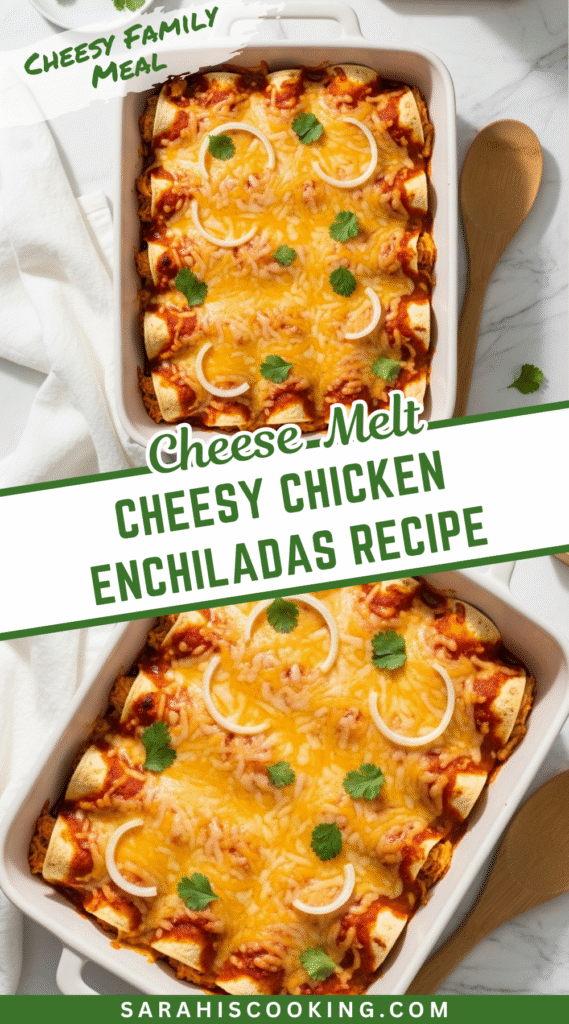
There’s something deeply comforting about a pan of cheesy chicken enchiladas coming out of the oven, all bubbly and fragrant.
It’s the kind of meal that feels like a warm hug, perfect for turning an ordinary weeknight into something just a little bit special.
Why This Recipe Works So Well
This recipe is a fantastic friend to both your schedule and your creativity, adapting seamlessly to what you have on hand.
You can go the full homemade route for a truly spectacular result, or lean on quality store-bought helpers for a dinner that’s miraculously fast.
Ingredients Needed for the Recipe
Gathering these simple ingredients is the first step toward your delicious dinner.
- Cooked, Shredded Chicken (1 ½ cups): The hearty star of the show, providing protein and a tender texture. A rotisserie chicken is a brilliant shortcut here.
- Enchilada Sauce (2 cups): This is the flavor powerhouse, bathing the enchiladas in its rich, spiced essence. Homemade is sublime, but a good store-bought jar works wonders.
- Shredded Cheese (2 ½ cups): The “cheesy” part of our title! It creates gooey pockets inside and a glorious, golden blanket on top. A blend of cheddar and Monterey Jack is pure magic.
- Corn Tortillas (8): The cozy wrapping for our filling, offering a soft, pliable texture and a subtle, earthy flavor that pairs perfectly with the sauce.
- Salt & Pepper (½ tsp salt, ¼ tsp pepper): These simple seasonings are essential for waking up all the other flavors and making the filling taste just right.
Your Enchilada Assembly Line
Before you start rolling, set up a little workstation to make the process smooth and even fun.
You’ll want your bowl of filling, the tortillas, your baking dish, and the sauce all within easy reach.
How to make Cheesy Chicken Enchiladas?
Step 1: Heat Things Up
Begin by preheating your oven to 350°F (175°C). This ensures it’s perfectly hot and ready to go by the time your enchiladas are assembled.
Step 2: Create the Filling
In a medium bowl, mix together the shredded chicken, ¼ cup of the enchilada sauce, 1 cup of the shredded cheese, and the salt and pepper.
That little bit of sauce in the filling is the secret to keeping the chicken incredibly moist and flavorful.
Step 3: Warm and Fill the Tortillas
If you’re using store-bought corn tortillas, this step is non-negotiable for flexibility. Wrap the stack in a damp paper towel and microwave for 30 seconds, flip, and heat for another 30 seconds.
Lay a warm tortilla flat, spoon a generous line of the chicken mixture down the center, and get ready to roll.
Step 4: Roll and Arrange
Gently but firmly, roll the tortilla around the filling into a tight cylinder. Place it seam-side down in your 9×13 inch baking dish.
That seam-side-down placement is a simple trick that keeps your enchiladas from unfurling in the oven.
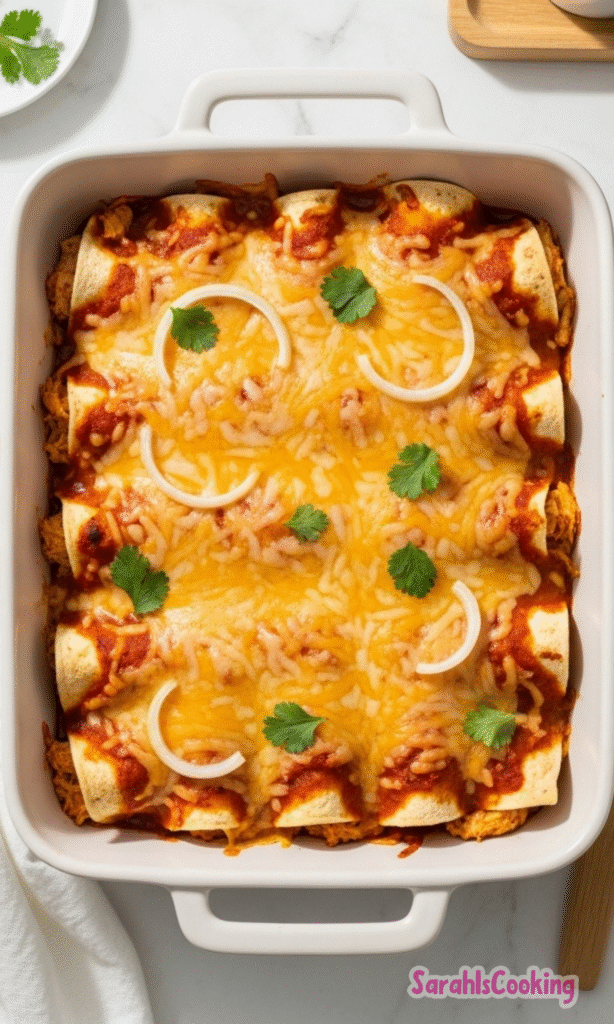
Step 5: Sauce and Cheese Them
Once all the enchiladas are snug in the dish, pour the remaining sauce evenly over the top. Use a spoon to spread it into any bare spots.
Now, shower the top with the rest of your cheese, because, well, more cheese is always a good idea.
Step 6: Bake to Perfection
Slide the pan into your preheated oven and bake for 20-25 minutes. You’re looking for the cheese to be completely melted, delightfully bubbly, and perhaps just starting to get a few golden spots.
Step 7: Serve Immediately
Let the enchiladas sit for just a minute or two after baking, then serve them right away while they’re piping hot and the cheese is at its most glorious.
Tips
A few little insights can make your enchilada experience even better.
- For the ultimate from-scratch experience, try making your own enchilada sauce and tortillas when you have a free afternoon. The difference in flavor is profound.
- If you’re using a very thick homemade sauce, pouring it over the top instead of dipping the tortillas results in a wonderfully plump enchilada that doesn’t get soggy.
- Don’t be shy with the cheese strength; a sharp or extra-sharp cheddar will give you a much more flavorful bite than a mild one.
- You can absolutely prepare components ahead of time. The sauce and tortillas can be made days in advance, making assembly on a busy night a total breeze.
- For a vegetarian twist, simply leave out the chicken and add in black beans or sautéed vegetables like bell peppers and corn.
The Perfect Toppings Bar
Setting out a variety of toppings lets everyone customize their plate exactly how they like it.
A little bowl of cool, creamy sour cream or Greek yogurt provides a lovely contrast to the warm, spicy enchiladas.
Fresh, chopped cilantro, diced white onion, and a squeeze of lime juice add a bright, zesty finish that cuts through the richness beautifully.
For a bit of heat and texture, sliced jalapeños, a drizzle of hot sauce, or even some sliced radishes are fantastic options to have on the table.
Storing and Freezing for Later
Leftovers can be stored in an airtight container in the refrigerator for up to three days, though the tortillas will soften as they absorb more sauce.
Reheating is best done in the microwave for a quick and easy meal, but the oven will give you a slightly crisper top if you have the time.
These enchiladas are also a fantastic candidate for freezing, making for a future dinner with almost no effort.
To freeze, assemble the enchiladas completely but hold off on the final layer of cheese, adding it fresh just before baking for the best texture.
Wrap the entire dish tightly in plastic wrap, then again in foil, and it will keep happily in the freezer for up to three months.
When you’re ready, thaw it overnight in the refrigerator and then bake as directed, perhaps adding a few extra minutes if it’s still cold from the fridge.
Cheesy Chicken Enchiladas Recipe
Description
Ever wondered how grocery stores make their rotisserie chicken so juicy and flavorful? Now you can recreate that magic at home with this easy recipe! Whether you use a rotisserie, oven, or slow cooker, this bird comes out perfectly seasoned, crispy-skinned, and packed with savory herbs and spices. Great for busy weeknights or meal prep—leftovers turn into countless delicious dishes!
ingredients
Instructions
- In a small bowl, whisk together kosher salt, smoked paprika, onion powder, dried thyme, black pepper, cayenne pepper, dried sage, and garlic powder to create the spice rub.
- Pat the chicken completely dry inside and out using paper towels (do not rinse).
- Rub the spice mixture generously all over the chicken—on the outside, inside the cavity, and gently under the skin on the breast and thighs.
- Drizzle olive oil over the chicken and massage to help the spices adhere and promote crispy skin.
- Cover and refrigerate for 1 hour (or up to 24 hours for deeper flavor). Remove from fridge 30 minutes before cooking to bring to room temperature.
- Stuff the quartered onion into the chicken cavity. Truss the legs together with kitchen twine for even cooking.
Choose your cooking method:
For **rotisserie**: Cook on a rotisserie grill for 1 hour 15 minutes, or until internal temperature reaches 165°F (74°C).- For **oven roasting**: Preheat oven to 450°F (232°C). Place chicken breast-side up in a roasting pan. Roast for about 60 minutes, or until internal temperature in the thickest part of the thigh reaches 165°F (74°C). If skin browns too quickly, tent breast loosely with foil.
- For **slow cooker**: Place chicken in the slow cooker. Cover and cook on LOW for 7 hours or HIGH for 4 hours, until cooked through.
- Let the chicken rest for 10 minutes before carving to allow juices to redistribute.
Nutrition Facts
Servings 6
Serving Size 1 serving (about 10 oz with skin)
- Amount Per Serving
- Calories 580kcal
- % Daily Value *
- Total Fat 34g53%
- Saturated Fat 10g50%
- Cholesterol 185mg62%
- Sodium 1790mg75%
- Potassium 520mg15%
- Total Carbohydrate 3g1%
- Dietary Fiber 1g4%
- Sugars 1g
- Protein 64g128%
- Calcium 40 mg
- Iron 3 mg
* Percent Daily Values are based on a 2,000 calorie diet. Your daily value may be higher or lower depending on your calorie needs.
Note
- Make ahead: Season the chicken up to 24 hours in advance for deeper flavor.
- Crispy skin tip: Ensure the chicken is very dry before oiling and seasoning.
- Variations: Add lemon halves, garlic cloves, or fresh rosemary inside the cavity for extra aroma.
- Leftovers: Use in tacos, soups, salads, casseroles, or enchiladas for quick meals.