Some cookies feel fancy. Some feel nostalgic. These Strawberry Chocolate Kiss Cookies manage to be both, without trying too hard.
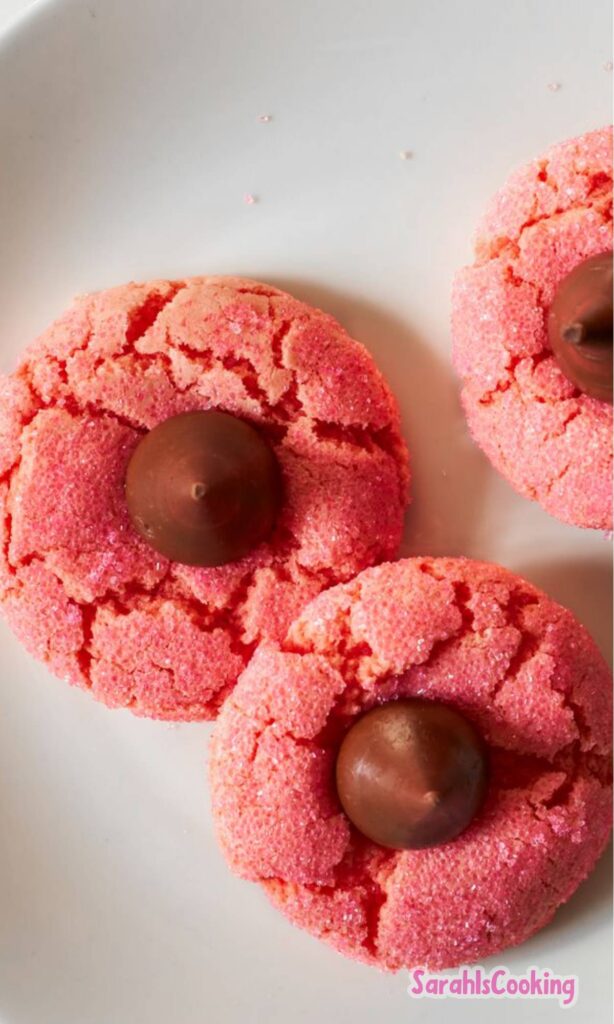
They’re soft, pink, slightly fluffy, and topped with a warm chocolate kiss that sinks right into the center. Sweet, simple, and very hard to ignore.
I originally made these as Valentine’s Day gifts, but honestly, they don’t belong to just one holiday. They’re the kind of cookie that quietly steals the spotlight, no matter the reason you baked them.
What makes them special isn’t complicated technique or rare ingredients. It’s the contrast — strawberry and chocolate, tender cookie and melty candy, playful color with classic flavor.
They come together fast, disappear even faster, and somehow feel thoughtful every single time. That’s a rare win in baking.
Why These Cookies Are Always a Hit
These cookies start with a strawberry cake mix, which gives them a soft texture and gentle fruit flavor. No dryness, no crumbly edges, just pillowy centers.
The red candy sprinkles add crunch and color, catching the light in a way that makes people pause. They’re festive without being over-the-top.
Then comes the Hershey’s Kiss. Placed right after baking, it melts just enough to cling, but keeps its shape.
Kids love them. Adults sneak seconds. They work as party treats, gift-box cookies, or late-night snacks straight from the rack.
And best of all, they don’t ask much of you. No chilling, no rolling pins, no stress.
Ingredients Needed for the Recipe
- Strawberry Cake Mix (15.25 oz) – The base that provides flavor, color, and soft texture.
- Eggs – Help bind the dough and keep the cookies tender.
- Melted Butter – Adds richness and moisture to the cake mix dough.
- Red Candy Sprinkles – Coat the outside for crunch and festive color.
- Flour – Lightly dusted on fingers to prevent sticking while rolling.
- Hershey’s Kisses – The chocolate center that melts slightly into the cookie.
How to make Strawberry Chocolate Kiss Cookies?
Step 1: Prep the Oven and Pan
Start by preheating your oven to 350°F. Line a baking sheet with parchment paper to keep things neat.
This small step makes cleanup easier and helps the cookies bake evenly. Always worth it.
Step 2: Mix the Dough
In a mixing bowl, combine the strawberry cake mix and eggs. Pour in the melted butter and stir until fully blended.
The dough will be thick, soft, and slightly sticky. That’s exactly how it should look.
Step 3: Prepare the Sprinkles
Pour the red candy sprinkles into a small bowl. Set it next to your dough for easy dipping.
Lightly dust your fingers with flour to keep the dough from sticking. A little goes a long way.
Step 4: Roll and Coat
Scoop about one tablespoon of dough and roll it gently into a ball. Don’t overwork it.
Roll the dough ball in the sprinkles until generously coated. The more coverage, the better the final look.
Step 5: Arrange the Cookies
Place the coated dough balls onto the prepared baking sheet. Leave space between them so they can spread slightly.
Repeat until the sheet is full, but not crowded. Good spacing matters.
Step 6: Bake
Bake the cookies for about 8 minutes. They should look set but still soft.
Avoid overbaking — these cookies shine when they’re tender. Trust the timing.
Step 7: Add the Chocolate Kisses
Remove the cookies from the oven and immediately press a Hershey’s Kiss into the center of each one. The heat will soften the chocolate just enough.
Don’t push too hard. Let the cookie cradle the chocolate naturally.
Step 8: Cool Properly
Let the cookies cool on the baking sheet for about 5 minutes. This helps them firm up without drying out.
Transfer to a wire rack and allow them to cool completely. Or sneak one while it’s warm, no judgment.
Flavor Variations Worth Trying
These cookies are fantastic as written, but they also welcome creativity. Small tweaks can give them a whole new personality.
Swap red sprinkles for pink, white, or even heart-shaped ones. They instantly match different celebrations.
You can also experiment with flavored chocolate kisses. Dark chocolate adds depth, while strawberry-filled ones lean extra sweet.
For a subtle twist, roll half the dough balls in white sanding sugar instead of sprinkles. The contrast looks beautiful on a platter.
Tips
- Store cookies in an airtight container to keep them soft for days.
- Press the chocolate kisses in while cookies are hot, not warm.
- Use parchment paper to prevent sticking and browning.
- Dust hands lightly with flour instead of adding flour to the dough.
- Don’t overbake — 8 minutes is the sweet spot.
Perfect for Gifting and Sharing
These Strawberry Chocolate Kiss Cookies were meant to be shared, and it shows.
The bright color, soft texture, and chocolate center feel thoughtful without being fussy. They travel well and look great stacked in boxes.
If you’re gifting them, let the chocolate set fully before packing. That keeps everything neat and polished.
They’re ideal for teachers, friends, neighbors, or kids’ parties. Few treats feel this cheerful straight out of the oven.
Storage and Make-Ahead Notes
Once cooled, these cookies store beautifully in an airtight container. They stay soft and fluffy for several days.
If stacking them, place parchment between layers. It keeps the chocolate tops clean and intact.
You can also make the dough ahead and bake fresh the same day. Freshly baked always wins.
These cookies are especially good slightly warm, when the chocolate is still soft. That moment doesn’t last long, though.