These St. Patrick’s Day Pot Of Gold Cookies are designed to be dependable, fast, and visually charming without requiring actual baking. I approach them the same way I approach any recipe I share, with attention to structure, texture, and repeatability.
This is not about shortcuts for the sake of convenience. It is about using smart components so the final result still feels thoughtful and polished.
You end up with a festive dessert that looks intentional, holds up well for parties, and can be made even when time is limited. That combination is exactly why this method works.
Who This Recipe Is For
This recipe is ideal for home cooks who want something celebratory but do not want to manage multiple baking steps. If you enjoy decorating more than baking, this fits naturally into your rhythm.
It is also perfect for busy families, classroom events, or anyone assembling treats the night before a gathering. The steps are simple, but the outcome still feels complete.
No advanced skills are required. If you can pipe frosting and handle soft candy carefully, you can make these successfully.
Why This Recipe Works
The structure relies on using a sturdy, pre-made cookie that acts as both the base and the visual “pot.” Choosing a thicker cookie gives height, which keeps the decorations from looking flat or crowded.
Whipping store-bought frosting introduces air, changing it from dense and slightly greasy to light and pipeable. That shift in texture makes the frosting behave more like a stabilized buttercream.
The candy elements are selected for flexibility and scale. Soft rainbow candy can bend without cracking, while mini marshmallows provide shape contrast and visual balance without adding weight.
Ingredients Needed for the Recipe
- Cream cheese frosting – Serves as the adhesive layer and visual background, providing stability for decorations while offering a slightly tangy flavor that balances the sweetness.
- Blue food coloring – Tints the frosting to create contrast so the rainbow and marshmallow elements stand out clearly.
- Chocolate and marshmallow cookies – Act as the structural base, giving height and firmness so toppings remain supported.
- Rainbow Airhead candies – Provide the flexible rainbow shape that defines the theme and adds chew without crumbling.
- Mini marshmallows – Represent clouds while also anchoring the rainbow ends so they stay in place.
Ingredient Insights and Function
Using cream cheese frosting instead of standard vanilla frosting improves both flavor and stability. The slight acidity cuts through the sugar, which prevents the cookies from tasting one dimensional.
If you substitute whipped frosting varieties, expect a softer hold. Decorations may shift during storage because those frostings contain more air and less structure.
The cookie choice matters more than most people expect. Thin cookies do not create enough height, which makes the rainbow appear oversized and unstable.
If you prefer homemade cookies, bake them as cookie cups instead of flat rounds. That added depth recreates the sturdy base needed to support the decorations.
Rainbow candy must be soft and pliable. Hard candy or fruit strips that crack will not hold the curved shape and will separate from the frosting.
Mini marshmallows are intentionally sized to match the scale of the cookie. Larger marshmallows overwhelm the design and can slide off because of their weight.
How to make St. Patrick’s Day Pot Of Gold Cookies Recipe?
Step 1 – Bring the Frosting to Room Temperature
Start with frosting that is fully softened but not melted. Cold frosting resists mixing and will not whip properly.
Let it sit at room temperature for about 20 minutes. You want it spreadable without being glossy.
Step 2 – Tint the Frosting
Spoon the frosting into a medium bowl and add the blue food coloring. Stir gently at first to avoid streaking.
Mix until the color is evenly distributed. A soft sky blue works best for contrast.
Step 3 – Whip for Texture
Use a hand mixer to whip the frosting until it becomes lighter and slightly fluffy. This takes about 1 to 2 minutes.
You will notice a visible increase in volume. That added air improves both texture and pipeability.
Step 4 – Prepare the Piping Bag
Fit a piping bag with a 1M piping tip and transfer the whipped frosting into the bag. Do not overfill, or control becomes difficult.
Twist the top closed to maintain pressure while piping.
Step 5 – Frost the Cookie Base
Pipe a flat spiral layer starting at the outer edge of each cookie and working inward. Keep the layer even rather than tall.
The goal is coverage, not height. A smooth base helps the candy sit securely.
Step 6 – Shape the Rainbow
Cut each rainbow candy in half so the scale matches the cookie size. Gently bend one half into a curved shape.
Press it lightly into the frosting center. The frosting should hold it upright without collapsing.
Step 7 – Add the Marshmallow Clouds
Place two mini marshmallows at each end of the rainbow. Press just enough to anchor them without flattening.
This step locks the rainbow in place while completing the visual design.
Step 8 – Allow the Structure to Set
Let the decorated cookies sit uncovered for about 30 minutes. This allows the frosting to crust slightly.
Once set, they can be moved or stored without shifting decorations.
How I Tested and Refined This Recipe
I tested several frosting approaches before settling on whipped store-bought frosting. Unwhipped frosting looked dull and felt too dense when piped.
I also experimented with homemade buttercream, which held structure well but made the cookies overwhelmingly sweet. The balance was not right.
Different cookie bases were another variable. Thin supermarket cookies caused the rainbow to tip, while oversized soft cookies held everything upright.
I tried adding extra decorative candy to resemble a literal pot of gold. Visually it crowded the surface and made the proportions feel off.
The final version keeps the design simple so each component has space. That restraint is what makes the cookies look intentional rather than cluttered.
Common Mistakes and How to Avoid Them
- Using cold frosting – It will not whip properly and results in a dense, hard-to-pipe texture.
- Skipping the whipping step – The frosting remains heavy and does not adhere well to decorations.
- Choosing thin cookies – They cannot support the candy structure and may break during handling.
- Overbending the rainbow candy – Excess pressure causes cracking and uneven curves.
- Pressing decorations too firmly – This forces frosting outward and destabilizes the surface.
- Stacking cookies before they set – The rainbows will collapse under weight.
- Overcoloring the frosting – Too much liquid food coloring loosens the consistency.
Make-Ahead, Storage, and Freezing Guidance
These cookies can be made a day or two in advance, which actually improves their stability. The frosting firms slightly, helping the decorations stay in place.
Store them in an airtight container at room temperature for up to one week. Keep them in a single layer to prevent crushing.
Refrigeration is not necessary and can dry out the marshmallows. If your environment is warm, short refrigeration is acceptable but should be limited.
Freezing is not recommended because marshmallows lose their texture when thawed. The candy rainbows may also become sticky.
If you must transport them, use a shallow container lined with parchment to minimize movement. Stability matters more than stacking efficiency.
Tips
- Whip the frosting just until fluffy, not airy, to maintain control while piping.
- Work with a small batch at a time so candy stays pliable.
- Use gentle pressure when inserting decorations to avoid cracking the frosting layer.
- Let cookies rest before storing so the surface can set properly.
- Keep proportions simple to maintain a clean visual look.
- If making with children, pre-cut the candy to streamline assembly.
- Choose cookies with a slightly domed top for better decoration support.
- Wipe the piping tip occasionally to keep edges neat.
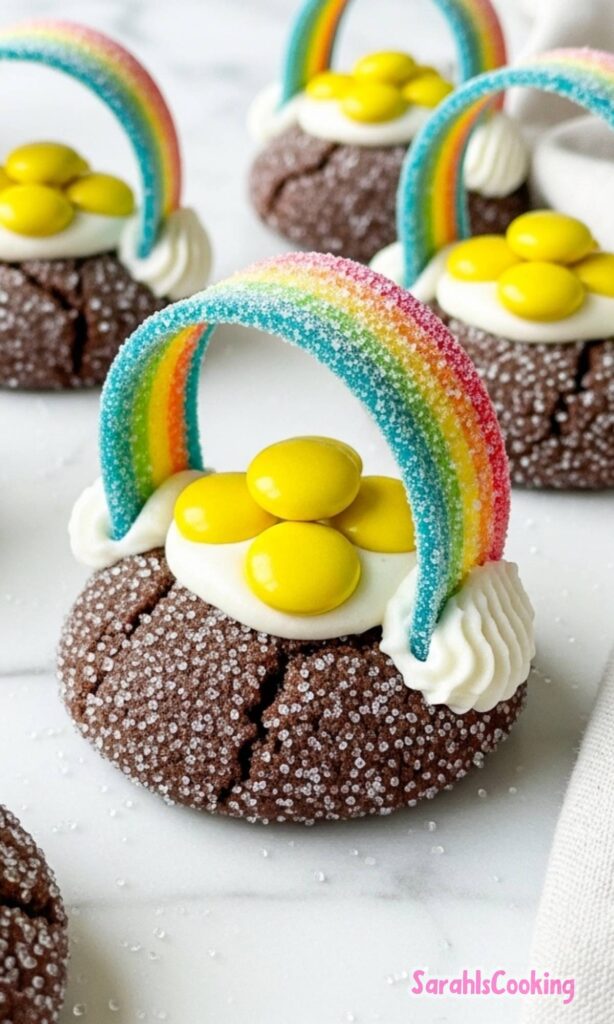
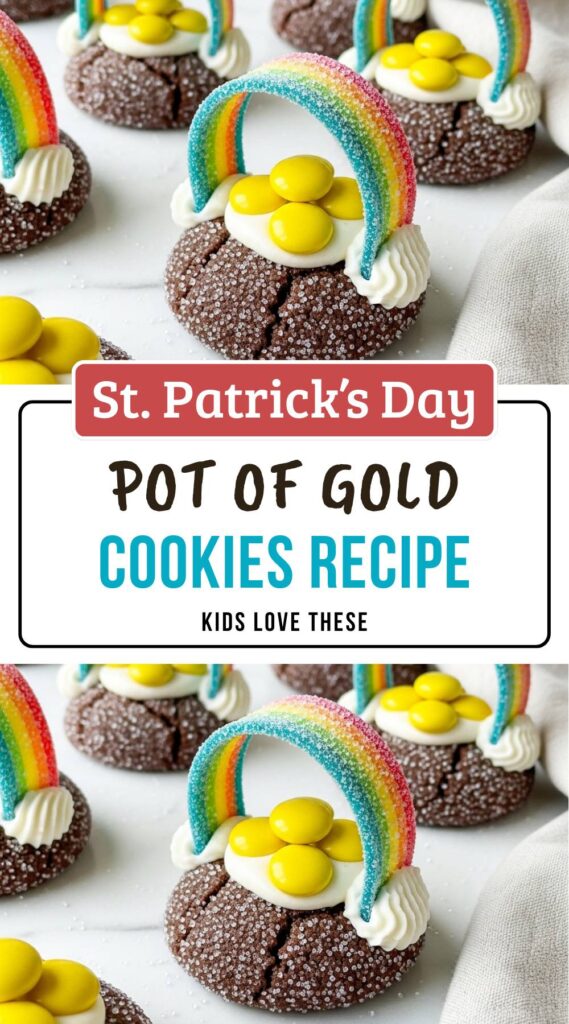
St. Patrick’s Day Pot Of Gold Cookies Recipe
Description
These St. Patrick's Day Pot Of Gold Cookies are the easiest, no-bake holiday treat! All you're really doing is decorating store-bought chocolate and marshmallow cookies with fluffy blue frosting, rainbow Airheads, and mini marshmallow clouds. Perfect for parties, classroom treats, or a fun family activity—no baking required, and everyone will love the adorable pot-of-gold design!
ingredients
Instructions
- Ensure frosting is at room temperature for easy mixing.
- Spoon the cream cheese frosting into a medium bowl.
- Add blue food coloring drops and stir gently until color is evenly incorporated.
- Using a hand mixer, whip the frosting until light and fluffy (about 1-2 minutes).Whipping adds air for better texture and volume
- Fit a piping bag with a 1M piping tip and fill with whipped blue frosting.
- Pipe a flat, even layer of frosting on top of each cookie, starting at the edge and working inward to fully cover the surface.
- Cut each rainbow Airhead candy in half lengthwise.
- Fold one half of an Airhead into a U-shape to resemble a rainbow and press gently into the center of the frosted cookie.
- Place 4 mini marshmallows on each cookie—two at each end of the rainbow—to look like fluffy clouds.
- Let cookies rest for 5 minutes to allow frosting to set slightly before serving or storing.
Nutrition Facts
Servings 12
Serving Size 1 cookie
- Amount Per Serving
- Calories 320kcal
- % Daily Value *
- Total Fat 12gg19%
- Saturated Fat 5gg25%
- Trans Fat 0gg
- Cholesterol 15mgmg5%
- Sodium 180mgmg8%
- Potassium 50mgmg2%
- Total Carbohydrate 52gg18%
- Dietary Fiber 1gg4%
- Sugars 38gg
- Protein 3gg6%
- Calcium 4% mg
- Iron 6% mg
* Percent Daily Values are based on a 2,000 calorie diet. Your daily value may be higher or lower depending on your calorie needs.
Note
- Pro Tip: Whip store-bought frosting to improve texture and volume—makes it fluffier and more pipeable!
- Make Ahead: Decorate cookies up to 1 day in advance; store in a single layer in an airtight container at room temperature.
- Customize: Swap blue frosting for green to match St. Patrick's Day themes, or add gold sprinkles for extra sparkle.
- Allergy Swap: Use gluten-free cookies and vegan frosting to accommodate dietary needs.