These St. Patrick's Day Mint Crinkle Cookies are designed to be dependable, festive, and easy to execute without sacrificing texture or flavor. They bake up soft, slightly chewy, and beautifully crackled every single time.
I developed this version to remove guesswork. The method leans on smart shortcuts while still applying solid baking principles so the cookies behave exactly the way you expect them to.
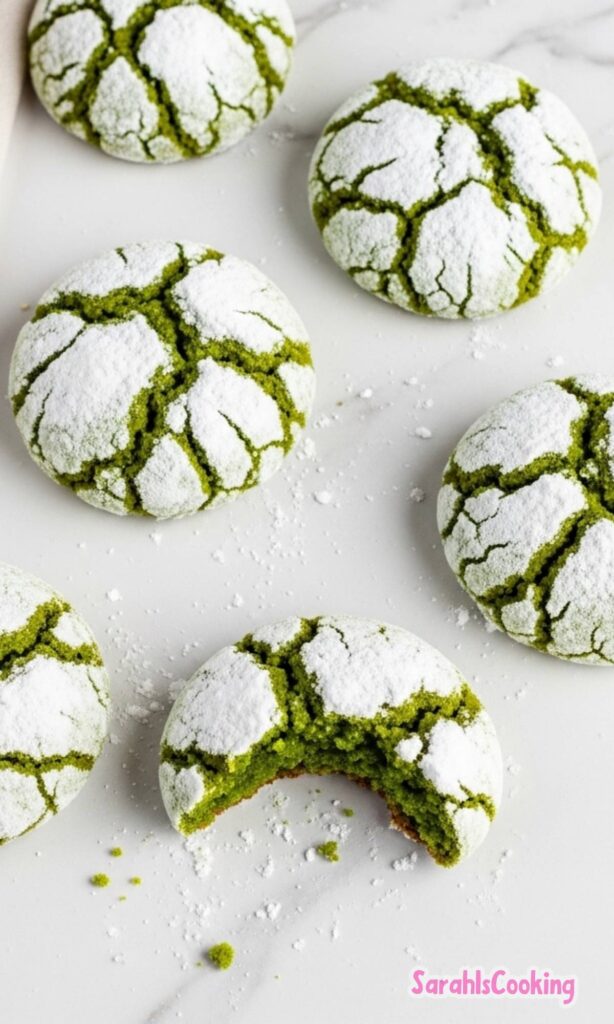
The result is a vibrant green cookie with a gentle mint profile and a delicate powdered sugar finish that stays visible instead of melting away. They are simple, but they are intentionally simple.
Who This Recipe Is For
This recipe is for home bakers who want a reliable holiday cookie without juggling complicated steps or specialty techniques. If you like clear structure and predictable results, this fits right into your kitchen rhythm.
It is beginner-friendly, but it also satisfies experienced bakers who appreciate efficiency. The dough comes together quickly, and the visual cues make it easy to know when everything is just right.
If you bake for family gatherings, classroom events, or seasonal treat boxes, these cookies deliver consistency at scale. They are especially useful when time is limited but expectations are not.
Why This Recipe Works
Using a white cake mix provides a controlled base with balanced flour, sugar, and leavening already calibrated. This creates a tender structure that stays soft without needing extensive measuring or creaming.
Melted butter adds richness while keeping the dough dense enough to hold shape during baking. Eggs supply structure and moisture so the cookies puff before settling into their signature crinkle texture.
The dual sugar coating is not decorative alone. Granulated sugar creates a barrier that draws surface moisture outward, while powdered sugar remains dry enough to form the dramatic crackled finish.
Ingredients Needed for the Recipe
White boxed cake mix - Provides the foundational structure, balanced sweetness, and leavening needed for predictable rise and tenderness.
Unsalted butter, melted - Adds fat for chewiness and flavor while controlling spread without aerating the dough.
Large eggs - Bind the dough, contribute moisture, and create the soft interior crumb.
Mint extract - Delivers the signature flavor without adding liquid that could thin the dough.
Mint green gel food coloring - Concentrated color that tints the dough evenly without affecting consistency.
Granulated sugar - First coating layer that encourages crinkle formation and protects the powdered sugar finish.
Powdered sugar - Outer coating that creates the classic snowy contrast against the green cookie.
Ingredient Insights and Function
Gel food coloring is essential because liquid coloring alters hydration and can cause excess spread. A small amount of gel delivers bold color while keeping the dough thick and stable.
Mint extract gives a rounded flavor reminiscent of classic seasonal treats, while peppermint extract produces a sharper, candy-like note. Either works, but the intensity of peppermint should be used carefully.
Butter must be melted but not hot. Overheated butter can partially cook the eggs during mixing, leading to uneven texture and a greasy dough that spreads too quickly.
Skipping the granulated sugar step is one of the most common substitutions people attempt, and it changes the outcome dramatically. Without that layer, the powdered sugar dissolves and the crinkle pattern disappears.
How to make St. Patrick's Day Mint Crinkle Cookies?
Step 1 - Preheat and Prepare
Preheat the oven to 375°F so the cookies begin baking immediately upon entering the oven. A properly heated oven ensures the rapid lift that creates the crinkled surface.
Line baking sheets if desired, but avoid overly insulated pans which can slow heat transfer. These cookies benefit from direct, even warmth.
Step 2 - Mix the Dough
In a large bowl, combine the cake mix, melted butter, eggs, mint extract, and gel coloring. Use an electric mixer until everything is fully incorporated and evenly tinted.
The dough will be thick and sticky, almost like soft modeling dough. That texture is correct and should not be loosened with additional liquid.
Step 3 - Set Up the Sugar Coating
Place granulated sugar in one shallow dish and powdered sugar in another. Keeping them separate allows each layer to perform its specific structural role.
This two-step coating is what creates defined cracks instead of a smooth, pale surface.
Step 4 - Portion the Dough
Use a cookie scoop to portion tablespoon-sized balls. Minimal handling prevents the dough from warming and becoming overly sticky.
Uniform size ensures even baking, which is especially important for maintaining soft centers.
Step 5 - Roll in Sugars
Roll each dough ball first in granulated sugar to lightly coat it. Then transfer it to the powdered sugar and roll generously until fully covered.
Do not press the coating into the dough. A loose layer allows the cookie to expand and crack naturally.
Step 6 - Arrange for Baking
Place coated dough balls on the baking sheet with space between them. They will spread slightly as they puff and settle.
Keeping them spaced promotes even airflow and prevents edges from overbaking.
Step 7 - Bake Until Puff and Crack
Bake for 9 to 11 minutes, watching for visual cues rather than relying only on time. The cookies should look puffed with visible cracks and lightly set edges.
The centers will appear soft and slightly underdone between the cracks. That is exactly what keeps them tender after cooling.
Step 8 - Cool Properly
Let the cookies rest on the baking sheet for about 5 minutes before transferring them. This allows the structure to set without drying out.
Move them to a wire rack to cool completely so steam can escape and the powdered sugar finish stays intact.
How I Tested and Refined This Recipe
I tested multiple fat ratios to find the balance between spread and chew. Too much butter created thin cookies, while too little produced a dry, cakey texture that lacked richness.
I also evaluated different coloring methods and found that liquid dyes weakened the dough structure. Gel coloring consistently preserved thickness and gave the cleanest visual result.
The sugar coating process went through several trials. Rolling only in powdered sugar caused it to melt into the surface, while adding the granulated sugar layer created the distinct crackled look.
Baking time required restraint. Early batches that were baked until they looked fully done became firm after cooling, so the final method intentionally removes them while still soft.
Common Mistakes and How to Avoid Them
Using hot melted butter, which can thin the dough and cause excess spread.
Skipping the granulated sugar layer, resulting in little to no crinkle effect.
Overmixing once combined, which can make the cookies dense instead of tender.
Baking too long, leading to dry cookies that lose their soft interior.
Adding extra liquid flavoring, which disrupts the dough's balance.
Handling the dough excessively, warming it and making it difficult to coat.
Placing cookies on a cool baking sheet, which delays lift and reduces cracking.
Make-Ahead, Storage, and Freezing Guidance
These cookies store well at room temperature in an airtight container for up to four days. Their texture remains soft, though the powdered sugar finish becomes slightly more absorbed over time.
If making ahead, you can prepare the dough and refrigerate it briefly to firm it for easier scooping. Let it sit a few minutes at room temperature before rolling.
Baked cookies freeze well for up to two months. Thaw uncovered so condensation does not dissolve the sugar coating.
For the best refresh, allow thawed cookies to sit at room temperature rather than reheating. Heat can melt the sugar layer and change the texture.
Tips
Use a cookie scoop to maintain consistent sizing and even baking.
Work quickly when rolling so the dough stays cool and manageable.
Coat generously in powdered sugar for bold contrast after baking.
Bake one test tray first to confirm timing in your specific oven.
Allow cookies to cool fully before stacking to preserve the finish.
Choose mint extract for a smoother flavor or peppermint for a sharper note.
Keep ingredients simple and resist adding extras that can alter structure.
Delightfully green, soft and chewy cake mix cookies bursting with mint and covered in blissful powdered sugar sweetness. These festive crinkle cookies are the perfect treat for celebrating St. Patrick's Day with a lucky seven-ingredient recipe that's as easy as it is delicious.
ingredients
1box white boxed cake mix (16.25 oz)
6tablespoons unsalted butter (melted)
2large eggs
1 ¼teaspoons mint extract (or peppermint extract for a Christmas twist)
2drops mint green gel food coloring (Americolor Soft Gel Paste recommended)
¼cup granulated sugar (for rolling)
⅔cup powdered sugar (for rolling)
Instructions
1
Preheat oven to 375°F (190°C). Line baking sheets with parchment paper or silicone baking mats.
2
In a large bowl using an electric mixer, mix together boxed cake mix, melted butter, eggs, mint extract, and mint green gel food coloring. Mix until fully combined. The dough will be sticky and thick, like play-dough.
Tip: Handle the dough minimally and use a cookie scoop for uniform cookies.
3
Place granulated sugar and powdered sugar in separate shallow dishes. Scoop dough into tablespoon-sized balls using a #50 disher or spoon. Roll each ball first in granulated sugar, then generously in powdered sugar to coat completely.
Tip: The granulated sugar draws out moisture to create the signature crinkle and acts as a barrier so the powdered sugar stays visible.
4
Evenly space coated dough balls on prepared baking sheets, about 2 inches apart to allow for spreading.
5
Bake for 9-11 minutes, until cookies are puffed and cracked on top, edges have begun to set, but centers still look soft and slightly underdone. Do not overbake.
6
Cool cookies on the baking sheet set on a wire rack for 5 minutes to allow them to set. Then transfer cookies directly to a wire rack to cool completely.
7
Once completely cool, enjoy your festive St. Patrick's Day Mint Crinkle Cookies! Store in an airtight container at room temperature for up to 5 days.
Nutrition Facts
Servings 30
Serving Size 1 cookie
Amount Per Serving
Calories86kcal
% Daily Value *
Total Fat3gg5%
Saturated Fat1.5gg8%
Trans Fat0gg
Cholesterol12mgmg4%
Sodium80mgmg4%
Potassium25mgmg1%
Total Carbohydrate14gg5%
Dietary Fiber0gg0%
Sugars9gg
Protein1gg2%
Calcium 15mg mg
Iron 0.3mg mg
* Percent Daily Values are based on a 2,000 calorie diet. Your daily value may be higher or lower depending on your calorie needs.
Note
Extract swap: Use peppermint extract instead of mint extract for a candy cane flavor perfect for Christmas baking.
Perfect crinkles: Always roll dough balls in granulated sugar first, then powdered sugar. This creates the signature cracked top and keeps the powdered sugar visible.
Don't overbake: Cookies will look slightly underdone in the center when ready. They continue to set as they cool on the baking sheet.
Make ahead: Dough balls can be rolled in sugars and frozen on a baking sheet, then stored in a freezer bag. Bake from frozen, adding 1-2 minutes to bake time.
Food coloring tip: Gel food coloring gives vibrant color without altering dough consistency. Liquid coloring may require more drops and can thin the dough.
Keywords:
St. Patrick's Day cookies, mint crinkle cookies, cake mix cookies, green cookies, mint cookies, easy cookie recipe, holiday desserts
Pin this recipe to share with your friends and followers.
Sarah
Food and Lifestyle Blogger
Hi, I’m Sarah, a home cook and baker who believes that good food doesn’t need to be complicated to be meaningful. This blog is where I share approachable, dependable recipes made with care — the kind of dishes you can come back to again and again.