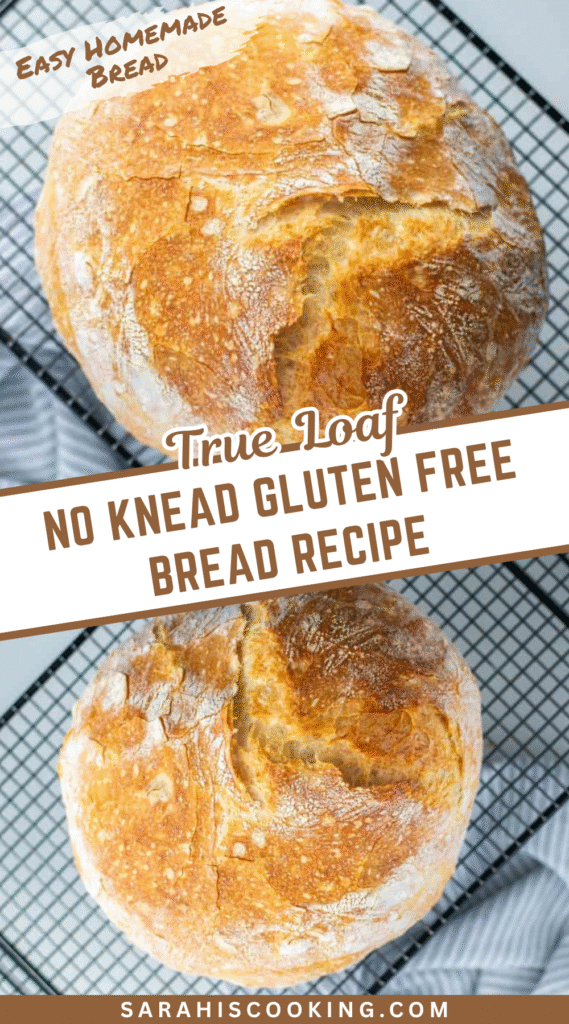
Have you ever stood in your kitchen, dreaming of the smell of fresh-baked bread but feeling completely intimidated by the process? You are so not alone. The idea of kneading, and proofing, and all that technical stuff can be enough to make anyone just close the pantry door. But what if you could have a gorgeous, rustic loaf of bread without any of that fuss?
Well, get ready to fall in love with baking all over again. This no-knead gluten-free bread is your golden ticket. It’s a simple, stir-together dough that does most of the work for you, promising a beautiful, crusty loaf that feels like a hug from the inside.
Why a Dutch Oven is Your New Best Friend
You might be wondering why this recipe calls for a specific pot. It’s not just for show, I promise. Baking your bread inside a preheated dutch oven is the secret to that incredible, bakery-style crust and soft, airy interior we all crave.
The heavy cast iron gets screaming hot and traps the steam released from the dough. This creates a mini steam oven, which is exactly what professional bakers use. It gives the bread an initial burst of rise, called oven spring, and then crisps up the outside to absolute perfection. Any good-sized dutch oven will work, but a bigger one gives your loaf a little more room to breathe and expand.
Ingredients Needed for the Recipe
Gathering your ingredients is the first, exciting step. The beauty here is in the simplicity—no obscure, hard-to-find items. Just a handful of pantry staples waiting to transform into something magical.
- 1 tsp active dry yeast
- 1 cup water, warmed to 110-120F
- 1 tsp honey (or maple syrup for a vegan option)
- 1 ½ cups gluten-free all-purpose flour, plus extra for dusting
- ½ tsp baking soda
- 1 tsp apple cider vinegar
- 2 tbsp olive oil
- 2 tsp garlic and herb seasoning
- 1 tsp salt
The Trusty Tools for the Job
Beyond the ingredients, you’ll want a few key helpers to make the process seamless. A large mixing bowl is your main stage, and a trusty rubber spatula will be your partner in mixing. Don’t forget a piece of parchment paper; it’s the safety net that prevents sticking and makes transferring the dough a total breeze.
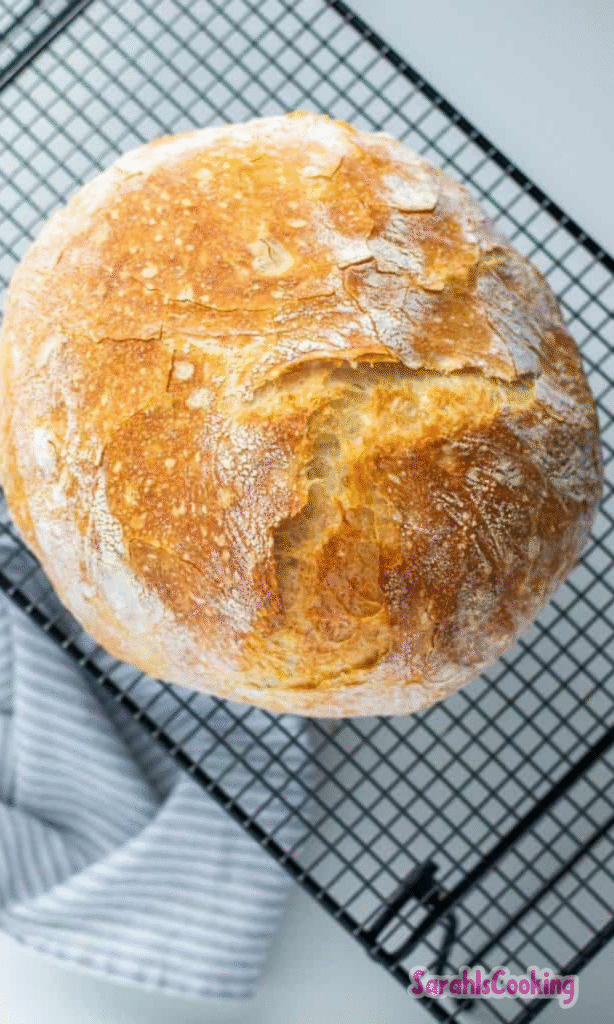
And finally, a cooling rack is non-negotiable. I know it’s tempting to slice into a warm loaf the second it comes out of the oven, but patience is a virtue here. The cooling rack allows air to circulate all around the bread, preventing a gummy, sad center and ensuring the perfect texture all the way through.
How to make No-Knead Gluten Free Bread?
Now for the main event. Don’t be fooled by the few steps—this is where the magic happens. Take a deep breath, and let’s begin.
Step 1: Wake Up the Yeast
In a large bowl, combine the yeast, warm water, and that little bit of honey. The water temperature is crucial here; too hot and you’ll kill the yeast, too cold and it won’t wake up. Think of a perfect, warm bath, around 110°F. Give it a gentle stir, cover the bowl, and walk away for 5 to 15 minutes.
When you come back, you should see a foamy, bubbly layer on top. That’s your sign that the yeast is alive, happy, and ready to give your bread life and a subtle lift. If you don’t see those bubbles, your yeast might be old, and it’s best to start fresh.
Step 2: Bring the Dough Together
Now, add all of the remaining ingredients right into that foamy yeast mixture. This includes your gluten-free flour, baking soda, apple cider vinegar, olive oil, garlic and herb seasoning, and salt. The vinegar might seem odd, but it reacts with the baking soda to give the bread an extra bit of lift and tenderness.
Using your rubber spatula, stir everything together until you have a sticky, shaggy, and fully combined dough. It won’t look like traditional bread dough, and that’s perfectly fine. Cover the bowl tightly again and let it rest in a warm spot for 45 to 60 minutes. This rest allows the flours to hydrate and the flavors to meld beautifully.
Step 3: Preheat Your Oven and Pot
While the dough is having its beauty rest, preheat your oven to a hot 450°F. This is the second critical step. As soon as the oven is heated, place your empty dutch oven, with its lid on, right inside. Let the pot preheat for a full 30 minutes. A blazing hot pot is the key to that incredible, crackling crust.
Step 4: Shape the Loaf
After the dough has rested, it’s time to shape it. Lay a large piece of parchment paper on your counter and lightly dust it with a bit of your extra gluten-free flour. Lightly flour your hands, too—this dough is sticky! Gently scoop the dough out onto the parchment.
With your floured hands, gently tuck and fold the edges of the dough underneath itself to form a tight, round ball. This creates surface tension, which helps the loaf hold its shape as it bakes. For a professional touch, use a sharp knife to score a shallow ‘X’ on top; this gives the steam a controlled place to escape, allowing the bread to expand evenly.
Step 5: The First Stage of Baking
Now, be very careful. Using oven mitts, pull the screaming hot dutch oven out of the oven and remove the lid. Carefully lower the parchment paper with your shaped dough right into the center of the pot. Put the lid back on, and quickly return it to the oven.
Bake with the lid on for 35 minutes. This trapped, steamy environment is what works its magic, giving the bread its initial impressive rise and setting its structure. Your kitchen will start to smell absolutely incredible.
Step 6: Finish for a Golden Crust
After 35 minutes, carefully remove the lid. You’ll see a pale, beautifully risen loaf. Now it’s time for the crust to develop. Continue baking, uncovered, for another 15 to 20 minutes.
Keep an eye on it; you’re looking for a deep, golden-brown color and a crisp exterior. The parchment paper might darken, but that’s normal. When it looks and smells like heaven, it’s done.
Step 7: The Most Important Step: Cooling
I know, I know. This is the hardest part. Using the parchment paper as handles, lift the bread out of the dutch oven and place the entire loaf, parchment and all, onto a cooling rack. You must, and I cannot stress this enough, let it cool completely.
This can take a full one to two hours. Cutting into a warm gluten-free loaf releases all the steam and results in a gummy, dense texture. I promise, the wait is worth it for that perfect, sliceable crumb.
Creative Flavor Twists to Make It Yours
The garlic and herb version is a classic for a reason, but your bread canvas is yours to paint. Why not try folding in a half cup of shredded sharp cheddar cheese and some chopped jalapeños for a spicy kick? Or, for a more earthy, savory loaf, stir in a tablespoon of chopped fresh rosemary and the zest of one lemon.
If you’re feeling a little adventurous, a quarter cup of chopped, sun-dried tomatoes and a handful of kalamata olives will transport you straight to the Mediterranean. The base recipe is wonderfully forgiving, so don’t be afraid to get creative and match the flavors to your meal, or simply to your mood.
Tips
A few final words of wisdom from my kitchen to yours. They’re small things, but they make a world of difference in your final, glorious loaf of bread.
- Always use a kitchen thermometer for your water. Guessing the temperature is the number one reason yeast doesn’t activate. That sweet spot of 110°F to 120°F is everything.
- Seasoning is your best friend. Gluten-free bread can sometimes lean towards the bland side, so don’t be shy with the salt and herbs. It elevates the entire experience from simple bread to something truly special.
- And finally, storage is simple. Once completely cool, store your bread in an airtight container or bag at room temperature for a day or two. For longer storage, slice it and freeze it; you can pop frozen slices straight into the toaster for a quick and delicious treat.
Is This Bread Freezer-Friendly?
Absolutely, and it’s a fantastic way to always have homemade bread on hand. Once the loaf is completely and totally cool, wrap it tightly in two layers of plastic wrap and then a layer of foil. You can freeze it whole for up to three months.
For even more convenience, slice the cooled loaf first. Place the slices in a single layer on a baking sheet to freeze for an hour, then transfer the frozen slices to a freezer bag. This way, you can pull out just one or two slices for a quick toast, anytime the craving strikes. No need to thaw, just straight from freezer to toaster.
No-Knead Gluten Free Bread Recipe
Description
This no-knead gluten-free bread is an easy and delicious option for homemade bread! This rustic loaf is flavored with garlic & herb seasoning and olive oil.
ingredients
Instructions
- Add the yeast to a large bowl and pour the warm water (110–120°F) over the yeast along with the honey. Gently stir to dissolve and let sit covered for 5–15 minutes until foamy.
- Add the remaining ingredients to the yeast mixture and stir with a rubber spatula until fully combined. Cover tightly and let sit for 45–60 minutes.
- While the dough rests, preheat oven to 450°F (232°C). Place a Dutch oven or cast iron pot (with lid) into the oven to preheat.
- Place a sheet of parchment paper on your counter and lightly flour it. Flour your hands and scoop the dough onto the parchment. Form into a tight round loaf. Lightly score a cross on top with a sharp knife.
- Carefully remove the hot Dutch oven from the oven. Remove the lid and transfer the dough (with parchment) into the pot. Cover with the lid.
- Bake covered for 35 minutes.
- Remove the lid and bake uncovered for another 15–20 minutes until the crust is golden and crisp. Watch parchment paper to avoid burning.
- Carefully transfer bread to a cooling rack. Let cool completely—ideally 1–2 hours—before slicing to prevent gumminess.
- Serve toasted or plain with your favorite toppings. Store leftovers in the refrigerator.
Nutrition Facts
Servings 6
Serving Size 1
- Amount Per Serving
- Calories 122kcal
- % Daily Value *
- Total Fat 3.8g6%
- Saturated Fat 0.5g3%
- Sodium 490mg21%
- Potassium 55mg2%
- Total Carbohydrate 19.4g7%
- Dietary Fiber 0.8g4%
- Sugars 1.5g
- Protein 2.8g6%
- Calcium 20 mg
- Iron 0.7 mg
* Percent Daily Values are based on a 2,000 calorie diet. Your daily value may be higher or lower depending on your calorie needs.
Note
- Flour substitute: Any 1:1 gluten-free all-purpose flour should work. Do not substitute with grain-free flours.
- Yeast tip: Use a thermometer—water above 120°F may kill the yeast.
- Flavor variations: Swap garlic & herb for rosemary, onion flakes, or Italian seasoning.
- Cooling is key: Gluten-free bread becomes gummy if sliced too soon—wait at least 1 hour.