There is something quietly special about baking cookies that look like you actually cared a little extra. These Heart Shaped Peanut Butter Cookies are exactly that kind of treat. They are simple, sweet, and full of that familiar peanut butter comfort that never fails.
I love recipes that feel doable on a regular day, not just on holidays. This one fits perfectly into that space. You get adorable heart-shaped cookies without needing fancy tools or a long prep session.
They come together fast, bake even faster, and somehow disappear almost immediately. I have made them with kids, without kids, and once just for myself. Every single time, the tray is empty before I expect it.
The heart shape makes them perfect for Valentine’s Day, birthdays, or even a random Tuesday that needs a little softness. The peanut butter flavor keeps them grounded and familiar. Cute and comforting is a strong combo.
What I appreciate most is how forgiving this recipe is. The shapes do not need to be perfect, and honestly, that makes them even better. Slightly uneven hearts feel homemade in the best way.
Why these cookies always work
Peanut butter cookies already have a loyal fan base. Add a heart shape and you instantly make them feel intentional and thoughtful. They look like effort, even though they are incredibly easy.
The dough is soft but manageable, which makes shaping stress-free. You do not fight with it or wonder if you messed something up. It behaves, and that alone makes baking more enjoyable.
They also bake quickly, which is dangerous in the best way. You barely finish cleaning the counter before they are ready to come out. Warm cookies this fast feel like a small gift.
Ingredients Needed for the Recipe
- 1 cup creamy peanut butter - this gives the cookies their rich flavor and soft texture.
- 1 large egg - helps bind everything together and adds structure.
- 3/4 teaspoon baking soda - allows the cookies to rise just enough.
- 1/2 teaspoon salt - balances the sweetness and enhances the peanut butter.
- 1 1/2 cups all purpose flour - forms the base of the dough.
- 1/2 cup unsalted butter, room temperature - adds richness and keeps the cookies tender.
- 2 teaspoons vanilla extract - rounds out the flavor with warmth.
- 1/2 cup brown sugar - brings moisture and a subtle caramel note.
- 1/2 cup granulated sugar - adds sweetness and helps with crisp edges.
Before you start baking
It helps to gather everything before turning on the oven. This recipe moves quickly once you begin mixing. Having ingredients ready keeps things relaxed and fun.
Room temperature butter is important here. Cold butter makes mixing harder and affects texture. Let it sit out for a bit, and you will thank yourself later.
Lining your baking sheets with parchment paper saves cleanup time. That matters, especially if kids are helping and flour somehow ends up everywhere.
How to make Heart Shaped Peanut Butter Cookies?
Step 1 - Prepare the oven and dry ingredients
Start by preheating your oven to 350 degrees Fahrenheit. Line two baking sheets with parchment paper and set them aside. This keeps things moving once the dough is ready.
In a medium bowl, whisk together the flour, baking soda, and salt. Mixing these first helps distribute everything evenly. Set the bowl aside for now.
Step 2 - Cream the butter and sugars
In a separate bowl, cream the unsalted butter with the brown sugar and granulated sugar. Mix until the texture looks smooth and slightly fluffy. This step builds the base of the cookie.
Take your time here, but do not overdo it. Smooth and combined is the goal. You want it soft, not airy.
Step 3 - Add wet ingredients
Add the egg, creamy peanut butter, and vanilla extract to the sugar mixture. Mix until everything comes together into a cohesive, creamy blend. The peanut butter smell alone is worth the effort.
Scrape down the sides of the bowl to make sure nothing gets left behind. Even mixing makes better cookies.
Step 4 - Combine wet and dry mixtures
Gradually add the dry ingredients to the wet mixture. Start by folding with a spatula to avoid flour clouds. Then switch to a mixer to fully combine.
Mix until there are no dry spots left. The dough should be soft and slightly thick. Scrape the sides and form one unified dough.
Step 5 - Shape the dough balls
Use a tablespoon cookie scoop to portion the dough. Roll each portion between your palms to form smooth balls. Place them on the prepared baking sheets, about two inches apart.
This spacing allows room for shaping and baking. Do not crowd them, even if you are tempted.
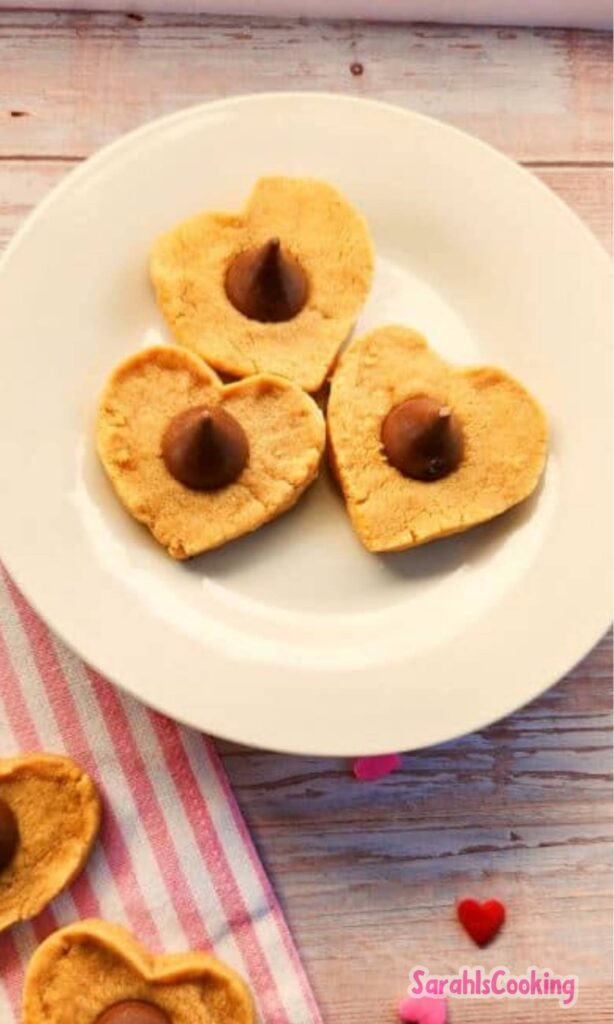
Step 6 - Form the heart shapes
Cover each dough ball with a small piece of plastic wrap. Gently flatten it with the bottom of a measuring cup. You want it slightly flat, not thin.
Remove the plastic wrap and use a butter knife or spatula to cut a small V shape at the top center. Push outward gently to create the heart curve.
Use your fingers to adjust the bottom point of the heart. It does not need to be perfect. Handmade is part of the charm.
Step 7 - Add the classic criss-cross
Using a fork, gently press a criss-cross pattern on top of each cookie. This adds texture and that familiar peanut butter cookie look. Press lightly so the shape stays intact.
If the edges shift a bit, just nudge them back. The dough is forgiving.
Step 8 - Bake and cool
Bake the cookies for 8 to 10 minutes. They bake quickly, so keep an eye on them. The edges should look set but not dark.
Remove from the oven and let them cool on the baking sheet for five minutes. Transfer to a wire rack to cool completely, or enjoy them warm.
Shaping cookies without stress
Shaping hearts without a cookie cutter sounds intimidating, but it really is not. The key is not rushing. Gentle movements make a big difference.
If some hearts look a little uneven, that is fine. They still read as hearts, and they still taste amazing. Perfection is not the goal here.
Tips
- Use room temperature butter for easier mixing and better texture.
- Do not overbake, as these cookies firm up while cooling.
- Make the V shape wide so it stays defined after baking.
- Use parchment paper to prevent sticking and uneven browning.
- Enjoy with a cold glass of milk for the best experience.
Fun variations to try
Once you master the base recipe, it becomes a great starting point for small twists. A drizzle of melted chocolate over cooled cookies adds a festive touch.
You can also press a few mini chocolate chips into the dough before baking. It adds texture without overpowering the peanut butter flavor.
For extra flair, lightly sprinkle sugar on top before baking. It gives a subtle crunch and a soft sparkle.
Making these with kids
This recipe is one I often make with my kids. It is simple enough for them to help without constant supervision. Shaping the hearts becomes their favorite part.
The mess is real, but the memories are worth it. Flour on the counter and laughter in the kitchen feels like a fair trade.
Letting kids help also takes the pressure off perfection. When the shapes are uneven, it just feels more personal.
How to store and share
Once cooled, these cookies store well in an airtight container. They stay soft for several days at room temperature. That said, they rarely last that long.
They also make sweet little gifts. Stack a few in a clear bag, tie with ribbon, and you have something thoughtful without much effort.
I have shared them with neighbors, teachers, and friends. They always get smiles, and that never gets old.
Heart Shaped Peanut Butter Cookies have a way of making moments feel warmer. They are simple, homemade, and full of care. Sometimes, that is exactly what a dessert should be.