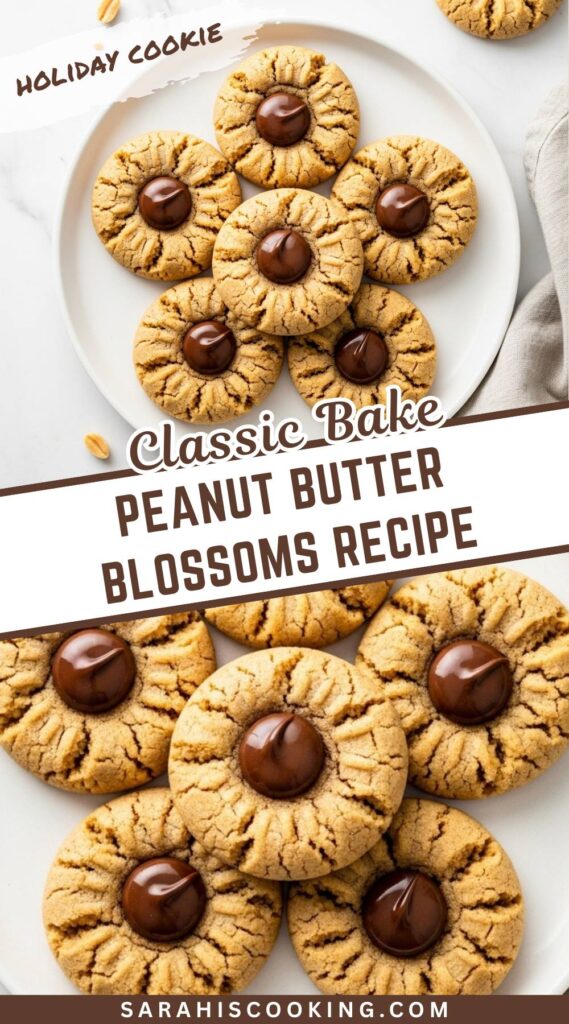
There’s a certain magic in the contrast of a soft, chewy peanut butter cookie topped with a smooth milk chocolate kiss.
It’s a familiar kind of magic, the kind that shows up every holiday season and somehow still feels special every single time.
For me, peanut butter blossoms are non-negotiable on a cookie plate. They’re simple, recognizable, and quietly irresistible.
I’ve baked this recipe year after year. It’s dependable, balanced, and designed to give you that classic texture—tender centers, lightly crisp edges, and chocolate that melts just enough to set beautifully on top.
A Recipe Steeped in Sweet History
Peanut butter blossoms have been around longer than most of us realize.
They first appeared in a national baking contest in the 1950s, and from there, they found their way into community cookbooks, family recipe boxes, and holiday traditions across the country.
What I love most about that history is how little the recipe needs to change.
When something works this well, it earns its place. This cookie has survived decades because it delivers comfort, familiarity, and flavor without trying too hard.
Why This Recipe Feels Special
This is the recipe I learned from my grandmother, written in the margins of an old cookbook with notes about bake times and dough texture.
Over the years, I’ve made small adjustments based on experience—how long to cream the butter, when chilling helps, and exactly how soft the cookies should look when they come out of the oven.
It’s the recipe I use when I want guaranteed results. The kind that makes people reach for seconds without thinking and ask if they can take a few home.
Ingredients Needed for the Recipe
Before you start, let everything come to room temperature. That one step makes mixing smoother and prevents uneven texture later.
Unsalted Butter (softened): Butter provides richness and structure. Softened butter creams properly with sugar, which is essential for a tender crumb. If it’s too cold, the dough won’t emulsify evenly.
Brown Sugar & Granulated Sugar: Brown sugar brings moisture and a subtle molasses depth. Granulated sugar helps the cookies spread just enough and creates that familiar sweetness on the outside when rolled.
Creamy Peanut Butter: This is the backbone of the cookie. A standard, shelf-stable peanut butter gives consistent results and the right balance of fat and sweetness.
Egg & Milk: The egg binds everything together, while a small amount of milk keeps the dough soft and prevents dryness. Together, they help the cookies bake up tender instead of crumbly.
Vanilla Extract: Vanilla rounds out the peanut butter and sugar, adding warmth without competing for attention.
All-Purpose Flour, Baking Soda, & Salt: Flour provides structure, baking soda gives lift and gentle spread, and salt balances the sweetness. Skipping salt here noticeably dulls the flavor.
Extra Granulated Sugar: Rolling the dough in sugar adds texture and helps the cookies form that classic crackled surface as they bake.
Hershey’s Kisses: Milk chocolate kisses are traditional for a reason. Their mild sweetness pairs perfectly with the salty peanut butter base.
Selecting Your Peanut Butter
This step matters more than most people expect.
Stick with a classic creamy peanut butter that doesn’t separate. Natural peanut butters lack stabilizers, which often leads to dry dough and cookies that crumble instead of staying soft.
If your peanut butter needs stirring, it’s better saved for toast than baking.
How to make Easy Peanut Butter Blossoms?
The process is simple, but timing and mixing technique are what make these cookies consistent.
Step 1 – Cream the Butter and Sugars
Beat the softened butter with the brown and granulated sugars for a full four minutes.
This isn’t just blending—it dissolves the sugar and incorporates air. The mixture should look pale, fluffy, and smooth. When this step is rushed, the cookies bake up dense and slightly gritty.
Step 2 – Add the Wet Ingredients
Add the peanut butter, egg, milk, and vanilla.
Beat until fully combined, scraping down the bowl as needed. The dough should look cohesive and silky. At this stage, I check the texture—it should be thick but soft, not stiff.
Step 3 – Incorporate the Dry Ingredients
Whisk the flour, baking soda, and salt together before adding them to the bowl.
Mix on low speed just until the flour disappears. Overmixing develops gluten, which makes cookies tough instead of tender. Stop early rather than late.
Step 4 – Chill the Dough (A Helpful Pause)
Chilling the dough for 30 minutes makes it easier to handle and improves structure.
This step helps prevent excessive spreading and gives the cookies a slightly thicker center. I rarely skip it unless I’m short on time.
Step 5 – Shape, Coat, and Bake
Preheat the oven to 375°F.
Roll the dough into 1-inch balls, then roll generously in granulated sugar. Space them a few inches apart on a parchment-lined baking sheet.
Bake for 8 to 10 minutes, until the edges are set but the centers still look soft.
Step 6 – The Grand Finale
Have your Hershey’s Kisses unwrapped and ready.
As soon as the cookies come out of the oven, gently press a kiss into the center of each one. The cookie will crack slightly around the edges—that’s exactly what you want.
The residual heat melts the base of the chocolate just enough to anchor it without losing its shape.
Freezing for Future Cravings
These cookies are excellent for make-ahead baking.
Baked cookies freeze well for up to three months. Thaw at room temperature before serving.
You can also freeze unbaked dough balls. When ready to bake, roll in sugar and bake straight from frozen, adding one to two minutes to the bake time.
Tips
A few small details can elevate your results.
Measure flour correctly by spooning it into the cup and leveling it off. Too much flour makes the dough dry.
Watch the bake time closely. The cookies should look slightly underdone in the center when removed—they firm up as they cool.
Press the kiss gently but confidently. Too much pressure flattens the cookie, while too little won’t anchor the chocolate.
Serving and Storing Your Creations
Let the cookies cool completely on the baking sheet so the chocolate can set properly.
Store in an airtight container at room temperature for up to four days. They pair perfectly with milk, coffee, or tucked onto a holiday cookie tray.
The Joy of a Baking Tradition
Peanut butter blossoms aren’t flashy, but they don’t need to be.
They’re familiar, comforting, and dependable—the kind of cookie that connects generations and shows up exactly when you want it to.
With the right technique and a little care, they’ll turn out beautifully every time. Happy baking.
This popular soft and chewy peanut butter cookie with a Hershey’s chocolate kiss in the center is the classic Christmas cookie. This recipe has been in my family for over 60 years and is the best peanut butter blossom recipe. What’s a holiday cookie plate without these nostalgic gems? These classic Peanut Butter Blossoms are a soft and chewy peanut butter cookie, coated in sugar, and crowned with a milk chocolate Hershey’s Kiss—making them utterly irresistible for chocolate-peanut butter fans.
ingredients
1/2cup Unsalted Butter (softened)
1/2cup Brown Sugar
1/2cup Sugar (plus extra for rolling)
1/2cup Creamy Peanut Butter (like Jif or Skippy; not natural)
1large Egg
1teaspoon Vanilla Extract
1Tablespoon Milk
1 3/4cups All-Purpose Flour
1teaspoon Baking Soda
1/4 to 1/2teaspoon Salt (use 1/4 tsp if using salted peanut butter)
In a large mixing bowl, cream together softened butter, brown sugar, and 1/2 cup sugar for 4 minutes or until light and fluffy.
2
Add creamy peanut butter, egg, vanilla, and milk. Beat for 2 more minutes, scraping the bowl as needed.
3
Stir in flour, baking soda, and salt until just combined. Do not overmix. For best results, chill dough for 30 minutes (optional but recommended).
4
Preheat oven to 375°F (190°C). Line baking sheets with parchment paper.
5
Roll dough into 1-inch balls and roll each in sugar to coat. Place 2 inches apart on baking sheets.
6
Bake for 8–10 minutes, or until edges are lightly golden but centers are still soft.
7
Immediately after removing from the oven, gently press a Hershey’s Kiss into the center of each cookie. The warmth will slightly melt the chocolate, securing it in place.
8
Let cookies cool on the baking sheet for 5 minutes before transferring to a wire rack to cool completely.
Nutrition Facts
Servings 36
Serving Size 1 cookie
Amount Per Serving
Calories120kcal
% Daily Value *
Total Fat6gg10%
Saturated Fat2.5gg13%
Trans Fat0gg
Cholesterol10mgmg4%
Sodium85mgmg4%
Potassium70mgmg2%
Total Carbohydrate15gg5%
Dietary Fiber0.5gg2%
Sugars10gg
Protein2gg4%
Calcium 15 mg
Iron 0.7 mg
* Percent Daily Values are based on a 2,000 calorie diet. Your daily value may be higher or lower depending on your calorie needs.
Note
Make ahead tip: Cookie dough can be chilled up to 48 hours before baking.
Freezing: Fully baked cookies freeze well for up to 3 months in an airtight container. Dough balls can also be frozen before baking—just roll in sugar after thawing.
Natural peanut butter warning: Avoid natural or oily peanut butters—they cause dry, crumbly cookies.
Don’t overbake! These cookies are meant to be soft and chewy. Slightly underbaked is better than overdone.
Keywords:
peanut butter blossoms, christmas cookies, hersheys kiss cookies, peanut butter chocolate cookies, classic holiday cookies
Pin this recipe to share with your friends and followers.
Sarah
Food and Lifestyle Blogger
Hi, I’m Sarah, a home cook and baker who believes that good food doesn’t need to be complicated to be meaningful. This blog is where I share approachable, dependable recipes made with care — the kind of dishes you can come back to again and again.