There’s something undeniably comforting about a classic peanut butter cookie. The smell of sweet peanut butter filling the kitchen, the satisfying crisscross fork marks on top, and that perfect balance of soft and chewy—this recipe has been a cherished favorite for generations.
Originally popularized in Betty Crocker cookbooks, it’s a recipe that has stood the test of time, and after countless tests in my kitchen, I can confidently say these cookies deliver exactly what you hope for in a peanut butter treat.
Whether you’re baking for a special occasion or just because, these cookies hit all the right notes. The recipe is forgiving yet precise enough to consistently yield soft, flavorful cookies. Let’s dive into what makes this classic so irresistible, step by step.
Ingredients Needed for the Recipe
- Peanut Butter: Provides the rich, nutty flavor and signature texture. Creamy gives a smooth taste, while crunchy adds delightful bits of peanut.
- Butter and Shortening: Both are essential for the ideal texture. Butter adds richness and flavor, shortening prevents excess spreading.
- Granulated Sugar: Adds sweetness and contributes to tender edges.
- Brown Sugar: Brings a subtle molasses note and chewiness to the cookies.
- Large Egg: Binds ingredients together and adds moisture.
- All-Purpose Flour: Forms the structure of the cookies, keeping them soft yet sturdy.
- Baking Soda and Baking Powder: Help the cookies rise and achieve the perfect soft texture.
- Salt: Enhances the peanut flavor and balances sweetness.
Choosing the Right Peanut Butter
Creamy vs. Crunchy
Picking your peanut butter is more than a personal preference—it affects texture and flavor. Creamy peanut butter creates a smoother, more uniform cookie, while crunchy adds little bursts of nutty crunch in every bite. For most classic bakers, creamy is the traditional choice, but I personally enjoy the occasional textural contrast from crunchy.
Natural vs. Processed
If you opt for natural peanut butter, make sure it’s fully blended, as separated oil can change the dough consistency. A fully mixed, high-quality peanut butter ensures the cookies spread evenly and maintain their signature crisscross pattern.
Tips for Measuring Peanut Butter
Spoon your peanut butter into your measuring cup and level it off rather than packing it down. Overly packed peanut butter can result in denser cookies that don’t spread properly. This little step makes a noticeable difference in the final texture.
How to make Classic Peanut Butter Cookies?
Step 1 - Beat the Wet Ingredients
In a large mixing bowl, combine your sugars, peanut butter, butter, shortening, and egg. Beat until smooth, with no streaks of butter or peanut butter visible. This step is crucial for achieving that tender, chewy texture everyone loves. Take your time here; a few extra seconds of mixing won’t hurt.
Step 2 - Stir in the Dry Ingredients
In a separate bowl, whisk together the flour, baking soda, baking powder, and salt. Gradually fold these dry ingredients into your wet mixture. Be gentle—overmixing can make the cookies tough. Stop as soon as the dough comes together; it should be soft but not sticky.
Step 3 - Chill the Dough
Cover the dough with plastic wrap and refrigerate for at least 30 minutes. Chilling firm up the dough, making it easier to shape and preventing the cookies from spreading too much during baking. I usually prepare the dough in the morning if I plan to bake in the evening—this extra time improves the flavor as well.
Step 4 - Shape and Create the Signature Fork Marks
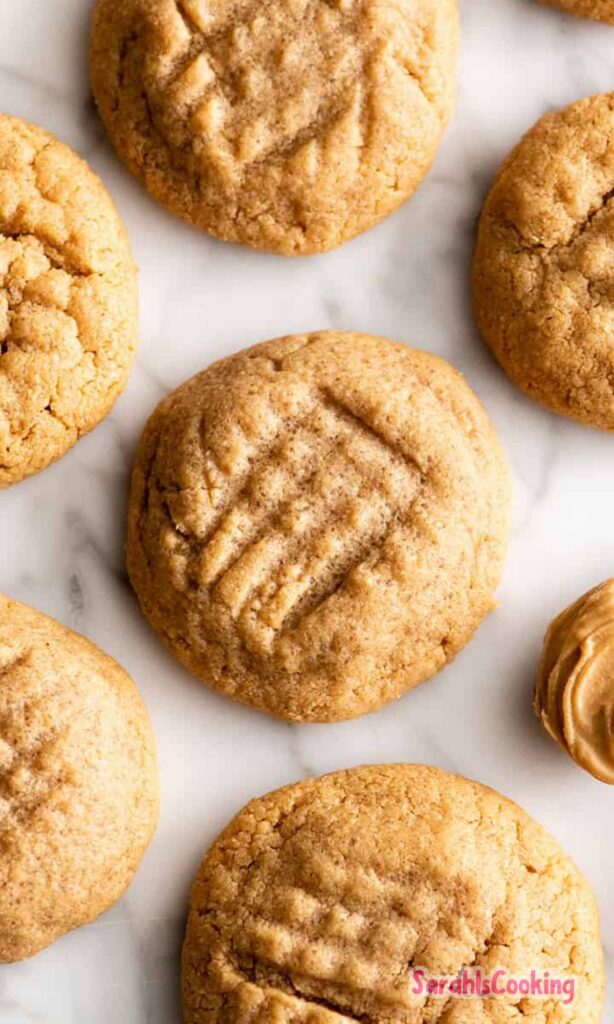
Using a cookie scoop or tablespoon, portion out dough balls and roll them between your palms to smooth. Dip a fork in sugar and press each cookie down in a crisscross pattern. This classic touch isn’t just for looks—it helps the cookies bake evenly and gives them that nostalgic charm.
Step 5 - Bake and Cool
Preheat your oven to 375°F (190°C) and bake the cookies on a shiny metal sheet for 10-12 minutes or until lightly golden. Allow them to cool on the baking sheet for 5 minutes to set before transferring to a wire rack. This brief resting period keeps them from breaking apart and maintains their chewy texture.
Serving and Presentation Ideas
Simple Yet Inviting
Classic peanut butter cookies are perfect served on a plain plate, allowing their golden color and crisscross pattern to shine. I often sprinkle a tiny pinch of flaky salt on top right out of the oven—it elevates the flavor and adds a delicate touch.
Gift-Worthy Presentation
For gifting, stack cookies in small tins lined with parchment paper, alternating layers with wax paper. Tie with a simple ribbon for a homemade feel. These cookies also pair beautifully with a glass of milk or a cup of coffee for a comforting afternoon treat.
Creative Serving Options
For a playful twist, sandwich two cookies with a thin layer of chocolate ganache or homemade peanut butter frosting. It transforms a classic into a showstopper without losing its nostalgic appeal.
Tips
- Chill your dough: It helps cookies hold their shape and maintain the iconic fork marks.
- Use a cookie scoop: This ensures uniform cookies that bake evenly.
- Don’t overmix the dough: Overmixing toughens cookies; stop when dry ingredients are just combined.
- Experiment with peanut butter types: Try crunchy for texture or natural for a richer flavor.
- Watch the baking time: Cookies can go from golden to overdone quickly; remove them while edges are lightly brown for a soft center.
- Store properly: Airtight containers at room temperature keep cookies fresh for up to 5 days, or freeze for longer storage.
- Add a sprinkle of sea salt on top before baking: Enhances flavor and balances sweetness beautifully.
- Customize toppings: Chocolate drizzle, peanut butter chips, or cinnamon can give each batch a fun variation without altering the core recipe.
These classic peanut butter cookies are more than just a recipe—they’re a piece of culinary history. Their simplicity, flavor, and comforting texture have kept them beloved for decades. Following these steps and tips, you’ll enjoy cookies that are soft, chewy, and irresistibly peanutty every single time. Sarah swears by them, and once you bake a batch yourself, you’ll see why this timeless recipe continues to bring joy to kitchens everywhere.