There’s flour on my sleeve and I’m not fixing it
I had one hand in the dough and the other trying to push a stubborn drawer closed with my hip. Oven already preheating, way too early honestly, because I always jump that step. The butter was softer than I wanted. Not melted, but not that clean, sharp-cornered cold either. I stared at it for a second like maybe glaring would firm it back up.
Didn’t work.
So I kept going anyway. That’s kind of how these rhubarb scones started – slightly off, slightly rushed, but somehow still worth it. There’s something about rhubarb that makes me less strict. Maybe because it’s already unpredictable. Some pieces are super tart, some mellow out, some turn that weird greenish blush that looks questionable but tastes fine.
Also I had chopped too much of it. That happens a lot. I see a pile and think, yeah that’ll shrink down. It doesn’t. It never does.
Ingredients I Used for the Recipe
- 1 cup chopped rhubarb – small pieces, about 1/2 inch, I went uneven though
- 1/2 cup granulated sugar – for sweetness, but also for that slight crust on top
- 2 1/4 cups all-purpose flour – the base, nothing fancy here
- 1 tbsp baking powder – makes them puff, don’t skip or they go flat and sad
- 1/2 tsp salt – balances the sweetness, I added a tiny extra pinch
- 1 tsp vanilla extract – soft background flavor, not overpowering
- 8 tbsp unsalted butter – cold, cut into chunks, mine was borderline too soft
- 1/2 cup buttermilk – plus a splash more because my dough was dry
How to make Rhubarb Scones?
Step 1 – Preheat and pretend you’re organized
I set the oven to 375°F and lined a baking sheet. The lining part matters more than I like to admit. I skipped it once and spent ten minutes scraping stuck bottoms off. Not repeating that.
Step 2 – Mix the dry stuff
Flour, sugar, baking powder, salt. I tossed everything into a bowl and stirred it with a fork because the whisk was in the dishwasher and I didn’t feel like digging. It worked fine. Maybe slightly lumpier, but nothing dramatic.
Step 3 – Butter situation
Added the butter chunks and started working them in with my fingers. This is where I noticed they were too soft. Instead of neat crumbs, I got more of a smear situation. Not ideal. I paused, stuck the bowl in the fridge for five minutes, came back, and tried again. Better. Still messy, but closer to that coarse crumb look.
If you have a pastry cutter, use it. If not, fingers are fine. Just move fast so the butter doesn’t fully melt into the flour.
Step 4 – Bring it together
Poured in the buttermilk and vanilla. Stirred with a spoon until it started clumping. It looked dry at first, so I added a small splash more buttermilk. Not measured. Just a guess. The dough should feel shaggy, not smooth. If it looks perfect, something’s off.
Step 5 – Fold in the rhubarb
Dumped in the rhubarb pieces and gently folded them through. Some juice started bleeding into the dough, giving it those streaks of pink. I always like that part. It makes the whole thing look more interesting than plain beige dough.
Step 6 – Shape without overthinking
Turned the dough onto a floured surface. It was crumbly, like it didn’t want to cooperate. I pressed it together with my hands, folded it once, maybe twice. Not a full knead. Just enough so it holds.
Flattened it into a rough rectangle. Not even. Edges were messy. I used a biscuit cutter for a few, then got lazy and cut squares with a knife. Both bake the same, honestly.
Step 7 – Bake and hover nearby
Placed them on the tray with a bit of space. Sprinkled a little sugar on top because I like that slight crunch. Into the oven for about 20 minutes.
I checked at 15. They were pale. Checked again at 18. Still pale but starting to smell right. Pulled them at 20 when the edges barely turned golden. If you wait for deep color, they dry out.
Somewhere between breakfast and snack
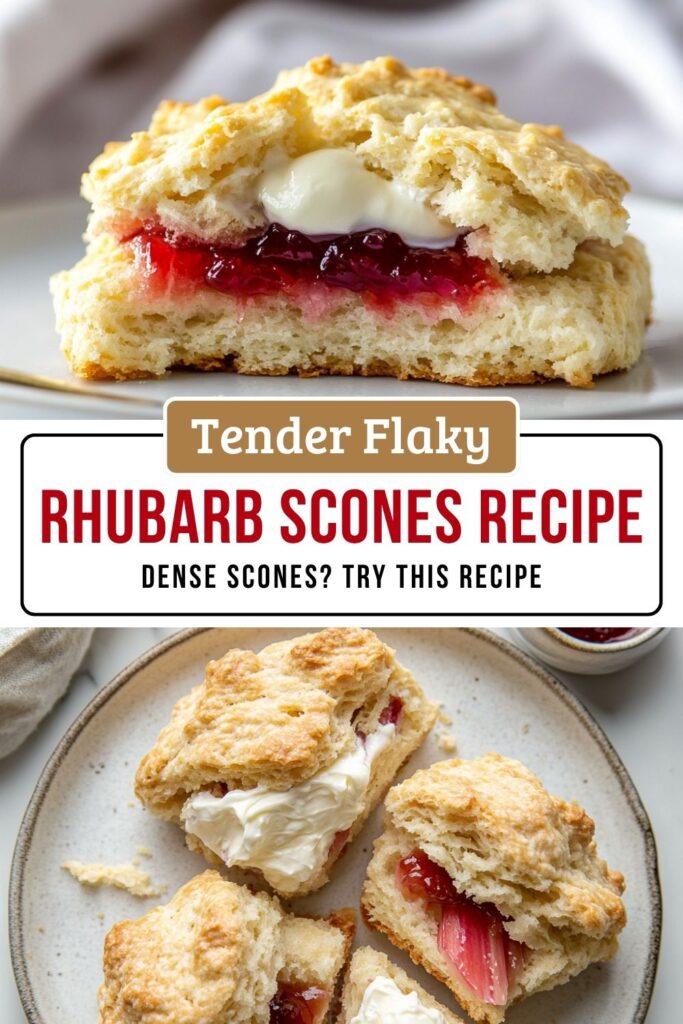
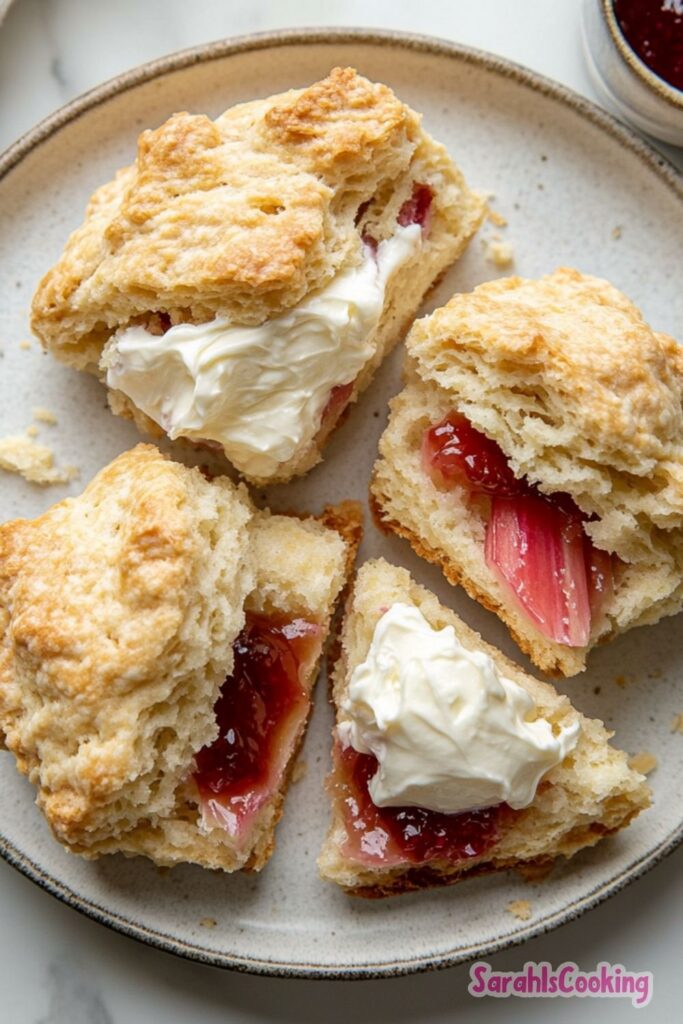
I ate one too early. Burned my fingers a little, then broke it open anyway. Steam came out, and the rhubarb was soft but still holding shape. That sweet-tart thing hit right away. Not sugary sweet. More balanced. I like that better.
Tried one plain first. Then added butter to another. Then, because I had it, a little cream on top. That one won. No contest. The cream softened everything and made it feel like something you’d get at a bakery that charges too much but you still pay.
They’re not dramatic scones. No glaze dripping everywhere. No chocolate chunks. Just simple, slightly crumbly, with those pockets of tangy fruit.
Tips
- Keep the butter cold. If it gets too soft, chill the dough for a few minutes before shaping.
- Don’t overmix once the liquid goes in. It should look messy, not smooth.
- Rhubarb can be frozen and used straight from the freezer. I’ve done it, works fine.
- If your dough feels too dry, add buttermilk a tablespoon at a time. Don’t dump.
- Cut them however you want. Circles look nice, squares are faster.
- Pull them out when just lightly golden. Overbaking ruins the texture.
A small thing I didn’t expect
I thought I’d want to add something extra next time. Maybe almond extract instead of vanilla. Maybe a glaze. But after finishing one, then another, I realized they don’t really need help.
They sit in that quiet middle space. Not flashy, not boring. Just solid. The kind of thing you make when you want something homemade but don’t want a whole production.
Also worth saying – if you have extra rhubarb, freeze it. I didn’t used to bother. Now I do. Chop it, freeze it flat, throw it into a bag later. Future you will be grateful when you randomly decide to make scones and don’t want to go out.
My tray cooled on the counter while I cleaned up. Or half-cleaned. There’s still flour on the floor. I’ll deal with it later.
Probably.
Rhubarb Scones Recipe
Description
These pretty rhubarb scones are loaded with little bits of juicy rhubarb, making them a perfect breakfast or afternoon tea-time treat. The subtle pink and green hues of the rhubarb poke through the buttery dough, lending a lovely sweet-tart flavor that brightens every bite. Be sure to freeze some rhubarb when it’s in season so you can enjoy these scones year-round!
Ingredients
Instructions
Prep and Mix Dry Ingredients
Preheat oven to 375°F (190°C). Line a baking sheet with parchment paper. In the bowl of a food processor, combine sugar, flour, baking powder, and salt. Pulse briefly to combine.Cut in Butter
Add the cold butter pieces to the food processor. Pulse about 20-25 times until the mixture resembles coarse crumbs.Form the Dough
Transfer the mixture to a large mixing bowl. Add the buttermilk (or half and half) and vanilla extract. Mix gently with a large spoon until the dough just comes together; it will look crumbly. If it seems very dry, drizzle in a little more liquid. Gently fold in the chopped rhubarb.Shape and Cut
Turn the mixture onto a lightly floured surface. Knead a few times with floured hands until the dough forms one cohesive piece without too much loose flour. Pat it out into a rectangular shape about 1-inch thick. Use a 3-inch biscuit cutter to cut out scones, or cut into squares with a knife.Bake
Arrange the scones 2 inches apart on the prepared baking sheet. Bake for about 20 minutes, or until just starting to turn golden on top. Do not overbake to keep them tender.Serve
Serve warm, optionally dusted with sugar or served with clotted cream or jam.
Nutrition Facts
Servings 8
Serving Size 1 scone
- Amount Per Serving
- Calories 210kcal
- % Daily Value *
- Total Fat 8g13%
- Saturated Fat 5g25%
- Cholesterol 20mg7%
- Sodium 240mg10%
- Potassium 150mg5%
- Total Carbohydrate 32g11%
- Dietary Fiber 1g4%
- Sugars 13g
- Protein 3g6%
* Percent Daily Values are based on a 2,000 calorie diet. Your daily value may be higher or lower depending on your calorie needs.
Note
Freezing Rhubarb: Wash and dry stalks, slice into 1/2 inch pieces. Lay in a single layer on a lined baking sheet and freeze for an hour until hard. Transfer to heavy-duty zip-lock freezer bags, removing excess air. They will last 6 months to a year. Use straight from frozen in recipes.