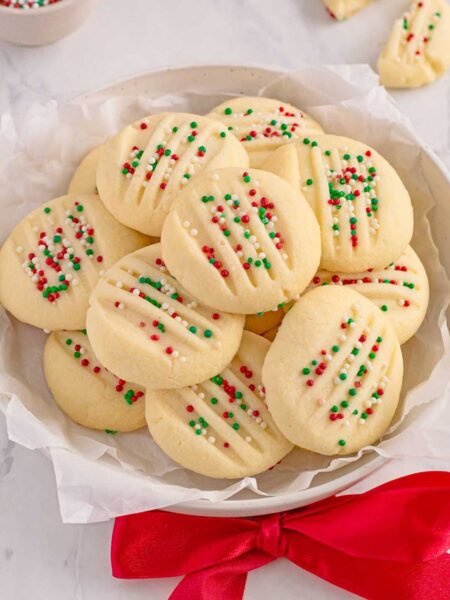
There is a specific kind of cookie that earns a permanent spot on the holiday baking list. It is not the most complicated or the most decorated, but it is the one people reach for first. These Peppermint Snowball Cookies are that cookie.
This version takes the classic buttery snowball and adds a layer of white chocolate and crushed candy canes. The base is tender and rich, while the topping brings a cool mint crunch. After multiple rounds of testing, this method produces a cookie that holds its shape, melts on the tongue, and looks like it belongs on a dessert table.
Whether you are baking for a cookie swap or a family gathering, this recipe delivers consistent results. The steps are straightforward, and the ingredients are standard. What matters is the order of operations and the attention to a few key details.
Who This Recipe Is For
This recipe is for anyone who wants a holiday cookie that feels special without requiring hours of decorating. If you have made basic drop cookies before and are ready for something with a bit more presence, this is a good next step.
It also suits bakers who appreciate a recipe that can be broken into stages. The dough chills for an hour, which means you can mix it ahead and bake later. The finishing step with chocolate and candy canes is simple enough to include children or to do while listening to a podcast.
If you are the type of baker who likes to understand why a recipe works rather than just following instructions, you will find the explanations here useful. This is not a fussy project, but it rewards attention to detail.
Why This Recipe Works
The structure of these cookies relies on a balance of fat, sugar, and flour that is common in shortbread-style recipes. The butter provides richness and tenderness, while the powdered sugar contributes to a fine, meltaway crumb. Using powdered sugar instead of granulated sugar is intentional. It dissolves more easily and leaves no graininess behind.
The egg acts as a binder, but the amount is modest. Too much liquid would make the cookies cakey instead of dense and buttery. The flour quantity is high enough to create a dough that can be rolled into balls without spreading too much in the oven.
Peppermint extract is the primary flavor, but vanilla is included to round it out. Pure peppermint alone can taste sharp or one-dimensional. The vanilla softens the edges and adds depth.
The white chocolate coating serves two purposes. It adds sweetness and richness, and it creates a surface for the crushed candy canes to stick. Without the chocolate, the candy would simply fall off. The candy canes themselves provide texture and a burst of mint that contrasts with the soft cookie.
Ingredients Needed for the Recipe
- Butter: Provides richness and structure. Must be softened to cream properly with the sugar. Cold butter will not incorporate evenly.
- Powdered sugar: Adds sweetness and creates a tender crumb. Its fine texture helps the dough stay smooth.
- Egg: Binds the ingredients together. A single egg is enough to hold the dough without making it wet.
- Peppermint extract: The main flavor. Use a pure extract rather than imitation oil for a cleaner taste.
- Vanilla extract: Rounds out the peppermint and prevents it from tasting artificial or harsh.
- Salt: Balances the sweetness and strengthens the gluten structure just enough to prevent spreading.
- Flour: Provides the bulk of the structure. All-purpose flour works best here. Bread flour would make the cookies tough.
- White chocolate bark or Candiquik: Melts smoothly and sets firmly. Chocolate chips contain stabilizers that prevent proper melting for dipping.
- Candy canes: Provide crunch and mint flavor. Crush them into small chunks, not powder, so they add texture.
Ingredient Insights and Function
Butter temperature matters more than most recipes admit. If the butter is too cold, it will not cream properly, and the dough will be uneven. If it is too soft or melted, the cookies will spread into flat disks. Softened butter should hold a slight indent when pressed but still feel cool to the touch.
Powdered sugar contains cornstarch, which helps absorb moisture and contributes to the tender texture. Do not substitute granulated sugar here. The cookies would be denser and the crumb would be less delicate.
The choice of peppermint extract is worth attention. Some brands are stronger than others. If your extract is particularly potent, reduce the amount slightly to avoid an overpowering medicinal taste. You can also add the full amount and trust that the white chocolate will mellow it.
White chocolate bark is preferred over chips because it contains more cocoa butter and fewer emulsifiers. It melts into a smooth liquid that coats the cookies evenly. If you only have white chocolate chips, add a teaspoon of coconut oil or vegetable shortening to thin the consistency.
Candy canes should be crushed by hand or with a rolling pin. A food processor can easily turn them into dust, which will not provide the same texture. Aim for pieces about the size of small peas.
How to make Peppermint Snowball Cookies

Step 1 – Combine the Dry Ingredients
In a small bowl, stir together the salt and flour. Set this aside for now. Whisking them together ensures the salt is evenly distributed. If you skip this step, you may end up with pockets of salt in some cookies.
Step 2 – Cream the Butter and Sugar
In a large mixing bowl, beat the softened butter and powdered sugar until the mixture is creamy and smooth. This takes about two minutes with a hand mixer or stand mixer. Scrape down the sides once during mixing to ensure everything incorporates.
The mixture should look light and slightly fluffy. Proper creaming aerates the butter, which contributes to a tender texture. Do not rush this step.
Step 3 – Add the Egg and Extracts
Add the egg, peppermint extract, and vanilla extract to the butter mixture. Beat until combined. The batter may look slightly curdled at this point, which is normal. The flour will bring it back together.
Make sure the egg is at room temperature so it emulsifies properly with the butter. A cold egg can cause the mixture to separate.
Step 4 – Incorporate the Flour
With the mixer on low speed, gradually add the flour mixture. Mix just until no streaks of flour remain. Overmixing at this stage develops gluten, which can make the cookies tough instead of tender.
The dough will be soft but not sticky. It should hold together when pressed.
Step 5 – Chill the Dough
Wrap the dough in plastic wrap and flatten it into a disk. Refrigerate for at least one hour. Chilling firms the butter, which prevents the cookies from spreading too much during baking.
If you skip this step, the dough will be too soft to roll into neat balls, and the cookies will lose their shape in the oven.
Step 6 – Shape and Bake
Preheat the oven to 350°F. Line baking sheets with parchment paper or lightly grease them. Roll the dough into one-inch balls and place them about two inches apart on the prepared sheets.
Bake for 10 to 12 minutes. The cookies should look set on the edges but not browned. They will be pale, which is correct. Overbaking dries them out.
Let the cookies cool on the baking sheet for five minutes, then transfer them to a wire rack to cool completely. Do not attempt to dip them in chocolate while they are still warm, or the coating will slide off.
Step 7 – Dip and Decorate
Melt the white chocolate bark according to package directions. Stir until smooth. Hold each cookie by the base and dip the top into the melted chocolate. Let the excess drip off for a moment, then gently press the dipped portion into the crushed candy canes.
Place the cookies on waxed paper to set. The chocolate will harden at room temperature within 30 to 60 minutes. Do not refrigerate to speed this up, or condensation may form on the surface.
How I Tested and Refined This Recipe
The first time I made these, I used the standard snowball method of rolling warm cookies in powdered sugar. The flavor was fine, but the cookies looked plain and the mint got lost. I wanted something more festive.
In the second round, I added crushed candy canes directly into the dough. The texture suffered. The candy pieces melted into the dough and left small voids, and the mint flavor was uneven. Some bites were intensely minty, while others had none at all.
That is when I moved the candy to the outside. Dipping the cookies in white chocolate created a clean canvas for the candy to stick to. It also added visual contrast and made the cookies look intentional rather than haphazard.
The butter quantity also required adjustment. The first draft used a full cup of butter, which made the dough too soft to hold its shape after baking. The cookies spread and lost their round form. Reducing the butter to half a cup solved the problem without sacrificing tenderness.
The chill time was another variable. Thirty minutes was not enough. The dough was still soft, and the cookies spread. One hour proved to be the minimum for easy handling and clean baking. Longer is fine, but not shorter.
Common Mistakes and How to Avoid Them
- Cookies spread too much: The dough was not chilled long enough, or the butter was too soft. Chill for a full hour and use butter that is just softened, not warm.
- White chocolate seizes or stays soft: Water or steam came into contact with the melting chocolate. Use a completely dry bowl and avoid covering the melting pot.
- Candy canes slide off: The chocolate was too thick or had begun to set before dipping. Work quickly and press the candy in gently while the chocolate is still wet.
- Cookies taste flat or overly sweet: The salt was omitted or the peppermint extract was weak. Salt balances sweetness, and fresh extract makes a difference.
- Dough is too crumbly to roll: The flour was overmeasured or the egg was too small. Spoon flour into the cup and level it off. Use a large egg.
- Cookies brown on the edges: The oven temperature is too high or the baking sheet is dark. Use a light-colored pan and check your oven with a thermometer.
Make-Ahead, Storage, and Freezing Guidance
The dough can be made up to three days in advance and kept in the refrigerator. Let it sit at room temperature for about ten minutes before rolling if it feels too firm.
Baked cookies without the chocolate coating can be frozen for up to three months. Thaw them at room temperature, then dip and decorate as directed. Do not freeze them after dipping, as the white chocolate may discolor or develop condensation.
Once assembled, the cookies keep well in an airtight container at room temperature for up to one week. The candy canes may soften slightly over time, but the texture will still be pleasant. If you live in a humid environment, store them with a silica gel packet or in a cooler part of the kitchen.
Do not stack the cookies directly on top of each other without a layer of waxed paper in between. The chocolate can stick and the candy canes may scrape off.
Tips
- Crush candy canes inside a sealed plastic bag to contain the mess.
- Use a cookie scoop to keep the dough balls uniform in size for even baking.
- Dip only the tops of the cookies to keep the bottoms clean and stable for storage.
- If the white chocolate thickens while dipping, reheat it gently in short bursts.
- Let the dipped cookies set on a cooling rack placed over waxed paper for easier cleanup.
- Double the recipe if baking for a crowd. These disappear quickly.
- Test one cookie after baking to check the mint level before dipping the rest.

Peppermint Snowball Cookies Recipe
Description
Fluffy, melt-in-your-mouth snowball cookies infused with peppermint extract, dipped in white chocolate, and finished with crushed candy canes. These festive treats are perfect for holiday cookie trays and make a delightful addition to any Christmas celebration. The buttery shortbread base pairs beautifully with the cool mint flavor and sweet white chocolate coating.
Ingredients
Instructions
- Stir together salt and flour in a small bowl. In a large bowl, beat butter and powdered sugar until creamy and well combined.
- Beat in egg, peppermint extract, and vanilla extract until fully incorporated.
- On low speed, gradually beat in the flour mixture until a soft dough forms.
- Wrap the dough tightly in plastic wrap and refrigerate for at least 1 hour to firm up.
- Preheat oven to 350°F (175°C). Line baking sheets with parchment paper or lightly grease.
- Shape chilled dough into 1-inch balls and place on prepared baking sheets, spacing about 2 inches apart.
- Bake for 10-12 minutes, or until bottoms are lightly golden. Do not overbake. Transfer cookies to a wire rack to cool completely.
- Melt white chocolate bark according to package directions. Dip the tops of cooled cookies into the melted chocolate, then immediately roll in crushed candy canes.
- Place decorated cookies on waxed paper to allow chocolate to harden completely before storing.
Nutrition Facts
Servings 36
Serving Size 1 cookie
- Amount Per Serving
- Calories 90kcal
- % Daily Value *
- Total Fat 4.5gg7%
- Saturated Fat 2.8gg14%
- Trans Fat 0gg
- Cholesterol 12mgmg4%
- Sodium 20mgmg1%
- Potassium 25mgmg1%
- Total Carbohydrate 12gg4%
- Dietary Fiber 0.3gg2%
- Sugars 9gg
- Protein 1.5gg3%
- Calcium 1% mg
- Iron 2% mg
* Percent Daily Values are based on a 2,000 calorie diet. Your daily value may be higher or lower depending on your calorie needs.
Note
- Make ahead: Dough can be prepared up to 3 days in advance and stored in the refrigerator, or frozen for up to 1 month.
- Storage: Store finished cookies in an airtight container at room temperature for up to 5 days, or freeze for up to 1 month.
- Variation: For a non-holiday version, substitute vanilla extract for peppermint and use colorful sprinkles instead of candy canes.
- Gluten-free option: Substitute a 1:1 gluten-free flour blend for all-purpose flour.