I approach even the simplest treats with the same mindset I use in baking from scratch. These Leprechaun Green Mint Crunch Cookies are intentionally designed to be easy, but still precise, repeatable, and dependable every time.
This is a no-bake recipe that leans on smart assembly rather than technique. The goal is a crisp cookie base, a smooth white chocolate coating, and a controlled mint crunch that does not overwhelm.
They are festive, yes, but more importantly they are structured to hold up at room temperature, travel well, and stay appealing long after they are made.
Who This Recipe Is For
This recipe is for home bakers who want something fun without sacrificing reliability. If you like clear steps and predictable results, this will feel comfortable.
It is also ideal for baking with children because the process is simple and visual. There is no oven management, no dough chilling, and very little that can go wrong if you follow the sequence.
If you occasionally need quick treats for school events, gatherings, or small celebrations, this is a practical addition to your rotation.
Why This Recipe Works
The structure relies on contrast. A firm chocolate sandwich cookie provides stability, while the melted white chocolate forms a smooth shell that sets into a protective layer.
Adding just a few drops of green food coloring keeps the coating fluid. Too much liquid would cause the chocolate to seize, so restraint is essential.
The crushed spearmint candies are applied while the coating is still tacky, allowing them to adhere without dissolving. This creates texture without introducing moisture that could soften the cookie.
The setting period is short because we are working with a thin coating rather than a heavy dip. That balance keeps the cookies crisp instead of dense.
Ingredients Needed for the Recipe
- White chocolate chips – These create the outer shell and act as both flavor and structure once set.
- Chocolate sandwich cookies – The base layer that provides crunch and prevents the dessert from feeling overly sweet.
- Green food coloring – Used sparingly to tint the coating without thinning or destabilizing the melted chocolate.
- Crushed spearmint candies – Adds texture and a controlled mint flavor that contrasts with the sweetness.
Ingredient Insights and Function
White chocolate behaves differently from dark or milk chocolate because it contains more sugar and milk solids. It melts quickly but can scorch just as quickly, so gentle heating is critical.
Chocolate sandwich cookies are ideal because they remain crisp even after coating. Softer cookies would absorb moisture and lose their snap within hours.
Gel food coloring works best because it adds color without adding extra liquid. Liquid coloring can cause the chocolate to thicken unpredictably.
Spearmint candies provide a cleaner flavor than peppermint. Peppermint can taste sharp and medicinal when paired with white chocolate, while spearmint stays balanced.
If you prefer to skip mint entirely, sprinkles or finely chopped candies can replace it. Just avoid anything sticky, as that can pull moisture into the coating.
How to make Leprechaun Green Mint Crunch Cookies?

Step 1 – Prepare the Work Surface
Line a baking sheet with waxed paper before you begin melting the chocolate. Once dipping starts, you need a place to set cookies immediately.
Have the crushed candies ready in a shallow bowl so you can coat the cookies while the chocolate is still soft.
Step 2 – Melt the White Chocolate
Melt the white chocolate slowly using short intervals of heat, stirring frequently. The texture should be smooth and fluid, never stiff or grainy.
If the chocolate overheats, it will thicken and become difficult to work with, so patience here prevents problems later.
Step 3 – Add the Color
Stir in three drops of green food coloring and mix thoroughly. The color should be even, with no streaks remaining.
Stop at a soft green tone. Adding more coloring risks changing the texture of the coating.
Step 4 – Dip the Cookies
Lower each cookie into the melted chocolate and turn it to coat evenly. Use a fork to lift it out, allowing excess chocolate to drip off.
A thin coating sets better and keeps the cookie from becoming too sweet or heavy.
Step 5 – Add the Mint Crunch
Immediately sprinkle or press crushed spearmint candies onto the surface. The warmth of the chocolate helps them adhere without sliding off.
Work quickly so the coating does not begin to set before the topping is applied.
Step 6 – Let the Cookies Set
Place the coated cookies on waxed paper and allow them to rest for about 20 minutes. During this time, the chocolate firms into a clean shell.
Avoid refrigeration unless your kitchen is very warm, as rapid chilling can cause condensation.
How I Tested and Refined This Recipe
I tested several melting methods before settling on gradual heating. Fast melting caused separation and a dull finish, which affected both texture and appearance.
I also experimented with different candy sizes. Finely crushed pieces adhered best, while large chunks fell off once the chocolate set.
One early version used more food coloring for a brighter shade, but it thickened the coating too much. Reducing the amount restored a smooth, even dip.
I tried double dipping for a thicker shell, but that overwhelmed the cookie and made it difficult to bite cleanly. A single, controlled coat proved ideal.
These adjustments resulted in cookies that stay crisp, look polished, and can be made consistently without guesswork.
Common Mistakes and How to Avoid Them
- Overheating the white chocolate, which causes it to seize and lose its smooth texture.
- Adding too much food coloring, leading to thick, unworkable coating.
- Dipping cookies too slowly, allowing the chocolate to begin setting before toppings are added.
- Using large candy pieces that fail to stick and fall off once hardened.
- Applying too thick a coating, which makes the cookie heavy and overly sweet.
- Refrigerating immediately, causing condensation that softens the cookie surface.
Make-Ahead, Storage, and Freezing Guidance
These cookies can be made a full day ahead without any loss of texture. Store them in a single layer or separated by parchment in an airtight container.
At room temperature they remain crisp for up to three days, provided they are kept in a cool, dry space away from humidity.
Freezing is possible, though not necessary. If frozen, allow them to thaw uncovered so condensation does not form on the coating.
There is no reheating required. These are designed to be served exactly as they are once set.
Tips
- Work in small batches so the chocolate stays fluid.
- Use a fork for dipping to achieve an even, thin coating.
- Crush candies finely for better adhesion and balanced texture.
- Keep moisture away from melted chocolate at all times.
- Let cookies set naturally for the cleanest finish.
- Prepare all components before melting to keep the process smooth.
Leprechaun Green Mint Crunch Cookies Recipe
Description
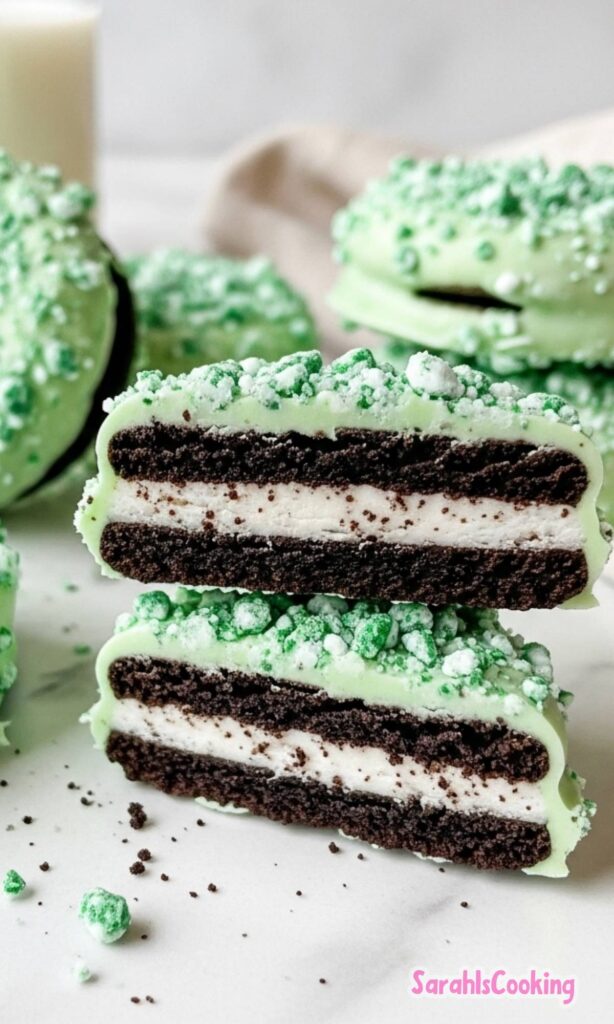
These semi-homemade no-bake cookies are the perfect little treat for your St. Patrick's Day party or event. Fun to make with kids, these minty green cookies feature Oreos dipped in white chocolate with a festive crunch. No baking required—just melt, dip, and enjoy!
ingredients
Instructions
- Melt white chocolate chips according to package directions (microwave in 30-second intervals or use a double boiler), stirring until smooth.
- Stir in green food coloring until desired shade is reached.
- Dip each Oreo cookie into the green chocolate, coating completely, then immediately roll or sprinkle with crushed spearmint candies.
- Place coated cookies on waxed paper and let set at room temperature for 20 minutes until chocolate is firm.
Nutrition Facts
Servings 12
Serving Size 1 cookie
- Amount Per Serving
- Calories 114kcal
- % Daily Value *
- Total Fat 5.5gg9%
- Saturated Fat 3gg15%
- Trans Fat 0gg
- Cholesterol 0mgmg0%
- Sodium 75mgmg4%
- Potassium 45mgmg2%
- Total Carbohydrate 16gg6%
- Dietary Fiber 0.5gg2%
- Sugars 14gg
- Protein 1gg2%
- Calcium 2% mg
- Iron 4% mg
* Percent Daily Values are based on a 2,000 calorie diet. Your daily value may be higher or lower depending on your calorie needs.
Note
- No mint? Swap spearmint candies for colorful sprinkles, gold dust, or shamrock decorations for a different twist.
- Make it dairy-free: Use dairy-free white chocolate chips to accommodate dietary needs.
- Storage tip: Keep cookies in an airtight container at room temperature for up to 3 days, or refrigerate for longer freshness.
- Kid-friendly: Let kids help with dipping and sprinkling for a fun St. Patrick's Day activity!