Introduction
This hummus is built for balance and texture. It is smooth without being loose, bright without sharpness, and rich without heaviness. Every ingredient has a defined role, and the blending method is intentional. The result is a hummus that holds a soft swirl in the bowl and tastes vibrant on its own, without relying on heavy toppings.
After repeated testing, I found that small adjustments in liquid ratio and blending time make the difference between a grainy spread and a silky one. This version is structured for consistency. It works whether you are serving it for guests or keeping a container in the refrigerator for weekday meals.
Who This Recipe Is For
This recipe is for the home cook who wants dependable results and understands that technique matters. If you have ever made hummus that tasted flat or felt slightly gritty, this method addresses those issues directly.
It is beginner friendly, but it does assume you will pay attention to visual and texture cues. A standard food processor is the best tool here. A high speed blender can work, though you may need to stop and scrape more frequently.
This hummus fits easily into weekly meal prep. It also works well for entertaining, where texture and seasoning need to hold up on a serving table for a few hours. The structure is stable enough to spread on sandwiches, spoon into bowls, or serve with vegetables without turning thin.
Why This Recipe Works
The Balance of Fat, Acid, and Starch
Hummus depends on controlled emulsification. Chickpeas provide starch and body. Tahini contributes fat and sesame depth. Olive oil rounds out the texture and softens the edges of the garlic. Lemon juice adds acidity that lifts the richness.
If the acid is too low, the hummus tastes heavy. If it is too high, the finish becomes sharp and distracting. In testing, I found that increasing lemon juice beyond a certain point made the hummus taste bright at first bite but slightly sour after resting. The final ratio keeps the flavor clean even after refrigeration.
Aquafaba, the liquid from the canned chickpeas, is not just a thinning agent. It contains starch and soluble proteins that help stabilize the mixture. Water will loosen hummus, but it does not create the same cohesive texture. The starch in aquafaba allows the tahini and oil to integrate smoothly without separating.
Blending Time as a Structural Tool
Most grainy hummus is under blended. Chickpeas have skins and fibrous structure that require more than a quick pulse. A full minute of continuous blending at the start breaks down the solids. Additional blending after adjusting the liquid refines the texture.
You can hear the difference. The processor shifts from a coarse grinding sound to a smoother hum as the mixture becomes creamy. Visually, the hummus transitions from dull and slightly lumpy to glossy with defined ridges that slowly relax back into the bowl.
I tested short blends of forty five seconds against longer blends of two to four minutes. The longer blends consistently produced a smoother mouthfeel, even when the ingredient ratios were identical.
Flavor Layering Without Overpowering
Garlic can easily dominate hummus. One clove produced a mild flavor that faded after chilling. Three cloves created a harsh edge that intensified over time. Two cloves struck the right balance once the hummus rested for thirty minutes.
Cumin adds warmth and depth without drawing attention to itself. Cayenne is used sparingly. It should not read as spicy. Instead, it provides subtle background warmth that prevents the hummus from tasting flat.
This layered approach to seasoning is similar to what I aim for in my The Best Guacamole Recipe, where fat and acid must be balanced carefully to avoid dullness or sharpness. In both cases, restraint creates clarity.
Ingredient Insights and Function
Chickpeas
Canned chickpeas are reliable and consistent. They are cooked to a uniform tenderness and provide predictable results. Drain them, but reserve the liquid.
For an even smoother texture, you can simmer the drained chickpeas with a pinch of baking soda for ten minutes, then rinse and cool before blending. The baking soda helps soften the skins. I tested this side by side with standard canned chickpeas. The difference is noticeable but not essential if you blend thoroughly.
If you cook chickpeas from dried, ensure they are fully tender. Undercooked beans will never blend completely smooth.
Tahini
Tahini quality matters more than most people realize. It should be pourable and well stirred, not dry and compacted at the bottom of the jar. A thick, separated tahini often tastes bitter and blends poorly.
During testing, I compared a smooth, runny tahini to a thicker brand that required aggressive stirring. The smoother tahini produced a creamier result with less bitterness. If your tahini tastes sharp on its own, the hummus will carry that note.
Lemon Juice
Fresh lemon juice is essential. Bottled juice tends to taste flat and slightly metallic. The acidity in fresh juice is brighter and integrates more cleanly with the tahini.
Add lemon gradually and taste. Acidity should lift the flavor, not dominate it. Remember that flavors sharpen slightly after chilling.
Aquafaba Versus Water
Aquafaba improves both texture and flavor. It maintains the chickpea profile while loosening the mixture. Water will dilute flavor and can make the hummus taste thin if too much is added.
In controlled testing, equal amounts of water and aquafaba produced noticeably different results. The aquafaba batch held soft peaks and had a creamier mouthfeel. The water batch was acceptable but less cohesive.
Olive Oil
Blending olive oil into the hummus creates a more integrated richness. Reserving a small drizzle for the top enhances aroma and presentation. When I blended all the oil in without topping, the flavor was round but visually flat. A light drizzle before serving adds contrast and a subtle peppery finish.
Step by Step Success Guidance
Draining and Reserving Liquid Strategically
Drain the chickpeas into a colander set over a bowl. Measure the aquafaba so you can control how much you add. This prevents accidental thinning.
Reserve a tablespoon of whole chickpeas for garnish. This small detail signals intention when serving and adds texture contrast.
Initial Blend
Add the chickpeas, tahini, lemon juice, olive oil, garlic, cumin, cayenne, and a portion of the aquafaba to the food processor. Blend continuously for at least one full minute.
At this stage, the mixture will likely look thick and slightly rough. That is expected. Scrape down the sides and bottom thoroughly. Chickpea fragments often cling to the bowl and can create hidden graininess.
Scrape, Assess, Adjust
After scraping, evaluate the texture. It should be cohesive but dense. If it appears dry or crumbly, add aquafaba one tablespoon at a time. Blend fully between additions.
Avoid adding too much liquid at once. Excess liquid cannot be easily corrected and can lead to a loose, spoonable dip rather than a structured spread.
Final Emulsification
Continue blending until the hummus looks glossy and smooth. The surface should form soft ridges that slowly settle. If it appears matte or stiff, it likely needs more blending time or a small addition of liquid.
Taste and adjust seasoning in a specific order:
- Salt for overall balance
- Lemon for brightness
- Cumin or cayenne for warmth
Let the hummus rest for at least thirty minutes before serving. Garlic mellows and flavors integrate during this time.
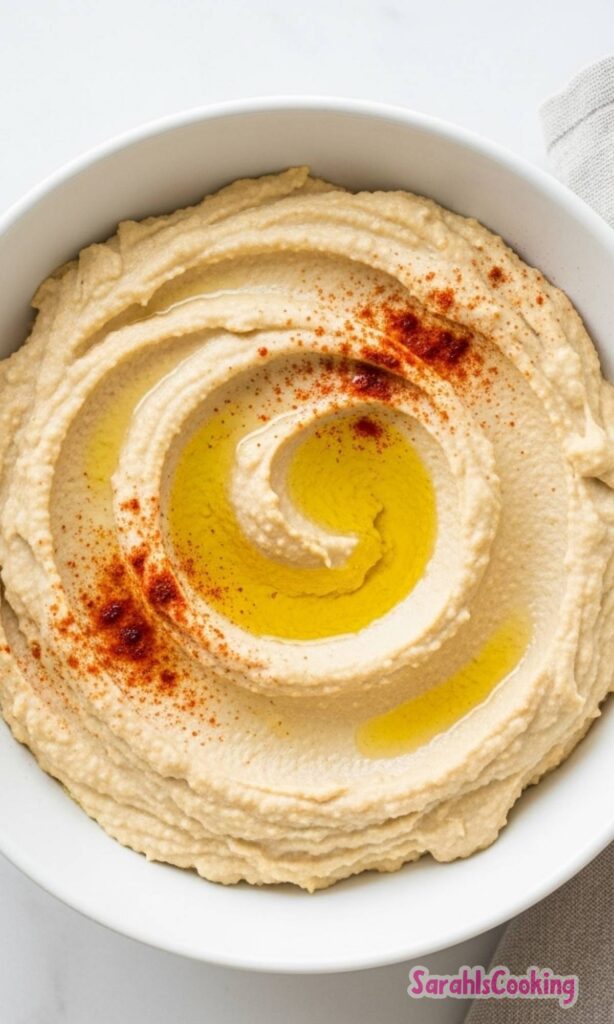
For serving, spoon the hummus into a shallow bowl and create a gentle swirl. A drizzle of olive oil and a sprinkle of paprika enhance both aroma and presentation.
It pairs naturally with a vegetable platter similar to my Veggie Tray Recipe, where fresh produce highlights creamy dips without overwhelming them.
How I Tested and Refined This Recipe
This version developed through structured testing rather than casual adjustment.
First, I tested liquid ratios. A quarter cup of aquafaba produced a thick paste that felt slightly dense after chilling. A half cup created a loose texture that spread too easily and thinned further on the counter. One third cup, with minor tablespoon adjustments, maintained structure even after twenty four hours in the refrigerator.
Next, I compared blending times. A forty five second blend left subtle graininess. Two minutes improved the texture significantly. Four minutes created the smoothest result without overheating the mixture. The final method reflects that longer blending time.
Garlic quantity required careful calibration. After chilling overnight, batches with three cloves developed a sharper finish. Two cloves maintained warmth without harshness.
I also tested blending all olive oil into the mixture versus reserving some for topping. Incorporating most of the oil improved internal texture. Saving a small amount for finishing enhanced aroma and visual appeal.
Each adjustment aimed to improve consistency across multiple batches. The final ratios are not arbitrary. They reflect how the hummus behaves immediately after blending and after refrigeration.
Common Mistakes and How to Avoid Them
Grainy Texture
Cause: Insufficient blending or undercooked chickpeas.
Correction: Blend longer before adding extra liquid. If needed, add aquafaba one tablespoon at a time and continue processing until smooth.
Bitter Flavor
Cause: Low quality tahini or excessive garlic.
Correction: Add a small squeeze of lemon and a pinch of salt. If bitterness persists, the tahini may be the issue. Start with a better brand next time.
Too Thick After Refrigeration
Chickpea starch tightens when cold. This is normal.
Correction: Stir in a teaspoon or two of water or lemon juice and mix thoroughly. Allow the hummus to sit at room temperature for fifteen minutes before serving.
Dull or Flat Taste
Cause: Under seasoning. Salt levels in canned chickpeas vary.
Correction: Add salt gradually and taste again. Brightness often improves with a small additional squeeze of lemon.
If serving as part of a larger spread with items like Easy Bruschetta Recipe, remember that hummus should be assertively seasoned so it holds its own among other flavors.
Make Ahead, Storage, and Freezing Guidance
Store hummus in an airtight container in the refrigerator for up to five days. Press a piece of parchment or plastic wrap directly against the surface to minimize air exposure. A thin layer of olive oil on top also helps prevent drying.
Flavor deepens slightly after the first day as garlic and cumin settle into the base. Texture firms as the starch cools. Stir before serving and adjust with a small splash of liquid if needed.
For freezing, portion the hummus into airtight containers, leaving a bit of headspace. Freeze for up to two months. Thaw overnight in the refrigerator. After thawing, stir thoroughly. If the texture seems slightly separated, a brief blend restores smoothness.
Always use clean utensils when scooping from the container. This extends shelf life and maintains food safety.
Final Reinforcement
A dependable hummus recipe is built on proportion, blending time, and thoughtful seasoning. When those elements are controlled, the result is consistent across batches.
This version reflects careful adjustment and repeated preparation. It is structured to work in a home kitchen without unnecessary steps, and it rewards attention to detail with a smooth, balanced finish every time.
Hummus Recipe
Description
Say goodbye to mediocre store-bought hummus—this authentic recipe delivers a creamy, flavor-packed dip, perfect for pita or as a standout on any Middle Eastern table. Made with simple, wholesome ingredients like chickpeas, tahini, lemon juice, and olive oil, it’s not only delicious but also healthier than most commercial versions.
ingredients
Instructions
- Drain the chickpeas in a colander, reserving the liquid (aquafaba). Do not rinse the chickpeas. Set aside a few whole chickpeas for garnish.
- In the bowl of a food processor fitted with a metal blade, combine the drained chickpeas, lemon juice, tahini, garlic, cumin, cayenne pepper, salt, olive oil, and ⅓ cup of the reserved chickpea liquid.
- Process for several minutes until smooth and creamy. The hummus should hold its shape when you drag a spoon through it. If too thick, add more reserved liquid, 1 tablespoon at a time, and blend again.
- Taste and adjust seasoning if needed—more salt, lemon, or spices as desired.
- Transfer the hummus to a serving bowl. Use the back of a spoon to create a shallow well in the center.
- Drizzle with olive oil, then sprinkle with paprika and chopped parsley. Top with the reserved whole chickpeas.
- Serve at room temperature with pita bread, pita chips, or fresh vegetables.
- Make-ahead: Store in an airtight container in the refrigerator for up to 2 days. Bring to room temperature before serving.
Nutrition Facts
Servings 12
Serving Size 1/4 cup
- Amount Per Serving
- Calories 98kcal
- % Daily Value *
- Total Fat 4g7%
- Saturated Fat 1g5%
- Sodium 225mg10%
- Potassium 135mg4%
- Total Carbohydrate 12g4%
- Dietary Fiber 4g16%
- Protein 5g10%
- Calcium 20 mg
- Iron 1 mg
* Percent Daily Values are based on a 2,000 calorie diet. Your daily value may be higher or lower depending on your calorie needs.
Note
- No need to peel chickpeas: While some recipes recommend peeling for extra creaminess, it’s unnecessary—blending time and reserved liquid achieve the same result.
- Tahini tip: Stir thoroughly before measuring—it separates in the jar. A hand mixer or whisk in a bowl works better than trying to stir in the can.
- Flavor boosters: Try topping with za’atar, sumac, toasted pine nuts, or a swirl of harissa for variety.
- Gluten-free & vegan: Naturally compliant—just verify all ingredient labels if allergies are a concern.