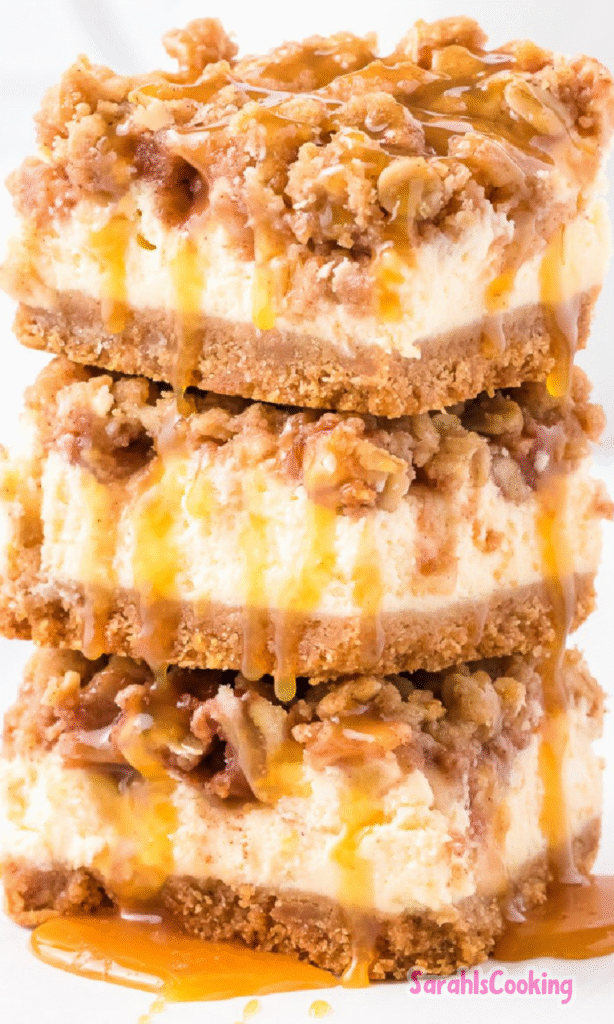
Apple Caramel Cheesecake Bars are designed to deliver everything people love about a layered fall dessert without the fragility of a full cheesecake. You get a firm, buttery base, a properly set cream cheese layer, tender spiced apples, a structured streusel topping, and a caramel finish that settles into the surface rather than sliding off.
This version is built for clean slices and consistent texture. The method is deliberate. The ratios are tested. If you follow the temperature and timing cues, you will get bars that hold their shape, chill beautifully, and taste balanced rather than overly sweet.
Who This Recipe Is For
These bars are for bakers who want structure and predictability. If you are comfortable using a mixer, pre-baking a crust, and layering components in one pan, this recipe will feel straightforward.
It is especially well suited for:
- Holiday dessert tables where clean slices matter
- Bake sales or gifting where portability is important
- Home bakers who prefer bar desserts over water-bath cheesecakes
If you have never made a cheesecake-style filling before, this is a good place to start. The apple and streusel topping naturally conceal surface imperfections. You still need to pay attention to mixing and bake cues, but you are not chasing a flawless top.
If you enjoy structured bar desserts, the technique here builds on the same crust discipline used in Cinnamon Sugar Blondies Recipe, where butter temperature and proper pressing determine final texture.
Why This Recipe Works
Every layer in this pan has a specific job.
The crust provides structure and fat balance. It is partially baked before the filling goes on. That pre-bake sets the flour and melts the butter just enough to prevent sogginess once the cream cheese layer is added. Skipping that step leads to a damp base.
The cheesecake layer is formulated to set firmly without becoming dense. The ratio of cream cheese to eggs is controlled so the filling bakes into a custard that slices cleanly but still feels creamy. Too many eggs would create a firmer, almost rubbery texture. Too few would leave the center loose even after chilling.
Sugar level matters here. The filling is moderately sweet, not aggressively so. That leaves room for the caramel drizzle and spiced apples without pushing the dessert into cloying territory.
The apple layer introduces acidity and moisture. Tart apples balance the fat in the cream cheese. Cutting them small ensures they soften in the oven without releasing excessive liquid. Large chunks hold too much water and can cause separation between layers.
The streusel topping acts as both texture and insulation. The oat and flour mixture absorbs some of the apple juices during baking. That protects the cheesecake layer underneath. Cold butter in the streusel creates defined crumbs. If the butter is soft, the topping melts into a flat sugary sheet.
Finally, caramel is applied while the bars are still warm. At that temperature, it seeps slightly into the streusel instead of pooling on top. That integration is what makes the finish feel cohesive rather than decorative.
Ingredient Insights and Function
Cream cheese is the structural backbone. Use full-fat block cream cheese, not whipped or spreadable varieties. Spreadable cream cheese contains stabilizers and extra moisture, which weaken the set. Full-fat dairy also contributes to the smooth mouthfeel that defines a proper cheesecake layer.
Room temperature matters. Cold cream cheese resists smoothing and encourages over-mixing. When you beat cold cream cheese aggressively to remove lumps, you incorporate air. Air expands in the oven and contracts as it cools, which can create cracks or a sunken center.
Eggs bind and stabilize. Lightly beating them before adding prevents streaking. Once incorporated, mix only until combined. Over-mixing introduces air and affects texture.
Granulated sugar sweetens and tenderizes. Brown sugar in the crust and streusel adds moisture and a slight molasses depth. That molasses note complements the apples and caramel without overwhelming them.
Butter must be cold for both crust and streusel. Cold butter creates distinct crumbs. When baked, those crumbs form a tender but structured layer. Warm butter blends fully into the flour and produces a dense, compact base.
Apples should be firm and slightly tart. Granny Smith is reliable because it holds shape and provides acidity. Honeycrisp works if you prefer less tartness, but it is juicier. When testing with sweeter varieties, I reduced the sugar tossed with the apples to prevent excess syrup from forming.
Quick oats in the streusel contribute texture and absorb moisture. Old-fashioned oats are thicker and do not soften as evenly in the bake time. Quick oats integrate more consistently and maintain crumb definition.
Caramel sauce should be thick, not runny. A thin sauce will slide and collect at the edges. If your caramel is very thick, warming it slightly improves distribution without thinning it excessively.
If you enjoy seasonal cheesecake variations, the stabilization principles here are similar to those used in Eggnog Cheesecake Recipe, where controlled egg ratio and careful mixing prevent overbaking.
Step-by-Step Success Guidance
Prep and Pan Setup
Preheat the oven fully before you begin assembling layers. Temperature consistency is important for even baking. Use a 13 by 9 inch metal baking pan for best heat conduction. Glass pans bake more slowly and may require slight time adjustments.
Line the pan with parchment, leaving overhang on two sides. This makes removal and slicing significantly easier once chilled.
Soften the cream cheese on the counter for about one hour. It should give easily when pressed but not feel oily.
Building the Crust
Combine flour and brown sugar, then cut in cold butter until the mixture resembles coarse crumbs. You should see small, pea-sized pieces of butter. If the mixture starts to clump, the butter is warming. Refrigerate briefly before pressing.
Press the crust firmly and evenly into the pan. Use the bottom of a measuring cup for a flat surface. Uneven thickness leads to uneven browning.
Bake until the edges are lightly golden and the center looks dry rather than shiny. This usually takes 15 to 18 minutes. The crust should smell toasted but not browned deeply.
Mixing the Cheesecake Layer
Beat softened cream cheese with sugar and vanilla until smooth. Scrape the bowl at least once. Lumps usually hide along the bottom.
Add lightly beaten eggs and mix on low speed just until incorporated. Stop when no yellow streaks remain. The batter should look smooth and slightly thick but not airy.
Pour the filling over the warm crust. It is fine if the crust is still warm. In fact, that helps the layers bond.
Preparing the Apple Layer
Dice apples into small, uniform pieces. Roughly half-inch cubes work well. Toss with sugar, cinnamon, and nutmeg until evenly coated. Let them sit for a few minutes. If you see excessive liquid pooling, drain lightly before adding to the pan.
Distribute apples evenly over the cheesecake layer. Do not press them down. Pressing can cause them to sink too deeply.
Streusel and Final Bake
Cut cold butter into the streusel mixture until crumbly. Sprinkle evenly over the apples, covering most of the surface without packing it down.
Bake until the edges of the cheesecake layer look set and the center jiggles slightly when the pan is gently shaken. The jiggle should be subtle, not liquid.
This stage typically takes 25 to 30 minutes. Overbaking causes dryness and potential cracking. Underbaking results in a loose center that does not fully set even after chilling.
Immediately drizzle caramel over the warm streusel. The warmth helps it settle into the crumb surface.
Cool at room temperature for one hour, then refrigerate for at least two hours before slicing. Chilling is not optional. It completes the set.
For clean cuts, run a sharp knife under hot water, wipe dry, and slice. Clean the blade between cuts.
How I Tested and Refined This Recipe
The first version I tested skipped the crust pre-bake. The result was predictable. The bottom layer absorbed moisture from the filling and became soft. Pre-baking solved that immediately.
In early trials, I used three eggs for extra firmness. The texture was too tight and slightly eggy. Reducing to two eggs created a creamier interior that still sliced cleanly after chilling.
I also tested using melted butter in the streusel for convenience. The topping baked into a flat, sugary layer rather than defined crumbs. Returning to cold butter restored texture.
Apple size mattered more than expected. Large chunks released moisture late in the bake and created pockets under the streusel. Smaller, uniform pieces cooked evenly and integrated better with the filling.
I evaluated bake times in both metal and glass pans. Metal produced a more consistent set at 30 minutes. Glass required several extra minutes and slightly darkened the edges. For reliability, metal is preferable.
Repeated testing confirmed that caramel applied after full cooling sat on top rather than integrating. Applying it while warm gave the best result in both flavor and texture cohesion.
These adjustments were not cosmetic. Each addressed a structural issue that affected slicing, texture, or moisture balance.
Common Mistakes and How to Avoid Them
Runny center after chilling usually means underbaking. The cheesecake layer must show set edges and a controlled jiggle before removal from the oven. If it appears wet across the surface, it needs more time.
Cracks or sunken center often result from over-mixing. Excess air expands and collapses. Mix on low and stop once combined.
Soggy crust is almost always caused by skipping the pre-bake or underbaking it. The crust should look dry and lightly golden before adding filling.
Watery apple layer can occur with overly juicy apples or large chunks. Dice small and avoid overly sweet, soft varieties.
Streusel that melts flat indicates warm butter. Keep butter cold and work quickly.
Caramel pooling at edges suggests it was too thin or applied after cooling. Warm slightly and drizzle while bars are hot from the oven.
If you are familiar with layered bar desserts like Easy Churro Cheesecake Bars, you know that layer discipline determines final texture. The same principle applies here.
Make-Ahead, Storage, and Freezing Guidance
These bars store well in the refrigerator for up to five days. Keep them covered to prevent drying. The crust remains firm, though the streusel softens slightly over time due to moisture absorption.
For best texture, slice after full chilling and store in a single layer or with parchment between layers.
Freezing is possible. Wrap individual bars tightly in plastic wrap, then place in an airtight container. Freeze for up to two months. Thaw overnight in the refrigerator.
The cheesecake layer freezes well. The streusel softens slightly upon thawing but retains flavor. Caramel may become firmer when cold. A brief 10 to 15 second warm-up in the microwave restores softness without melting the structure.
Do not leave these bars at room temperature for extended periods. Because they contain dairy and eggs, refrigeration is necessary for food safety.
Final Thoughts
These Apple Caramel Cheesecake Bars are built on tested ratios and practical technique. Each layer supports the next. The crust is firm, the filling sets cleanly, the apples stay tender without flooding the pan, and the caramel integrates rather than sliding away.
When baked with attention to temperature, mixing, and timing, they deliver consistent results. That consistency is what makes a dessert dependable, whether it is served at a holiday table or sliced for a simple weeknight treat.
Apple Caramel Cheesecake Bars Recipe
Description
These apple caramel cheesecake bars are perfect for autumn desserts, although they're delicious at any time of the year. The bars are easy to make ahead of time and the streusel and caramel toppings will have you coming back for more bites.
If summer’s got you down and you just can’t wait for cooler weather, you can at least pretend it’s that golden-brown time of year with these apple caramel cheesecake bars. They’re cool and wonderful to eat in hotter weather but have that apple-cinnamon-caramel taste that evokes falling leaves and cool breezes. These bars come together in layers and are incredibly simple to make. Best of all, the apple and streusel layers, along with the caramel sauce, mean you don’t have to worry about any cracks forming on the top of the cheesecake and affecting the appearance of these bars.
ingredients
Crust
Cheesecake Filling
Apple Layer
Streusel Topping
Caramel Drizzle
Instructions
Make the crust
Preheat oven to 350°F (175°C). In a small bowl, combine 2 cups flour and 1/2 cup brown sugar; cut in 3/4 cup butter until crumbly. Press mixture into a well-greased 13x9-inch baking pan. Bake 15–18 minutes or until lightly browned.Prepare cheesecake filling
In a large bowl, beat cream cheese, 1/2 cup sugar, and vanilla extract until smooth. Add eggs; beat on low speed just until combined. Spread evenly over the baked crust.Add apple layer
In a small bowl, toss chopped apples with cinnamon, nutmeg, and remaining 2 tbsp sugar. Spoon evenly over the cheesecake layer.Make streusel topping
In another bowl, mix 3/4 cup flour, 3/4 cup brown sugar, and quick-cooking oats; cut in 1/3 cup butter until crumbly. Sprinkle evenly over the apple layer.Bake and cool
Bake 25–30 minutes or until the filling is set. Remove from oven and immediately drizzle with caramel topping. Cool in pan on a wire rack for 1 hour, then refrigerate for at least 2 hours before cutting into bars.
Nutrition Facts
Servings 36
Serving Size 1 bar
- Amount Per Serving
- Calories 285kcal
- % Daily Value *
- Total Fat 15g24%
- Saturated Fat 9g45%
- Cholesterol 55mg19%
- Sodium 180mg8%
- Potassium 90mg3%
- Total Carbohydrate 34g12%
- Dietary Fiber 1g4%
- Sugars 22g
- Protein 4g8%
- Calcium 60 mg
- Iron 1 mg
* Percent Daily Values are based on a 2,000 calorie diet. Your daily value may be higher or lower depending on your calorie needs.
Note
- Make-ahead tip: These bars can be made up to 2 days in advance and stored covered in the fridge.
- Freezing: Wrap individual bars tightly and freeze for up to 3 months. Thaw in the fridge before serving.
- Crust variation: Substitute graham cracker or shortbread cookie crumbs for the flour crust.
- Fruit swap: Firm pears like Bosc work well in place of apples.